


Caterpillars seem to be, and may be, the most difficult component of homemade tracked vehicles to manufacture. It doesn't matter what you want to make caterpillars for - a small all-terrain vehicle for hunting, a motorized towing vehicle for fishing, or a crawler-mounted walk-behind tractor for household work. In all cases, you need a lightweight and easy-to-manufacture home-made caterpillar, which would then also serve for a long time and would not require close attention to itself during operation.

Who can afford to buy serial caterpillars in one of the online stores - they do it and do not think. But for most skilled craftsmen, the budget for building appliances for home use does not allow this. They come to the aid of ingenuity or the Internet!
There are several ways to make them, and one of the most common among garage builders is making tracks from truck tires. Using a boot knife, periodically moistening it in ordinary soapy water for easier sliding on the rubber, cut out the tire beads, leaving only the treadmill. It is only here in the article that you can describe this process in one sentence. In fact, this is a very time-consuming and traumatic job that requires patience and care. The result of this painstaking process will be a high-quality and not tattered cut.

For those who want faster results, there is another option - take a jigsaw with a fine file.
Remember! Regardless of the chosen cutting method, the result is always up to you. One can be carried with a knife, injure himself and cut everything crooked, while the other will do everything quickly and accurately with a jigsaw. It all depends on your skills, abilities and experience - choose the method based on them.
 After you have cut the beads from the tire, you need to check the resulting ring for elasticity and, if necessary, remove the excess, inner layers of rubber. Next, you need to figure out if the existing tread pattern will suit you, and if not, then cut a new one, because the tracks, depending on the operating conditions, may require good lugs. Someone may need a regular long drive on the highway and do not need to make changes, but fishermen and hunters driving through swamps and deep off-road would benefit from good grip.

Homemade tracks made of car tires can be used on various equipment, they are quite reliable and inexpensive to manufacture. Of course, they have pros and cons, and indeed, no doubt everyone has something to add to the described manufacturing process.
Video of a small tractor with homemade tire tracks:
You can make amendments to the article or supplement it, as well as express your opinion, in the comments to it without registration.
Each driver personally decides for himself whether to buy tracks or do it himself. We will consider both aspects, but each of them is advisable only if the car drives not only on the highway. Tracks are a great way to improve off-road performance, and tuning is a must for many motorists. Is it worth buying tracks for the Niva if you can make them yourself?
The challenges of transporting incredibly heavy camp gear and being tied to public transport on hunting grounds are a must for every hunter. An off-road vehicle, even such as the Niva, solves these problems only partially, since there remain obstacles in the form of gullies, slopes and off-road terrain, which a car on standard wheels cannot cope with. There is an urgent need to switch your transport to caterpillar tracks. How to make tracks for Niva in three ways, in which cases is it better to buy ready-made ones?
In the production of tracks, special rubber is used with a special substance in the composition, thanks to which even aggressive weather conditions do not reduce their strength and elasticity. The weight of one track can vary between 75 - 110 kg, which is influenced by the design of the product and its type. Despite this weight, the transformation of the "Niva" into an all-terrain vehicle is not difficult, since the caterpillar easily rolls on the ground, there is no need to lift or drag it.
There is also nothing complicated in the design of the tracked propeller - a powerful metal frame in the shape of a triangle, one large roller at the top and five pairs or more of a smaller size at the bottom. The caterpillar is put on them.
The classic wheel hub is installed in the upper roller, then it is put on a rigid hitch, so that when the hub rotates, it transfers the rotational movements of the entire structure. The key advantage is the ability to turn the steering wheel just like with the wheels. If necessary, the tracks for the car are removed and replaced with ordinary tracks.
What are caterpillars for? Pros and cons of the design
The basis of the audience of drivers installing tracks on a car is made up of extreme people, hunters and fishermen, who, in pursuit of pristine beauty and maximum comfort, do not skimp on elements of car modernization. Given the purpose of using your own car and the size of your wallet, you will have to choose between buying tracks and making them yourself. If you rarely go off-road, and most often your Niva sees only the main highway, there is no point in buying.

If you are fond of fishing and hunting, then increasing the cross-country ability of the vehicle due to such a modification is vital in order to master new cordons, as well as safely, quickly and comfortably get to the so-called fishing spots. After installation, you can see the following positive changes:
- The level of comfort when driving off-road is significantly increased, the difference between wheels and caterpillar tracks is immediately felt.
- The speed of the vehicle increases when driving in snowy, swampy or sandy areas. Indicators reach 80 km / h.
- The vehicle cross-country ability also increases and this parameter can be compared with the cross-country ability of the Belarus tractor. The only limitation is the amount of ground clearance, which for the Niva is 30 cm.
The first tracks on cars appeared about 100 years ago, and during this time motorists have fully appreciated their advantages, however disadvantages also exist:
- A set of tracks is expensive, and when making a homemade structure, you cannot do without basic skills and additional equipment.
- Slopes, hills and terrain with sudden elevation changes can be a problem for the suspension system and transmission, as a vehicle of this size requires more track area.
- Moving over a fallen tree trunk or similar obstacle is also not always possible.
Main manufacturers and prices
The first tracked mechanisms were developed in the USA, after which they were distributed throughout the world. Nowadays, several dozen manufacturers are engaged in the production of such structures, including domestic ones. Of the imported brands, Mattracks is considered one of the most popular. Their prices correspond to the big name - one set corresponds to the cost of a Russian car.
Several companies are now engaged in the production of tracks for passenger cars, but such a purchase, again, will not be cheap. Pricing depends on the following factors:
- diameter of bearings and axles;
- metal thickness and quality;
- design features.
When choosing imported caterpillar mechanisms, be guided by the price of 230 - 700 thousand rubles. By deciding to buy domestic tracks for Niva, you can cut costs by half.
Developed by Chelyabinsk engineers
Engineers from Chelyabinsk offer an alternative design, thanks to which the vehicle can conquer not only off-road conditions, but also water. Movement on water is provided by quick-detachable pontoons fixed on the chassis.
They can be stored on a wheeled ski trailer or trunk when not needed. The installation of the tracks in this case is somewhat more laborious when compared with the classic tracked mechanisms, the installation of which does not take more than an hour. You will have to follow the step-by-step instructions:
- At the first stage, the car should be started on the tracked module, get rid of the wheels and lower the suspension onto the safety catches.
- Next, the car is attached to the frame, and the module bridge is connected to the cardan.
- At the final stage, the control unit is installed and the hydraulic system is pumped.
Such an all-terrain mechanism is installed for 2 hours, at least, after which control is available through the steering wheel. After another off-road raid, the car is brought back to the platform, and the tracked modules replace the usual wheels. The issue price is 100 thousand rubles. and higher.
Can I make caterpillars with my own hands?
If the cost of the finished set of tracks discouraged you, you can consider the option with self-production, but you should know in advance about the laboriousness of such a process. You should have master level locksmith equipment and construction skills. Garage production may not even be considered, since you have to use special machines and tools for turning hubs, assembling and installing sprockets, shafts and bearings.
There are three ways in which the caterpillar made by you on the "Niva" will perform its functions - from a conveyor belt, from car tires or from belts. These will be the simplest designs, which, despite their functionality and maintainability, cannot be called full-fledged tracks.
Conveyor belt tracks
To assemble the tracked set, you can use a conveyor belt with a thickness of 8 - 10 mm and a sleeve-roller chain. Be sure to sew the edges of the tape with fishing line to reinforce it and avoid fraying. Use an overcast seam. The hinge can be used to connect the ends of the tape. The connection through flashing can also be applied, but the reliability will be questionable. In general, this design inspires confidence in terms of reliability and is easily repairable.

Also, caterpillars can be made from the conveyor belt using a rectangular shaped pipe. To do this, you must first give the tracks the required shape using a pressing machine. You can use nuts and bolts to fix the tracks to the tape. We will consider this technology in more detail. You will need the following tools and materials:
- pressing machine;
- hammer and a set of keys;
- hole puncher;
- drill, angle grinder and welding machine;
- fittings and profile pipes;
- grover, washers, nuts and bolts;
- conveyer belt.
The phased technology is as follows:
- Taking into account the width of the caterpillar being manufactured, cut the track blanks with a grinder.
- Press the workpieces on the machine to give them the desired shape, use waste oil to lubricate the ends.
- Weld the fangs on each track and additionally at the top of the V-shaped reinforcement.
- Check the correct dimensions at the track installation site.
- Use an industrial hole punch to create holes in the conveyor belt. You can make such a hole punch yourself - it will be a tube sharpened from the end part with a side hole for removing rubber waste.
- Drill two holes in the tracks at each end.
- At the final stage, the assembly of the caterpillar is waiting for you.
Tracks from car tires
Having decided to use car tires for the manufacture of tracks, you should choose them with the appropriate tread pattern, which will replace the lugs. Tires from tractors or trucks will do. Carefully remove the tire beads using a well-sharpened boot knife. Moisten the blade periodically in soapy water to make cutting easier.
If you are skilled at using an electric jigsaw, you can also use this tool in tandem with a fine-toothed saw.
To achieve the required level of elasticity, several layers of the inner ring can be removed. Compared to the first option (conveyor belt + sleeve-roller chain), car tires are more reliable, since the ring contour in this case is closed and the ends do not need to be connected.
Belt tracks
Crawler belt kits are also classified as easy to manufacture. Grousers are used to assemble the track from V-shaped rubber belts. The connection is made by means of small bolts and rivets. The spacing between the belts must match the dimensions of the drive sprocket. Use rivets to secure the ends of the resulting blade.
conclusions
Summing up, it is worth mentioning the ease of installation of the tracks, which takes less than an hour, unless of course we are talking about the Chelyabinsk invention.
Before installation, weld special triangle-shaped kerchiefs to the Niva bridges to strengthen them. As for homemade designs, they are unlikely to compete with the factory options in terms of reliability, but they will be an excellent solution for single raids for game or fish.
Many lovers of home-made vehicles are engaged in the development and manufacture of tracked ATVs.
A variety of solutions are used when bringing ideas to life, but the biggest problem for enthusiasts of this type of transport has been and remains the caterpillar. Of course, no one prohibits the use of factory-made propellers in their samples, but I want an all-terrain vehicle (or snowmobile), made with my own hands, to have home-made tracks. Let's take a look at some of the ways to make tracks that have shown reasonably good performance.
The simplest option
The track propeller for snowmobiles and light all-terrain vehicles can be made on the basis of an ordinary bush-roller chain and a conveyor belt. To make such a caterpillar, there is no need to have special tools or equipment, everything is done “on the knee”.
Track from a conveyor belt
To extend the life of the tape, it is advisable to stitch its edges with a fishing line with a step of about a centimeter (just like seamstresses do overcasting the edges of the fabric), this will save the tape from fraying. The connection of the tape into a ring can be done in any available way, for example, using a hinge like a piano loop, or stitching the ends of the tape (less reliable method).
The belt thickness should be selected based on the engine power. When using engines from motorcycles of domestic production, a tape with a thickness of 8-10 millimeters, which is used on agricultural conveyors, shows good results.
Despite the simplicity of manufacture, such a self-made track for a snowmobile has a decent resource and, moreover, is easy to repair if necessary.
Tire tracks
It is quite common among homemade people to make tracks from car tires. For this purpose, tires from trucks are selected, preferably with a suitable tread pattern (there will be less work with the tire in the future).

Tire caterpillar
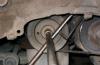
To make such a caterpillar, it is necessary to cut the beads from the tire, leaving only the treadmill. This work is quite laborious and requires a lot of patience, since only a well-sharpened boot knife is used from the tools.
To simplify the work, you can wet the blade from time to time in a soapy solution, then the rubber is easier to cut. Alternatively, you can consider the use of homemade cutting devices, or use a jigsaw on which a file with a fine tooth is fixed (it is also better to moisten the file with soapy water).
First, the sides are cut from the tire, then, if necessary, excess layers are removed from the seamy side of the resulting ring (if the track is too hard). After that, if the tread pattern does not meet the designer's requirements, a new lug structure is cut.
A home-made caterpillar made of a tire has an undoubted advantage over the above-described sample, since it has an initially closed loop, which means that its reliability will be several times higher. The downside is the limited width of the finished track, however, if necessary, you can use the double and triple width option.
Belt tracks

An attractive option for making a caterpillar with your own hands because of its relative simplicity.
V-shaped belts are connected in one piece by means of lugs attached to the belts with rivets or screws.
Thus, a track is obtained with already existing holes for the drive sprocket (for this you only need to leave gaps between the belts).
There are many ways to make caterpillars - the main thing is to have the desire and patience, and then everything will work out.
Those who like to go fishing often in winter often face the problem of cross-country ability. After all, it is not always possible, even in an off-road vehicle, to drive directly to the river bank, and even more so to the very place of fishing. A crawler snowmobile is a way out of this situation. However, the price of such equipment in stores is sometimes not affordable, and therefore there is a need to make such a device with your own hands. In today's article we will look at how it is done on tracks and what you need to have for this.
Caterpillar
The first step is to start with the most difficult part of the snowmobile design - the track. Along with the motor, it is the main driving element of all equipment. In order to do it, you first need to draw up drawings of homemade snowmobiles on tracks (similar to our second photo).

This way you will know the exact sequence of the work performed and will not forget about any small detail. And now about how to make a caterpillar in practice. To do this, we need to take a plastic pipe (about 40 millimeters in diameter) and 2 strips. The number of pieces of strips depends on how long your caterpillar will be. Working with these parts, or rather, their processing is easily done on a circular or (grinder). In this case, you need to cut through the part one wall at a time. This is necessary to ensure the accuracy of the work performed. How to connect the conveyor belt to the cut pipe halves? To do this, we need two while the diameter of their thread should be about 6 millimeters. If you combine this value of the elements with the manufactured structure, the step between the lugs at the output will be 93 millimeters.

When "baiting" parts of pipes with their cut side outward, be sure to maintain a step distance between them. If the offset is 3 millimeters or more, this will lead to inconsistent operation of the teeth of the drive gear and the belt itself, which will cause overshoot in the snowmobile. And this already leads to a loss of control. This discrepancy can lead to the fact that the belt can simply slide off the rollers.
It is also important to observe the dimension of the caterpillar. How long it will be depends directly on the power of the engine on which the homemade snowmobile will work. On the tracks, it is necessary to calculate the nominal pressure of all equipment on its plane. Thus, the curb weight of the snowmobile relative to the roadway should be no more than 0.4 kg / cm 2.

How to drill the tape?
Homemade tracked snowmobiles work fine with belts drilled with a conventional drill. However, in order for the device to work as long as possible, you need to re-sharpen the drill to work with rubber in advance. You should first purchase a tool designed for processing wooden surfaces. Under no circumstances use metal drills.

Other chassis parts
The rest of the units will be easier. For example, components such as axles and rubber wheels, Buranov sprockets and protected bearings can be purchased at any specialized store. By the way, it is better to buy inflatable wheels. This technique will be softer on the go. The axle can be taken from a simple garden cart (biaxial). If necessary, you can cut it off or, conversely, expand it to suitable values \u200b\u200bfor the technique. If you are unable to purchase a drive shaft from a store, you can try making one on a lathe. When making your own shaft, make sure that it fits the bearings well in size.
Homemade snowmobile on tracks: frame
We will have it perform the main load-bearing function and hold all the parts, including the engine, in one whole. By the way, as a motor, you can use a power plant from a motorcycle along with a gearbox. But back to the frame. We will make it from a steel section with a diameter of 25x25 millimeters. In this case, it must be welded in such a way that it has two longitudinal and three transverse beams. The presence of these parts on the frame will significantly strengthen its structure.

Finishing work
Finally, on how to install on a homemade snowmobile on tracks During the assembly of the snowmobile, here you need to make two swivel sleeves. This will be your steering gear. How it's done? Weld a 1/3 ”female water socket to the front beam and screw the male threaded connections into them. The branch pipes already have track racks and welded bipod for the tie rod. By the way, you can use skis from an ordinary children's car "Argamak". But before that, first prepare them for installation: attach the angles for attaching the swivel stand and cut the metal. This will greatly improve the handling and handling of the snowmobile at high speed.
Real SUVs have high cross-country ability (I mean, not city SUVs). However, their cross-country ability is often limited, and it is understandable that this is not a tank "embody". For example, on snowy slopes or swampy meadows, such a car is already ineffective. We have to resort to tractors and all-terrain vehicles on tracks, but tuning does not stand still, but develops by leaps and bounds, so literally in an hour you can put your jeep, even if it is a UAZ or NIVA, on tracks, removing the wheels, thus, we multiply the passability ...
The effectiveness of tracks has long been proven, but converting a car to such a chassis would mean a deep modernization of the suspension, which is very expensive and not always possible. Therefore, tracks were needed that would sit in the regular places of the wheels, practically on standard hubs, without profound technical changes. And you know, such options have existed for a long time! Moreover, you can remake almost any car, but of course, it is more effective to remake frame jeeps, or off-road vehicles with high cross-country ability, such as our NIVA.
Design principle
Now blocks are sold for all four wheels of a car, we simply remove the standard wheels, fasten special adapters to the hubs - we put on the tracks.
No, they are not large, but correspond exactly to the size of your car, they just fit into standard wheel arches, there are options even for cars, although this is a little absurd.
The design is also simple, with a triangular metal frame, with five (sometimes more) pairs of rollers at the bottom and one large one at the top. On which a caterpillar is worn, made using a special technology (many will say it looks like rubber), but this is not entirely true, wear resistance and elasticity are at a high level, they remain soft even at sub-zero temperatures. Of course, no one will give you the composition of the material.

In the upper "big" roller, a standard wheel hub is installed and put on a rigid hitch, thus, the rotating hub will transmit the rotation of the entire structure, so the all-terrain vehicle is ready for you. The big plus is that you can turn the steering wheel like on a regular car with wheels, also when you need to just remove the tracks and put on ordinary wheels.
Track dimensions
Of course, many are now interested in the size. So I want to run through them quickly. I personally will take the option for our cars, for "NIVA" for example, since they are more in demand for it.

Width - ranges from 320 mm to 450 mm
Height - about 700 mm
Length approx. 1000 mm.
Weight - 80 - 100 kg.
From the side it resembles a triangle, and therefore will fit into any wheel arch.
Manufacturers
In fairness, it should be noted that they were developed in the USA, and only after that they were dispersed throughout the world. Now do several dozen, and maybe hundreds of companies around the world, including Russia.
If we take imported versions, then the most famous of all is the company - Mattracks, this is one of the founders of the production of such "rollers". True, their prices bite, for the price of a kit you can buy a Russian car.


If we take domestic manufacturers, then here we can highlight Chelyabinsk, it is there that they produce rollers for NIVU, UAZ, etc. The cost is several times lower than that of foreign analogues.
The main advantages
The advantages are obvious - improved cross-country ability. And also an increase. Deep snow in the fields, swamps of small bogs, and simply "well" washed out roads become easy obstacles. If we take for what these tracks were originally developed, it is overcoming deep snow, they were made for rescuers on mountain roads, where ordinary SUVs simply cannot pass. What can I say, the caterpillars have proven themselves only from the best side.
For example, watch the video where NIVA easily passes in deep snow, and “calmly” unfolds.
Re-shoeing from ordinary wheels does not require any changes in the suspension design, you can remove the wheels with your own hands and hang the tracks in literally 1 hour. And if you need to return the wheels back - an hour and they are in place. This adds a very big plus.
Minuses
Of course there are also disadvantages, where can we go without them. The first, but obviously one of the most important, is the use on asphalt roads - here you need to maintain a special speed limit, almost all manufacturers recommend moving at a speed of no more than 40 km / h, otherwise the track itself is very quickly erased, you will simply throw it away.


The second is that it is difficult for such "rollers", and I would even say impossible, to overcome a fallen tree, even not significant at 10-15 cm in height, ordinary SUV wheels would simply run over it, but the caterpillars would not.
Third, this is a fairly high price, although I will dwell on this in more detail.
Price
Needless to say, this is a very expensive pleasure. Taking for fun and "pokatushak" on snow-covered fields is not entirely rational.
Foreign counterparts cost from $ 3,500 to $ 10,500. What is now at the rate of about 230 to 700,000 rubles!
Domestic manufacturers keep amounts from 100 to 250,000 rubles.
Prices "walk" from your car (the more, the more expensive), load, track width, etc.
Can you do it yourself?
YES of course you can, why not! After all, they are also produced by people. However, you will need to do technical research, calculate the load, weld the triangle. Look for rollers and the belt itself (many make old rubber). As you can see, not everything is so simple - although it should be noted that it is realizable.

You will also be interested in:
Why are special technological holes made in the pulleys? In auto repair shops to fix ...
Even the most careful drivers sometimes find themselves in unpleasant situations. If you are leaving ...

Well, finally, I decided to pay attention to this important aspect of the game, in fact ...

No? But in vain! After all, it is the name that characterizes the game. And it translates as follows: ...
Tuning mod for GTA San Andreas will add to the game new options for upgrading cars, ...

