


At the start stage alteration own car Much attention should be paid to the Tuning of the VAZ 2110 panel. Many owners of the "dozens" hold the position that the car should not fall behind modern trendy trends in the world of four-wheeled high-speed "iron horses".
Of course, everyone wants his car, despite certain worniness and already rather rich history of the VAZ 2110 brand, looked beautifully, "felt" powerfully and provided high comfort inside the cabin for all passengers. In the process of movement on vehicle Many passengers pay attention to the instruments.
Of course, the original, with designer exclusive solutions that are literally affecting and admiring are always more interesting for them. Tuning should be started with the search panels. To install such detail, you will have to use your own skills and dexterity, if you do not want to give your blood in various car dealerships.
Moreover, this work does not require use special tools. It will be enough for the use of PASSATIA and the cross screwdriver.
How to create a new design dashboard VAZ 2110

The whole process of updating the instrument panel does not take much time. All you need to do is dismantling outdated "details" and installing a modernized model. How to remove the VAZ panel, you can learn in the repair and operation of the car. But the main stages should be reminded:
- first you need to turn off the battery terminals. The steering wheel should be lowered to the lower position.
- you must unscrew the screws of the panel lining fasteners.
- next, turn off the connector on the left, in this situation we are talking about the machine switch of external refreshment. Then, using the Passati, should be accessed by the attachment of the instrument combination.
- Next - remove it. Some models are attached using M5 screws. In the end, you must disconnect the connectors.
After that, you can install a new panel in the reverse order. Such will always cause admiration for passengers and a sense of own pride.
Bright variety of flowers

Today, the mode change the backlight of the dashboard is gaining fantastic revolutions. Almost everywhere cars have neon backlight or inner LED illumination. However, all these innovations are the cheapest pleasure that is not all for the pocket. Otherwise it is dealing with the replacement of the factory backlight on multicolored.
You can, no doubt, take advantage of the ready-made tuning options, but it will cost a lot. It is best to spend it with your own hands. In this situation, the main thing is to possess required materials And patience. First you have to disassemble the "tidy". It is necessary to remove the protective glass. Next, remove the arrows. To do this, you need to use a screwdriver and hard cardboard.
It should be put under the arrow, and then pushing it with a screwdriver. Then neatly and slowly raise it need to top. Next, remove the substrate. To do this, the stationery knife is useful. It must be shunken between the panel and the substrate and cut through the sealant layer in a circle. After removing the substrate. We disassemble the panel and begin.

1. Remove the light filter layer using the stationery knife. The light filter is a colored paint layer. It is applied from behind the substrate and gives color illumination the numbers and the rest. To completely get rid of the light filter, you can use acetone or other liquid that contains alcohol.

2. Next, change the color of the backlight. First you can change the backlight of the odometer. To do this, you will need to dismantle the Odometer screen, and then remove the blue film and remove the light bulb. It should be replaced with a multicolor universal LED. It can change colors. LED attach to the cartridge of the regular light bulb. Install the odometer screen in place.
3. Now you can proceed to a complete replacement of the backlight. Fresh LEDs to the "tidy" frame. Such LEDs can be bought with a colors switch. We set them in place and attach them to standard tidy backlight contacts.

4. Go further. Now it is necessary to make the shooters to have the ability to change the backlight. To do this, remove the red paint layer from the arrows. For this operation, you can use the stationery knife and acetone. When the arrow is cleaned, it can be painted using a white nail polish. The main thing is that the arrow is white, since this color transmits color gamut LEDs.
5. Before the final stage, you need to secure the LED colors switch on the panel. Such a switch can be installed, for example, in the lower right corner of the "tidy". After that, you can install everything in place. First, the substrate is mounted. For greater reliability, you can use sealant. After that, we install the arrows in place. Insert protective glass. After that, we admire the result.


How beautiful to highlight the WAZ 2110 panel buttons

Conducting the tuning of the panel of the presented car, among other things, you can also highlight the "Tidy" buttons. Take, for example, the power button. To begin with, you will have to dismantle and disassemble it. To do this, you need to pull on the different sides of its rolling part and the case.
After the button is elongated, you can access the incandescent lamp. If there is a desire, you can take it out. If you cannot pull out the light bulb, then follow the next. With a screwdriver or a knife, we use the latch on both sides. Before us will appear the switch of the switch. Here we need a black bracket. Like her, we calmly dissolve the entire mechanism.
Now it's easy to remove the lamp, it will suit the tweezers. Now you can connect fantasy. You can purchase a LED lamp of any color. It should be borne in mind that the advantage is contact number 6, and minus - №7. Polarity can be found if you look at the back of the body. A shoe with wires is inserted here. Next, check how the backlight works. If everything is fine, go to the next part.

Get rid of a green light filter. It can be drilled, it is necessary to carry out carefully so that the drill does not pass through the entire design. As a result, we remove the light filter from the design and check it on working capacity.
It should be noted that almost all the buttons, if there is a desire, can be refined in this way. The exception is only the position of minus and positive contacts, they need to be watching the electric hammers. If there are no schemes, you can safely find her photos on the Internet. Minus contact is usually denoted by a black wire, plus - any color.
Most often - it is white. You can remember, but it is better to draw or photograph the contact connections, in the process of assembly, the confusion will not occur. The assembly process must be made in the reverse order.

Installation of twitters in the instrument panel VAZ 2110

You can enjoy the tweeter installation panel (high-frequency speaker). One of the most problematic stages is the drilling of the holes. Windshield It prevents drilling at right angles. But without a tree, it is impossible to do without a drill, because under the plastic shell there is a metal strip. In this situation, the paper should be made of a template or stencil.
Using a knife, you can remove the soft area of \u200b\u200bthe panel (from the outer side - plastic, with the inner - the likeness of the foam rubber). Then we take a drill and drill around the previously marked area. It is better to use compact drills. When the hole is drilled, uneven edges should be fixed. To do this, you can use special nozzles for drills.
You need to drill at a distance from devices and sensors. It should be noted that wires or brackets can come across the metal strip. The mounted tweeter element must pass tightly into the hole. If there is a certain freedom, it is necessary to compact this area with a sealant. Wires from tweeter can be hooed along the edges of the air ducts.
This tweeter is an important component if an acoustic system is built in the car. Without such a detail, the sound and the volume of sound will not be complete.

The domestic car 2110 can not boast a high-quality panel. In a strong frost or summer heat plastic often begins to crack. In addition, its angle is sometimes dugs. The "tidy" of this machine consists of three parts: central, upper lining and lower plastic lining. The angle is most often dug through: unscrewing the screws that attract the upper lining, or through what has moved its soft part from the metal part of the top overlay.
At the first time you need to remove the panel, because otherwise tighten the top lining will not work. If only a soft part has been deployed, then solutions can be several. You can stick it, but it will not be kept hard, on the plastic air deflector. Another option - you can disguise the slot that is formed when the angle of the panel is dug.
You can, no doubt cover the gap with a wire. It is stacked inside using a screwdriver. Instead of wire, you can use the headlight seal. In this case, you can return the corner to the place. For gluing a corner use mounting foam. The sheathing, thanks to the foam, will hold on exactly on the metal case, but at first it needs to be cleaned and degreased.
Then we put the foam inside, with the help of a wet rag, we remove the surplus of foam. Clamps for paper press the corner. Immediately clean the foam is not needed. You should wait until it dry. After the foam dries, you need to paint it with a marker. It may seem that the foam is drunk, but in fact, the corners of the panel will not go out.
Now you can proceed to repair the cracks on the panel. To do this, use either a means for plastic repair, or drag the lining with the material. As for the first option, it is the easiest, because when repairing it is not necessary to remove the lining. You can remove the crack using a special epoxy resin.
Also for use is suitable for Cosbogen and cold welding. So that the crack does not stand out, you should repaint the dashboard. With the second method, when a drawing automotive details, use skin or leather. First, the crack must be shaded. If the problem is in the corner of the panel, which was dug up, then it will not be waged.
If the "tidy" crackled, then completely hide the crack and, at the same time, not to remove it, it is quite difficult. If the case has affected the repair, it is better to immediately replace it with euphlary. You can see how to solder plastic.
Stylish and modern pad
The boring staff panel (on video) quickly borries many owners of VAZ 2110, but to buy an alternative, which is equipped with a computer and stands greater money, do not want. What to do in such a situation? there is excellent optionwhich will allow you to conduct economical tuning with your own hands. One of the most simple ways - Purchase of the lining.
You can find them without any problems in online stores (the photos presented there give a general idea of \u200b\u200bsuch details). To install it, you must remove the "tidy" and carefully pull the arrows. By installing arrows in place, you should make sure that nothing interferes with their movement. Otherwise, it will have to disassemble everything.
If this version of tuning is added to the backlight of the scale and arrows, you can almost instantly transform to unrecognizable your own car.
How to high qualityly conduct noise insulation of the VAZ 2110 panel

It's no secret to anyone that often the VAZ 2110 creaks the panel. Elimination of the screens is called still noise insulation. This process begins with the disassembly of "tidy" into three parts that are mounted with a bolt. As an "anti-scrip" you can use the model, and the bitoplast will perform the noise absorber.
In places contact parts of the panel, the model should be used. All holes from the bolts need to close the model to eliminate the loss of air flow streams. The back of the torpedo needs to be saved by the Bitoplast.
Its remnants can be pasted inside. Read more like glue noise insulation. Often, the screens are called a black box with fuses and glove box. At the bottom of the latter you need to lay a bitoplast, and the sides should be saved by the model. Boca of a black box, which come into contact with the panel, should be punctured by the model. It should be noted that the Bitoplast when landing is drunk and problems with the installation of "tidy" should not occur.
Nothing can so please the owners as silence and the complete absence of various annoying creaks in the car. Comfort in the cabin, which occurs after noise insulation of the panel, causes only pleasant sensations.
In contact with
Odnoklassniki.
Found a mistake? Highlight the text with the mouse and press Ctrl + Enter
In the framework of one plant it is interesting to trace how evolved dashboard VAZ 2107, 2109, 2110, 2114; And the VAZ 2115 has already been equipped with an electronic dashboard. And how can modern models of this plant boast?
Dashboard VAZ 2110 and other models - Evolution of cars
One of the first domestic cars Is VAZ. For this model of the car, the most first option with electronics was "dozen", after which such developments the company began to apply on all other modifications of the car. Dashboard VAZ is unique in its kind. In addition, such a device has unique characteristics. In the first models of the vase, the board with devices was organized outside, which complicated access to her, but in the Lada of the 14th model, this nuance was taken into account - it was at least highlighted from the inside lamps. It is in this car there are a lot of other features.
The dashboard on VAZ cars includes approximately 19 designations, of which the most important and basic are considered, naturally, the tachometer, the fuel level sensor. The VAZ panel also has an arrow sensor temperature sensor that shows how efficient the liquid cools the motor. From the mark of precisely 105 degrees, the red scale begins and ends at 113, to the red, though, it is better not to reach, because the engine is desirable not to go out for a 100-degree mark. Tachometer is the largest shooter on the shield, of course, after the speedometer.
As a rule, it is necessary that the normal engine turnover is in the area up to 5.5 thousand per minute. Following a red scale. Here in this range, the arrows hit are not as dangerous as with a motor temperature sensor.
Dashboard - device priors
When choosing the most suitable car model, it should not only pay attention to the presence of a variety additional optionsBut also evaluate a shield with the main indicators of the auto state. This is especially attractive for VAZ fans who have already tested no one generation of this product. If the dashboard is considered, PrioraFor example, it is expected to look like, but will noticeably differ with the early VAZ options. For example, Priora It has a completely different torpedo, there is also no keys on her visor. Speaking about the same device at Vase, it is worth noting that there are large keys on the edges of the dashboard, which are especially popular for models Audi, Land Rover. and Citroen.
If you look from the point of view of ergonomics, this idea is not bad, however, this option is not quite convenient, since the steering wheel overlaps the indicators on the keys. The prior has the following controls on the panel: Switch (designed for outdoor lighting, it can occupy 3 positions), instrument lighting regulator, which changes their brightness during the outdoor lighting, headlight head regulator and rear fog lights switch. In order to enable sound signalYou must click on the right either left button of the steering wheel, where it is necessary to have an appropriate character.
Dashboard: Kalina - an example of "smart" electronics
In order to understand how modern VAZ dashboard is arranged, KalinaAs one of the last representatives of this plant, will serve as an experimental sample. In order to start the process of diagnosing this auto element, you must click the daily mileage reset button and rotate the ignition key. In this case, if everything is done correctly, follow the arrows. Of initial position The arrow of the tachometer, speedometer and sensors will start moving to the final value. Information Screens can be switched using the button on the handle of the janitors. Then the performance of the tachometer, speedometer and sensors will be checked.
Then the software version will be displayed, and if there are errors, all codes will be visible. To do this, you need to know what numbers in the dashboard mean. Note that on Kalina, the dashboard is similar to the same device in the grant. After all, they have not only similar indicators, but also alarms. If comparing a shield Kalins with analogue of early VAZ models or priors, then the device Kalins It has quite a lot of differences with them. However, all variations of these panels are electric device, and depending on the configuration of cars, they simply have different volumes of information displayed.
Do you have any troubles for nervous cells? Creeping on the VAZ 2110 on the panel - far from the most pleasant and even annoying sounds that can be involuntarily "enjoyed" when driving. And what to say about the aesthetic side of the question. Cheap plastic product clearly does not emphasize the status of its owner. This is also added to the problems of the motorist associated with the need to maintain the "tidy" and regular patchwork of new cracks on it.
If the stove constantly works in your car in winter, especially with the heating of the side windows - you can also boldly poke your finger on the dashboard. This is a really eternal trouble of most cars VAZ. The reasons are very trivial, about what will be told by a little later.
Change, as they say, sewed on soap, is also not necessary. Let AvtoVAZ are not always attentive to small constructive details of its cars, but they are all easily eliminated by motorists themselves. Therefore, the problem of lining on the panel can also be very easy to solve. And already as it depends on you and on the ones of the following ideas you will get more likely.
How to maintain an old lining on the instrument panel VAZ-2110
The main problem of this kind of products, of course, is poor-quality plastic, which has a trust property. No less serious problem - peeing the main parts of the "Skill". There are only three of them: the upper, lower and medium, respectively. It is on connecting joints that often happens that the gaps are expanding.
Most motorists, at least seal all the heat-conducting channels "tidy", so that on the VAZ 2110 the pad on the instrument panel works much more efficient. Also in the course goes and the anti-scrip, since the unpleasant sound of sliding on the joints of the plastic sufficiently presses on the head when driving.

Very often, VAZ motorists have to learn to repair cracked plastic. For this is special means. Cracks can also be sealed with cold welding or epoxy resin, but after this procedure, it is still necessary to repaint the surface of the recovered panel. No one forbids also to pull the torpedo to leather or other finishing material as a good alternative.
Over time, the panel, one way or another, comes into a state of non-thendition, strongly discrediting the presentability of your VAZ-2110. Patch and gluings will not work in an unlimited quantity, and not grateful this occupation. Have you ever thought about the need to replace "tidy"? Below we will try to explain why you need it.
Why it is worth losing a replacement overlay
Perhaps you really think that the replacement of the front intersection of the dashboard will be a challenge for you. However, it's hard to argue that the original factory plastic is hardly different high quality and presentable, and with this you need to do something. A good cover on the instrument panel of the VAZ 2110 euro-shape will cost about 6000 rubles and has a lot of advantages:
- update the aesthetic view of the car VAZ-2110 cabin;
- there are also exclusive offers inheriting in their design prestigious imported cars;
- you get rid of problems of low-quality plastic: fading material in the sun, creak, cracks and expanding gaps at the junction of the panel elements;
- improved sound insulation properties: All sorts of noises emanating from under the hood of the car (including driving on poor-quality roads), to a lesser extent will be given to the VAZ-2110 salon;
- chimney ducts of stock covers for the panel leave much to be desired, because you will certainly improve heat exchangers inside the cabin in winter time of the year.

By the way, "Europelle" for the "dozens" from the VAZ there are several types. For example, Euro-1 is quite ascetic in its design and does not have a glove box opposite the passenger seat. But it is for the lining from the series under the second number. There are also decorative lining, only complementing the interior design and mounted as an intestine on top of the main.
The original furnace ventilation system in VAZ-2110 cars, indeed, does not suit most of the drivers. Many motorists because of this do not have the possibility of a comfortable ride in the winter season. You can, of course, to upgrade the old overlay for the panel: Seal all the slots of the model, compensating for the heat loss, but the purchase of fundamentally new can really kill the "two hares."
You can choose a lot of logical arguments in favor of what good new pad on the VAZ 2110 panel is good. And this means that if you have means and opportunities - it remains only to take a hand tool and proceed to business. Below we briefly tell how to replace the front overlay.
How to easily and correctly remove the old "tidy"
A car looked in the process of repairing the dashboard looks really scary. The front seats stretched from the salon, shot of the steering wheel, pile of the heap of electrical wiring, protruding from the bottom of the car. Everywhere we love VAZ-2110 seems like improved inside out of inside out. In order to create so complicated, it would seem, the operation you will need only passasia and a screwdriver cross.
Connecting connectors are really a lot and it is possible that the most terrible moment of replacement of the "tidy" VAZ for most motorists. True, it is not necessary to understand all these intensions of electrical wiring. Just take the rule to marke and mark all the disconnected connectors and then the reverse installation process will be not more difficult to build a children's designer "Lego".
Thanks for the subscription!
Get ready for the preliminary stage of disassembly steal your most of your day. Better start in the morning. Hardly you will manage to cope earlier than five to six hours painstaking work. In the process of dismantling you will have:
- remove seats in the cabin;
- completely dismantle heat-conducting tunnels on the floor;
- remove wheel laces together in switches under it;
- dismantle the dashboard along with the lining;
- the same applies to the relay and other connectors available after dismantling the glove box. Headlights of the VAZ-2110 headlights and other controls on the panel are removed.
To the vehicle body, the VAZ-2110 panel is attached with a set of self-tapping screws and two studs in the heat tunnel area of \u200b\u200bthe furnace guiding the air flow on the side windows. After unscrewing the screws to prevent you from removing the panel, only inappropried wiring harnesses can be removed with which you already know what to do. And, since you decided to make the replacement of the "tidy", a good idea will also be upgraded by a panel for indication.
Several tips for updating the dashboard (indicative) of the VAZ-2110 panel
If the standard panel pad on the VAZ 2110 to indicate the sensors and the meters you have already managed, for sure, you will be pleased to know what to replace this element of the car is extremely simple. That's where you can show your creative talents in art and printing skills. If this kind of work is not for you - you can always buy ready-made overlays in the store, or contact the designer.
If you are interested in exactly how to give individual damn the lining for the instrument panel over your steering wheel - this is relatively simple. A template is created in a graphic editor on a computer (CorelDRAW, Photoshop or similar) and then printed on a self-adhesive film (preferably dark matte color) with a plotter. On the Internet there is a lot of ready-made as standard templates for VAZ-2110 and modified. It is much more profitable than buying ready-made linings in the store.
The tuning of the VAZ dashboard is also very popular with LED indication. This kind of illumination practically does not heat plastic, durable and consumes the minimum of electricity. But the pad will now look extremely stylish and fashionable. You can connect both the stationary backlight, including ignition, and the special regulator controlled (it is allowed to set the mode of operation, the brightness of the glow and its color).
As in any other machine, the VAZ 2110 instrument panel is designed to display the general condition of the car, to show a steady operation or problem in its main systems, as well as the speed of movement, fuel level, etc.
However, as practice shows, not for all control panel - an open book. Consider its device, instruction and description of the display light bulbs in the new and old sample panel.
Indication designations
As you know, all the light bulbs on the control panel are ignited at the moment of inclusion of ignition, and then when the engine is already running, most of them go out. But when someone remains to burn, or blinks, it can not fail, because not everyone can immediately figure out what kind of faults it indicates which systems is needed urgent repairs.
Consider the designations of the VAZ 2110 instrument panel. You should know that regardless of whether the panel of a new or old sample is on your machine, the designations are almost the same, but there are indicators can be slightly different.
Top part
So let's start from left to right. At first - the top of the control panel:
- Side scale from 50 to 130 and arrow. Shows the temperature of the toosol (antifreeze) in the engine cooling system;
- Almost round scale (0 - 80) and arrow. Tachometer showing engine speed;
- Two arrows at the top almost in the middle of the control panel - turn signals (right, left);
- Speedometer. Well, this device is probably known, shows the speed with which the car moves;
- Side wheelchair and most often with two images of a refueling column (white and red). Instead of a red column there may be a yellow light bulb. This is the fuel level indicator in the tank. If the red column lights up (yellow light), it means that there are very little fuel in the tank - no more than 7 liters, urgent refueling is required.
Bottom part
Consider the indicators at the bottom of the control panel. If they do not burn, it means that the machine works fine, and when any of them lights up - this indicates malfunctions in certain nodes. Exactly this is the signal that repair is needed, and the faster - the better. From left to right:
- The extreme left at the bottom is the indicator - the air damper light bulb (if you have a carburetor engine);
- Icon in the form of ancoal. If this light is running, it means that in the engine insufficient pressure Oil. Anxious signal. Need to stop, find the cause;
- Round icon with the letter P inside, on the control panel indicates that the parking brake is turned on, which is known to be turned off, touched from the place;
- A malfunction index associated with a generator or battery (on the indicator a conditional image of the battery). Perhaps the battery charge does not work from the generator, there is a break in the chain, the generator belt is weak or cut. In any case, you need your intervention and repair, otherwise troubles are not avoided;
- If the engine works, and at the same time on the control panel check. Indicator Engine is the most unpleasant for the driver, as it indicates serious malfunctions in the engine. In general, when you light up this indicator, it is recommended to stop moving off the engine. Most likely, he needs repairs;
- Usually above Check Engine Located a red triangle. It burns when the "accident" works - alarm sign;
- Light bulb depicting the headlight indicates that the range light is turned on. Designed to control light headlights: when an oncoming car appears, do not forget to switch to the near light;
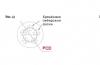
- A very important indication icon, which has the front panel (in a red circle) - a signal that is not enough brake fluid. It may be possible somewhere that it is desirable to find out as soon as possible and, if necessary, carry out urgent repairs, replenish the level;
- The burning light icon is control over the inclusion of dimensions;
- In addition to the indicated light bulbs, the front control panel has time pointers (and the button to set the clock and minutes) as well as the display on which the common and daytime mileage is reflected. On the new sample panel, this display can be narrow.
Deciphering the car error codes is presented in this material:
Additional panel
Additional front panel BSC of the new sample has indicators:
- Depicted Maslenka. If the light is running - check the oil level;
- The icon lights up, in which at some fantasy you can "identify" working wipers. This suggests that little washing fluid for glasses in a tank;
- Conditional image of a thermometer over a container with liquid - heat toosol;
- The crossed out light bulb on which the arrow indicates is a sign that the stop signal or dimensions does not work;
- If the light bulb lights up with the image of the wheel with brake pads, it is possible that the pads were worn and demanded a replacement;
- A man's sign with a seat belt says that the belt should be fastened.
Removal and refinement
In short, the device and control panel icons. If for some reason it refused, you should not immediately fall into panic. Most often, the reason in the absence of contacts in the wiring. But of course, if you wish, you can completely change or make tuning panels.
Make a tuning of the dashboard backlight will help this material:
For example, removing the lining, replace the light bulbs with brighter LEDs. Such a panel works brighter and signals supplied by the car will be noticeable for the driver. If desired, you can install more solid, which transforms the salon.
To remove the panel, you need:
- Disconnect the Wire "-" AKB;
- Remove by unscrewing the screws;
- Remove the fastenings of the control panel to the lining, remove the instrument combination from the nest;
- Remove the glass mask;
- Disconnect the wires with the shoe;
- Make changes to the instrument panel or replace it with a new one. Collect everything in reverse order.
On the cars of the VAZ 2110-2112 family, the dashboard includes checking light bulbs and on-board devices, with which the driver can easily monitor the condition of the machine. The following display lights are displayed on the instrument panel: the temperature of the coolant, turn signals, tachometer, the fuel level, speedometer, the image in the form of a benzocolone, meaning that it is necessary to refuel, the inclusion lights of the dimensions and far Light, low level Brake fluid, screen reflecting car mileage, alarm alarm, check engine that signals engine malfunctions, clock display, generator fault indication or recharging rechargeable battery, indication of the handbrake, the low pressure light bulb in the engine and on the carburetor motors of the air damper light).
Disassembly and replacement of instruments
To replace (repair) devices, it is necessary to make the following actions in a strictly prescribed manner:
1. It should be removed completely assembly all.

2. Unscrew the screws (2 pcs.) Which secures the bus. After that, the tire itself must be disconnected from the instrument system board.
3. Unscrew the screws (7 pcs.), With which the frame with glass is attached.

4. It is necessary to remove the frame, disconnecting it with the instrument system.
5. Unscrew the screws in the amount of 2 pieces, which secures the instrument combination board.

6. Disconnect the left light filter on which the symbols of control lamps are indicated.
7. Disconnect the right light filter on which the symbols of control lamps are indicated.

8. Unscrew the screws (2pcs), with which the blocks of red and white are attached. Then remove these pads.
9. Unscrew the nuts of the fuel level sensor fastening, the coolant temperature sensor and the tachometer. Each device is attached to 3 nuts.

10. Disconnect the board from the instrument system housing.
11. Unscrew the appliance scan screws to the case (5pcs).

12. From the system housing, remove the scale of instruments.
13. Very cautious, pushing the fuel level index with a screwdriver, it is necessary to remove it from the axis.

14. Unscrew the screws (2pcs), which the fuel level index is attached to the scale.
15. Disconnect the fuel level pointer. Install a new one in his place. When installing the sensor, make all the actions in the reverse order.
16. Replace the remaining devices like the described order. This is all the repair of the device panel VAZ 2110. As you can see anything difficult and there is no need to go to specialized service, and pay money.
17. Assembly of the instrument system must be in order, the disassembly procedure. When conducting these works, it is necessary to take into account that the nuts that the tachometer is attached have another thread.
In many cars, including VAZ 2110, in the combination of instruments, the control lamps A12 were found in the instrument combinations? 1.2. When replacing the lamp, you must perform the following steps:

2. Cartridge with a blurred lamp, should be rotated until it stops counterclockwise.
3. Remove the cartridge with the lamp from the instrument system.
4. The new lamp is installed in the location in the reverse order. This method is replaced by all other lamps of the instrument combination.
You will also be interested:
The main goal of stating on the body of each car VIN-code is to protect the car from the hijacking. But...

Insufficient or overestimated tire pressure threatens premature failure ...

Drivers who decided to replace the wheels need to accurately calculate the ratio of fasteners ...
Drivers who decided to replace the wheels need to accurately calculate the ratio of fasteners ...
Using automatic selection of tires and discs for the car VAZ 2107, you can avoid ...

