


To replace the timing belt on a Mazda 626 GF, many owners of this car turn to specialized car services for help, where such a service will cost an average of 2,000 - 3,000 rubles, and in more expensive services the price can double. However, by paying this not very large amount, you do not get a 100% guarantee that everything will be done efficiently, so you can replace the belt on your own. All you need is a good set of keys, a hole and a jack, the belt itself and 4-5 hours of free time, although the first time it may take longer.
1) We drive the car into a hole and raise it on a jack to turn the right front wheel, which prevents us from removing the protection. Disconnect the terminal from the battery. Then we do not completely unscrew the bolts from the pump pulley and carefully remove the power steering pump, and so that it does not interfere with us, we hang it on a wire somewhere on the side. We remove the pulley from the pump, after loosening the fastening of the generator, remove the belt from the generator.
2) Next, we rearrange the jack under the pallet in order to slightly raise the motor with its help. We remove the engine mountings, for this it is necessary to unscrew the nuts and mounting bolts. Adjusting the jack will make this process easier. We go to the valve cover and disconnect / unscrew everything that may interfere with its removal, after which we remove the cover.
3) We turn to the crankshaft, which, with the help of the cap head and the crank, must be turned until the letter "T" on the plastic protection coincides with the mark "BM" on the crankshaft. In addition, it is necessary to set the marks "I" and "E" on the same level on the camshaft pulleys. We ask the assistant for help in removing the crankshaft pulley. We need a head and some kind of pipe that plays the role of a lever in order to break the bolt. We send the assistant to the salon, his duties are to "stick" the fifth speed and firmly press the brake pedal. Unscrew the pulley bolt.
4) We go directly to the timing belt. The first step is to remove its plastic protection. Armed with a bright marker or corrector, we put marks on the camshaft teeth and belt cavities, as well as on the crankshaft pulley and belt. We pull the spring off the tension roller, and then remove the tensioner itself by unscrewing the fastening bolt. We remove the belt, and then move on to the bypass roller.
5) We transfer the marks from the old belt to the new belt; for reliability, you can count the teeth between the marks. We return the bypass roller and tensioner to their places, but do not tighten the bolts on them yet. Guided by the marked marks, we tighten the new belt, scrolling the camshaft and crankshaft pulleys will facilitate this process. Now we tighten the bolts on the rollers and install the spring on the tensioner. A couple of turns on the crankshaft pulley will help to get the belt into place.
With the reverse sequence, we collect everything that was filmed earlier. The gasket, it is better to take a new one, coat it with sealant on both sides. The bolts must be tightened in a specific sequence, their numbering can be indicated. We start the engine and listen for any extraneous noise.
If all is well, then forget about replacing the belt for about 100,000 kilometers, provided that the belt was original. If the belt is not original, then after 60,000 kilometers we check its condition. The original belt code is FP01-12-SF0, products of any well-known company, for example, Conti Tech, Bosch, Gates, Dayco and others, are suitable as an analogue. The idler roller code is FS01-12-730A (can be replaced by NTN or GMB), the idler roller code is FP01-12-700A (RBH or NSK analogs).
Timing tags Mazda 323 - 626 body BJ 1.8 / 2.0 DOHC, Mazda Premasi 1.8 Year 1992-2005
FP-DE FS-DE motor
Replacement frequency Mazda Premasi, 323: replacement - after 87,000 km.
Mazda 626: with a maintenance interval of 10,000 km - replacement after 96,000 km. with a maintenance interval of 15,000 km - replacement after 87,000 km.
Broken belt Engine damage - YES
Removing the Mazda Premacy belt
1. Place a temporary support under the engine.2. Remove:
□ Lower motor protection.
О Inner panel of the right wing.
□ Crankshaft position sensor (if required).
□ Camshaft position sensor (if required).
□ Right engine support.
□ Ancillary drive belts.
□ Water pump pulley.
□ Power steering pump (if required, without disconnecting hoses).
3. Install the crankshaft pulley retainer.
4. Remove:
□ Bolt (1) of the crankshaft pulley.
□ Crankshaft pulley (2).
□ High voltage wires.
□ Cylinder head cover.
□ Oil dipstick and dipstick tube (3).
□ Covers (4) for timing belt.
5. Temporarily install the bolt (1) to hold the crankshaft toothed pulley.
6. Turn the crankshaft to the position of the piston of the first cylinder at TDC. Check the alignment of marks (5) and (6) with the benchmarks.
Note: the marks on the back of the camshaft pulleys must be parallel to the plane of the cylinder head.
7. Use the Allen key (8) to hold the tensioner pulley (7). Disconnect the tensioner spring (9).
8. Take the tensioner pulley away from the belt, release the belt tension.
9. Remove the timing belt.
Mazda Premacy Belt Installation
1. Measure the length of the tensioner spring (9). If the free length of the spring is more than 36.6 mm, replace it.2. Check the alignment of marks (5) and (6) with the benchmarks.
3. Fit the belt in a counterclockwise motion starting from the crankshaft and without slack in the drive strand.
4. Using the hex wrench (8), bring the tensioner pulley to the belt.
5. Secure the spring (9). Make sure the belt is tensioned with spring force.
6. Slowly turn the crankshaft two turns.
7. Check the alignment of marks (5) and (6) with the benchmarks.
8. Remove the bolt (1).
9. Install the removed parts in the reverse order of removal.
10. Install the crankshaft pulley retainer.
11. Tighten the crankshaft pulley bolt (1) to 157-166 Nm.
12. Install the crankshaft position sensor. Adjust the gap between the probe tip and the sync ring (gap 0.5 -1.5 mm).
So, with a run of 96 tkm, I decided to replace the timing belt. In the spring I asked how much it would cost me in Yokohama-service (at the same time when I gave them a car with a power steering pump). They counted me along with spare parts (timing belt, oil seals 3 pcs, rollers - 2 pcs, and work) almost 10 tr. : - (((Nafik-nafik ......Looking ahead, I will say that the entire replacement cost me a SUN strap (900r), well, I bought a sealant for 130r, although it was needed a little and a little. Native oil seals - they do not flow, everything is dry, the rollers do not make noise either. Didn't change. Well, work - 3-4 hours, slowly, but without experience with this engine. Prior to that, I changed 2 times at Toyota Sprinter, 5A-FE engine. Well, it's a little simpler there. But in general - the same.
Unscrewing the pulley bolt turned out to be the easiest in this procedure, the most difficult is to properly tension the belt. Why - I will explain below.
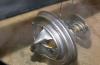
Now in order. First, I removed the power steering pump so that it would not interfere, and at the same time I changed the gland in it. Then we disconnect everything that interferes with removing the valve cover. All the wires, tubes, all this is perfectly bent towards the intake manifold. We loosen the nuts-bolts of the right engine mount. We lift the car on a domkat (front right), put it on a suitable stand (I just have a wooden block). We remove the right wheel. We remove the plastic protection. A view of the crankshaft pulley opens. You need to unscrew the bolt. This is the simplest :) On the bolt - the head, we rest the knob against the spar (photo 1). After that we strike with a starter for a split second - EVERYTHING! The bolt is ripped off. I read about this method when I changed the belt on a Toyota for the first time. I suffered then and could not turn it away in other ways. This one works flawlessly.
That's it, then quietly unscrew the bolt. Remove the pulley. They say he can turn sour and you can also suffer with him. But with me - normally - I took it off just by shaking my hands back and forth ... :)
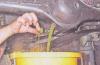
Next, we use a jack to move the engine up and down. I worked in a garage in a pit. I just put a board across and put a jack on it (photo 2). We support the engine, unscrew the nuts and bolts of the right engine support, remove the support. After that, we remove the valve cover and 2 plastic covers (upper and lower) that cover the timing belt, raise and lower the engine with a jack as necessary. It was difficult to remove the lower plastic cover - the water pump pulley interfered. I tried to remove it by unscrewing 4 bolts by 10, but failed. It is spinning, and I did not figure out how to do it. Well, okay, the cover has already been removed, since it is flexible and allows some liberties when removing and installing.
The belt drive appeared back in 1956. Prior to that, only a chain was used in the power units of cars. The belt connects the shafts of the engine, making their work synchronized. The timing drive is very important. Taking this fact into account, you need to monitor its condition all the time and make a replacement in time. The belt can be replaced by specialists, but you can also do it yourself. To do this, you just need to carefully read the instructions. Here we will talk about replacing the belt drive with a Mazda 626 2.0.
Because of what the drive is cut off
Mazda manufacturers claim that the belt drive resource is 150,000 km. This is quite a lot, but the consumable can wear out earlier. And here are the reasons for this:
If the chain breaks, this can lead to serious consequences - bending of the valves and getting various defects in pistons and cylinders. The valves may not bend, but that's only if you're very lucky. Much here depends on their position at the time of the break. If a blow follows, then the valve stem will bend. After that, they can only be replaced. But the worst that can happen is piston damage. But you can understand this only by completely disassembling the engine.
If the belt breaks, the motor stops completely on the move. After that, it is no longer possible to start the engine, and the starter rotates easier than usual. Occasionally a knocking sound can be heard during the break. This is evidence that the valves did collide with the pistons. After that, you no longer need to try to start the engine, otherwise additional harm may be caused to it.
Replacement schedule
The operating instructions for the car indicate the timing of the timing belt. In Mazda it is 150,000 km. It also states that along with the belt, the tensioner roller must be replaced. Of course, if it has not yet worn out, it is not necessary to do this, but very soon a backlash may appear on it, and then you will have to disassemble the entire mechanism again due to the replacement of one roller. Therefore, it is better to do it right away.
An early replacement of the belt drive may be necessary in the following cases:
- the belt is cracked;
- the edges are loose and separate threads are visible;
- cracks appeared between the teeth;
- the teeth are frayed or cracked.

It is recommended to inspect the belt drive more often, especially since this is not difficult to do. Together with the belt, you need to inspect the sprockets and cylinder walls. If oil leaks appear on them, this is an alarm signal.
Attention: if the engine starts to work unstable, and at idle, shots are heard from the exhaust pipe, then you need to inspect the belt again. Most likely, the phases of gas distribution have shifted. This can happen if the belt has jumped several teeth.
Choosing a company
Modern belts are made of high quality material, they have high-tech qualities, so they are not cheap. To choose a quality consumable, you should adhere to the following recommendations:
- Take with you an old consumable, so as not to be mistaken with the size of the teeth and some other parameters. The length and width of the teeth must match exactly.
- Choose only the best options. You should not save here.
- Cheap belts are always tough. But it is worth choosing an elastic consumable. Although it is more expensive, it will last much longer.
- The surface of the belt must be smooth. Burrs and sagging on it are not allowed, this is a marriage.
You should not buy such consumables in online stores, since it will not be possible to check the above parameters in this case. It is better to buy belts from trusted retail outlets. By the way, there they are sold in the complex.

And here's how to identify a fake. If you think you are being offered a counterfeit product, please ask for a few samples. On the back are their numbers. They are always different for branded consumables, and the same for fakes.

Belt replacement
The main thing when replacing a belt drive is to monitor the alignment of the marks. If they are shifted, this will lead to a violation of the gas distribution function. To replace, you will need a set of conventional tools:
- key for removing wheels;
- jack;
- spanner keys;
- heads;
- extension cords;
- pliers;
- screwdrivers;
- clamps.
1. We put the car on level ground. We fix it by placing it on the brake. We jack up the car and remove the wheel on the right.
2. Remove the protective cover.
3. Remove the crankcase protection, mud flaps and other elements that will interfere with further work.
4. We jam the crankshaft with a large screwdriver. It must be inserted between the flywheel teeth.
5. Unscrew the bolt securing the crankshaft pulley. After that, we dismantle the pulley, and screw the bolt back.
6. Rotate the crankshaft until the marks on the sprockets and the flywheel match.
7. Loosen the tension of the tension roller. We remove the belt, then remove the roller itself.
8. We take out the oil seals.

Tip: Usually the pulley bolt is tightened very tightly, and it can be problematic to unscrew it. Ask the assistant to apply the brakes in 5th gear. This will make it much easier to unscrew it.
9. The new drive must be put on so that the slack is formed on the side of the tensioner. Watch for coincidence of labels.
10. We begin to tighten the belt. To do this, insert pliers into the hole of the tension roller, turn and tighten the nut. The belt is properly tensioned if it cannot be rotated more than 90 degrees.
11. We carry out the assembly from the opposite, start the engine and listen to how it works.
Video
You will also be interested in:
With the onset of autumn cold weather, all motorists begin to turn on the interior heater to ...

In a wide range of power units of the German auto giant VAG (Volkswagen AG), FSI engines, ...
1. Unscrew the filler plug of the rear axle. 2. Substitute under the drain ...

OUR PARTNERS: Website about German cars Lamps used in a car Any ...

The car heater helps to maintain the optimum temperature in the cabin not only ...

