


Unfortunately, starter failure is not uncommon. Moreover, as a rule, such a nuisance happens at the most inopportune moment. It would seem that yesterday everything was in order, but today, the car categorically does not want to start. How to be? Of course, you can hand over the car to the service, entrusting the professionals, but there is an easier solution - to check the starter from the battery with your own hands. The procedure is not complicated, the main thing is not to rush and be careful.
The main types of malfunctions and their causes
A starter is a device used to start a car engine, and all its faults are classified as follows:
- Mechanical - in the overwhelming majority of cases, is the most common wear and tear of parts and components of the device. It is based on long-term use of the starter or non-compliance with the basic rules of operation. In some cases, it can cause electrical breakdowns;
- Electrical - related to the supply and distribution of power. Often, checking a starter that has similar problems consists in diagnosing open circuits, turn-to-turn closures, burning of the working surfaces or closing plates caused by the passage of high current through the contacts.
 If we consider the question of how to check the starter in more detail, it is worth first of all to figure out what kind of breakdowns are most common. Among the most common malfunctions, it is worth noting the following:
- The starter does not turn the car engine when it starts;
- The device itself works, but at the same time, the crankshaft remains stationary;
- The starter motor turns the engine too low;
- Even after starting the engine, the starter continues its work.
Sequence of work
So how do you test a starter? This work is quite simple, even a novice car enthusiast can do it and consists of the following intermediate stages:
- Checking the starter performance;
- Relay diagnostics;
- Checking the anchor;
- Diagnostics of brushes and windings;
- Checking the bendix.
Step-by-step implementation of the procedure
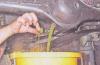
The starter test begins with its dismantling and fastening in a vice. It is very important here to observe the measure - excessive force can completely destroy the device... To check its performance, it is enough to close the contact bolts located at the back of the starter with a piece of wire or any metal object. If the starter is in order, it will begin to rotate, which means that the reason for the breakdown is most likely in the traction relay. Please note, when checking, the temperature of the device should be within 20 degrees, without surges and drops.
 As for the relay test, it is very simple to perform it. For this, wires with low resistance are used, connected in the following sequence: a relay on the starter housing and a positive battery terminal on one side, a device housing with a negative terminal on the other. If the device is working, the armature will push out the gearwheel, accompanied by a characteristic click. Otherwise, you need to think about changing the relay.
To get an answer to the question of how to check the starter armature, you need to use a conventional test lamp with a voltage of 220 V. It is worth remembering that the operation of this component is possible only if there is a resistance of 10 kΩ and a beat of 0.08 mm.
A quality check of the starter armature begins with a competent connection of the contacts - the armature is connected to the power source, and the device body to the lamp. If the lamp burns or sparks, and the air smells of burnt wiring, then the anchor has a breakdown and needs to be replaced.
To check the brushes, you need to use two wires and a 12-volt light bulb, which is connected to ground and a brush holder. If the light is on, there are problems with the integrity of the brushes that need to be replaced. Checking the winding is performed using the same light bulb connected to the winding terminal and the device body. Remember that all work is carried out exclusively when connected to the battery.
Bendix check is carried out as follows. By means of a soft gasket, in order to avoid damage, the bendix sprocket is attached in a vice, after which its coupling is carefully turned in both directions. If the ring is in good condition, it should rotate exclusively in one direction. If the clutch rotates freely in both directions, then it is time to replace the component.
Summing up
That, perhaps, is all. The question of how to check a starter is fully disclosed. We hope that the information presented in the article will help you, and you will be able to independently perform all the operations described in it. Good luck on the road.
Most car breakdowns happen at the most inopportune moment, when you need to get to a certain place on time, you need to meet relatives at the bus station and in many other cases. Vehicle breakdown occurs, including due to a malfunction of the starter. It seems that the car should run without any problems, all the mechanisms work perfectly, but it still won't start.
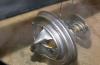
Starter assembly appearance
You can give the car to a car service, entrusting it to strangers, however, there is another solution that should be used if you do not want to waste time and money on servicing the unit in a service center. This is a test of the starter and its performance on our own.
Breakdowns of a device that starts a car engine are classified according to the following pattern:
- Mechanical faults. Failure is the normal wear and tear of device components. The cause of the malfunction may be long-term operation of the starter, as well as neglect of the basic rules of operation. Some mechanical damage is caused by electrical problems.
- Electrical faults. Incorrect power supply can cause such damage. How to check the starter in this case? The answer is obvious and simple: to diagnose turn-to-turn closures, to trace possible burns of the working surfaces and closing plates, which may be caused by the passage of excessive current through the contacts.
The following symptoms of starter failure are most common throughout the life of a vehicle:
- The starter is working properly, but the crankshaft remains motionless;
- The starter does not function (does not turn the car engine when starting);
- The starter turns the car engine, but at the same time there is an insufficient number of revolutions;
- The starter motor continues to operate after the vehicle has been started.

1 - collector; 2 - back cover; 3 - stator housing; 4 - retractor relay; 5 - relay anchor; 6 - cover from the drive side; 7 - lever; 8 - arm bracket; 9 - sealing gasket; 10 - planetary gear; 11 - bendix gear; 12 - cover insert; 13 - limit ring; 14 - drive shaft; 15 - bendix; 16 - driving ring; 17 - drive shaft support with an insert; 18 - gear wheel with internal gearing; 19 - carrier; 20 - central gear; 21 - armature shaft support; 22 - permanent magnet; 23 - anchor; 24 - brush holder; 25 - brush
Where to start repair work
In order to answer the question of how to check a starter on a battery, you do not need to have extensive experience in the field of car repair. You just need to adhere to the basic rules and sequence of work:
- The correct functioning of the starter is checked.
- Relay test.
- Diagnostics of anchors and brushes.
- Diagnostics of a device that provides silent engine start (bendix).
Checking the starter performance is carried out in stages
Checking the starter as a whole
At the initial stage, the device is dismantled and fixed in a vice. Make sure that the device is securely in the vise, but at the same time not too tightly pressed. Next, the contact bolts are closed using a wire cut or any taken metal object. If the starter is functional, it will start moving. This means that the cause of the breakdown is most likely a malfunction of the traction relay.

Checking the starter with a battery
Checking the solenoid relay
Checking the starter retractor relay is as follows: on the one hand, a relay on the starter housing and the positive battery terminal are used, and on the other, the starter housing with a negative terminal. If the reason is not in the relay, then the armature will instantly push the gear outward, making a characteristic click.

Checking the solenoid relay with a battery
Checking anchor and brushes
If the first two steps did not help identify the cause of the malfunction, you should check the starter armature. To do this, you need to apply a voltage of 12 volts directly to the starter, bypassing the retractor relay. In this way, we will not be able to find out exactly what is defective - the armature or brush windings. But when disassembling the starter, you can visually easily diagnose the cause of the breakdown, plus you can resort to using a multimeter.

Checking the armature and brushes with the battery
Checking the bendix
Checking the bendix for performance is also carried out without any problems. A soft pad will be needed to prevent damage to the component. With its help, the bendix is \u200b\u200bplaced in a vice. The clutch of this starter element should only rotate in one direction. If the rotation occurs in both directions, the cause of the breakdown of the device is precisely the malfunction of the coupling, which should be replaced immediately.
A starting device called a starter is one of the principal components of the machine. If the starter stops functioning properly, the problem is reflected in the starting of the engine. In this article, you will learn how to check the starter winding and other components, as well as what to do.
The main symptoms of a starter malfunction
ATTENTION! Found a completely simple way to reduce fuel consumption! Don't believe me? An auto mechanic with 15 years of experience also did not believe until he tried it. And now he saves 35,000 rubles a year on gasoline!
Experts write that the main prerequisites for a breakdown of the starting device are in the AK, the retractor relay and in the winding. The latter is simply melted, which leads to a short circuit.
| How does the problem manifest | Cause of malfunction | Elimination method |
|---|---|---|
| When the starter is turned on, the armature does not rotate, the traction relay does not work | The storage battery is defective or completely discharged | |
| Pole terminals of the storage battery and wire ends are strongly oxidized; loose ends | ||
| Turn-to-turn short circuit in the retraction winding of the traction relay, short circuit to ground or open circuit | Replace the traction relay | |
| Open in the power circuit of the starter traction relay | Check the wires and their connections in the circuit between plugs "50" starter and ignition switch | |
| Contacts "30" and "50" of the ignition switch do not close | Replace the ignition switch connector | |
| Jamming of the traction relay armature | Remove the relay, check the ease of movement of the armature | |
| When the starter is turned on, the armature does not rotate, or rotates too slowly, the traction relay is activated | ||
| The storage battery is defective or discharged | Charge the battery or replace | |
| Pole terminals of the storage battery and wire ends are oxidized; loose ends | Clean the terminals and cable lugs, tighten and lubricate with Vaseline | |
| The fastening of the ends of the wire connecting the power unit to the body or to the terminal "minus" of the battery is loose | Tighten the cable lugs | |
| The contact bolts of the traction relay are oxidized or the nuts securing the wire lugs on the contact bolts are loose | Strip the contact bolts, tighten the wire retaining nuts | |
| Burning of the collector, hanging of brushes or their wear | Clean manifold, replace brushes | |
| Open or short circuit in the stator or armature windings | Replace stator or armature | |
| Closing the brush holder "positive" brush to ground | Repair short or replace manifold side cover | |
| When the starter is turned on, the traction relay is repeatedly activated and deactivated | ||
| Cause of malfunction | Elimination method | |
| Battery discharged | Charge the battery | |
| Large voltage drop in the traction relay power circuit due to strong oxidation of the wire tips | Check the wires and their connections in the circuit from the battery to the plug "50" of the starter | |
| Open or short circuit in the holding winding of the traction relay | Replace the traction relay |
Testing the winding

The principle of testing a winding is no different from conventional checks on electrical components. If a light bulb is selected as a measuring device, then it should be connected in series between the body of the starting device and the winding. In other words, one terminal of the meter is fixed to the case, and the other - to the winding terminal.
The indicator output that is connected to the winding must be sequentially connected first to one, and then to the other terminal of the winding. The indicator should not light up, otherwise it will indicate a breakdown.
You can also check the condition of the starter winding using a multimeter. The device must measure the resistance of the winding - it should be within 10 kOhm. A multimeter is often used to check the winding. You just need to set the device to the megger or dial mode.
As you know, the starting device has two windings - stator and rotary. Above, it was described how to check the winding on the stator. As for testing the rotor winding, it is carried out as follows: the test lamp is connected to a 220 V electrical outlet with one end, and the other output is applied to the collector plate. You also need to consistently attach the output of the test lamp to the core. If the indicator lights up, rewinding is inevitable. Most likely, a complete replacement of the rotor will also be required.
Thus, diagnostics of faults in both windings is carried out using various devices, which, when tested, make it possible to determine short-circuits and breaks. It is important to remove all external defects before checking, cleaning the surfaces with fine sandpaper. You can also use a grinder for stripping, but carefully.

In the process of testing the windings of the starting device, it is also important to check the starter armature, to which you need to supply 12 V current from the battery directly, bypassing the relay. We can assume that everything is in order with the anchor of the device if it starts to twist after such a voltage supply. On the contrary, if the starter does not react in any way to the voltage supply, then there is a problem with the armature or brushes. Disassembling the starting device will help determine the malfunction specifically.
As a rule, the main difficulties with the armature are associated with the breakdown of the winding to the case (can be determined by checking the resistance - with an ohmmeter), unsoldering the collector terminals (it can be seen during an external examination) and interturn closure.
Introducing a video on how to check the starter anchor
The closure of the winding can also be judged by external signs. For example, if you can see burnt out lamellas, shavings and other particles inside the winding, this clearly indicates a short circuit.
The starter is one of the most important elements and components of automotive electrical equipment. If it fails, then not all car owners know how to determine the malfunction of the starter and repair it.
Like any other unit of a car, it is common for a starter to break down at one time or another. In order to avoid extreme consequences and all sorts of complications, you need to learn how to identify problems. We will learn how to determine the breakdown of a starter.
Determination of malfunction by ear
ATTENTION! Found a completely simple way to reduce fuel consumption! Don't believe me? An auto mechanic with 15 years of experience also did not believe until he tried it. And now he saves 35,000 rubles a year on gasoline!
Experienced drivers are used to listening to the car. And this is very good, because the unwanted breakdown of any part can be noticed at the beginning, by identifying the signs by ear. A timely stopped process will not lead to irreparable consequences, but will make it possible to repair the part.
Here are the main characteristic sounds, listening to which, you can determine the malfunction of the starter:
- Sticking sound when the ignition is turned on. In this case, the engine may not start at all, or the engine will start with great difficulty. A problem of this kind indicates several points: a discharged battery, poor fixation of the battery terminals, a broken wiring and internal malfunctions of the starter together with the traction relay;
- The sound of a machine spinning heavily. This is the noise of the starter armature, provided the traction is working normally. As a rule, the reasons for this situation are: wear of the armature sleeves, oxidation of contacts, discharge of the battery, etc .;
- Slip sound from broken clutch rings;
- Rough movement or sticking sound. As a rule, this is due to a jammed starter armature;
- Another noise associated with starter disconnection. As soon as the engine starts, the drive or traction lever sticks. If a problem of this type occurs, you must immediately turn off the ignition by disconnecting the wire connecting the device directly to the relay.

In addition, starter malfunctions can be judged by various unusual noises, which give reason to think about replacing bearings, weakening any mechanisms or breaking.
Fault identification with a tester
The starter motor does not turn the flywheel or does it slowly. Obviously, the torsional force must be sufficient to start the internal combustion engine. If this does not happen, it is recommended to start checking the circuit.
The essence of ideal chain operation boils down to the following:
- All contacts, including the "ground", must be fixed securely and tightly;
- The battery must be well charged;
- The wire from the traction must be intact and have good contact;
- All contacts of the ignition switch must function properly;
- The cable from the battery to the starter must not be damaged and loosely fixed.
Thus, it is worth paying attention to the problems listed above if the "starter-engine" connection is faulty.

Among the purely electrical problems of the starter, it is customary to distinguish the following:
- Failure of traction.
- Armature collector wear.
- Weakening of the brush group.
Obviously, various measuring devices come to the aid of a person if problems arise with electricity. As a rule, experienced motorists always keep a tester in the car, which makes it easy to determine this or that starter malfunction.
If there is no tester, then an ordinary 12-volt bulb will quietly perform its functions.
Below is the algorithm for conducting a test using a 12 volt indicator.
- Connect one end of the light bulb to the starter brush assembly;
- The other end of the homemade tester is on the case.
Diagnostics is carried out: if the light comes on, then the brush assembly needs to be replaced, there are obvious breakdowns.
To test the brushes with an ohmmeter, you need to measure the resistance between the brushes and the base plate. If the value is not equal to infinity, the brushes need to be replaced.
Battery check
The starter can also be checked with the battery. The procedure makes it clear if the starter is functioning correctly. To do this, you need to dismantle the starter, put it on the battery, and then short-circuit the battery terminals with the ends of the starter.
More precisely: the negative terminal of the battery must be connected to the starter housing, and the positive terminal to the upper end of the traction and switch-on contact.
The health of the device can be judged by scrolling the motor and moving the bendix forward. If this does not happen, the problem can be clearly identified.
Separate checks
Separately, you can test various parts of the starter, including the traction relay. The positive terminal of the battery is connected to it, and the negative terminal is connected to its body. If the relay is in order, the bendix should move forward.
If the bendix does not extend, the following problems can be identified:
- Jammed anchor;
- Burnout of the winding;
- Burnout of relay contacts.
You can test the bendix itself separately. The body of the overrunning clutch is clamped in a vice through a soft gasket and then manually scrolled to the left and right.

A serviceable bendix should not turn in both directions, as this will indicate damage to the stopper and malfunction of the overrunning clutch. It is clear that the bendix rotating in both directions will not allow the starter to spin normally, but only when it is idle.
As for checking the winding, this is done with special devices, such as a de-stand. Again, if there is no device, you can use a light bulb, but already at 220 V. The principle of the test is to detect breakdowns. As in the case of brushes, you need to connect the tester with one end to the body, the other to the winding terminal. The breakdown can be judged by the light bulb lit up.
If an ohmmeter is used, then its readings should not exceed or be less than 10 kΩ.
You can check almost all parts of the starter, including the anchor.
Video in this article: how to check the starter yourself
As you can see, there are many ways how to determine the malfunction of the starter on your car. And you can do this with your own hands, without the use of any complex devices and technologies.
A car starter in its size cannot compete with the motor, or, or at least, but not for this miniature device in a modern car, all of the above nodes would be nothing more than a set of useless units. It is the starter that starts, starts the engine, hence the name - starter. Starter malfunctions lead to inevitable difficulties with starting the engine, and sometimes they are not allowed to do this at all. Today in the heading "" I will tell you about the starter, its malfunctions, the causes of occurrence, as well as how to diagnose these very malfunctions.
What is a starter, I have already told in a nutshell, I think this device is familiar to everyone and there is no point in giving a complete "book" definition of this node. Instead, I suggest talking about starter failures.
Starter malfunctions can be roughly divided into several categories:
Mechanical ... This category includes failures caused by critical wear and tear, as well as failures associated with damage caused by shock or other damage caused by mechanical means.
Electrical ... This category includes power outages, power failures, etc.
Starter malfunction symptoms:
- The starter does not turn;
- The starter motor turns, but the crankshaft does not turn;
- The starter clicks, but does not turn;
- The starter turns very weakly and the motor cannot start;
- The starter motor turns after the engine is started.
What to check?
- Check the operation of the starter as a whole;
- Check the solenoid relay;
- Check the anchor and starter brushes;
- Diagnose the starter bendix.
To check starter in general it is necessary to remove it. Then, using, we connect the wires to the starter, as shown in the photo. If, during the check, the starter starts working and starts rotating, then we can conclude that the reason is not in it and that the starter is working. If not, we continue diagnostics.
Checking the solenoid relay
We connect one "positive" terminal to the relay on the starter housing, and the "negative" terminal to the starter body. After you apply current to the terminals, the operating solenoid relay will immediately push the gear outward with a characteristic click.
Checking the anchor and brushes
If the previous tests did not give positive results, you should continue the test, the next in turn are brushes and an anchor. We supply 12 volts directly to the starter, bypassing the retractor relay. Thus, it will be possible to accurately diagnose the malfunction of the armature winding or brushes. You can also check the brushes with a multimeter or a regular 12-volt light bulb. We connect the wires to the brush holder and the mass, if the light is on, the brushes are faulty and must be replaced.
Checking the bendix
Checking the bendix also does not require special skills or tools. We take the bendix and carefully fix it in a vice, and try to turn it, if the starter clutch turns only in one direction - the bendix is \u200b\u200bworking properly. If it rotates in both directions, the clutch is most likely defective.
Situations are possible when the bendix has serious wear, and its teeth are licked or chipped off, in which case the bendix simply cannot engage with the flywheel. There is only one way out - to replace the starter bendix.
Starter clicks but does not turn engine
If during the attempt you hear distinct clicks of the solenoid relay, but the motor does not spin at the same time, or it happens very slowly and with difficulty, then the reason may be as follows:
- The rotor clings to the "plus" of the stator;
- Bushing or motor shaft wedges;
- There is a short circuit in the winding (rotor or stator).
If the starter does not turn at all, make sure that:
- There is no break or short circuit of the holding winding, for this we use a multimeter;
- The starter power wires are intact.
When the first signs of a starter malfunction appear, take action immediately, any delay will eventually turn against you. One "fine" day, when you try to start your car, you simply will not succeed and according to the "law of meanness" it will happen exactly when you really need a car urgently. As soon as you suspect that the starter is "junk" - check its performance and, if necessary, replace it either yourself, or contact the service station for help.
You will also be interested in:
With the onset of autumn cold weather, all motorists begin to turn on the interior heater to ...

In a wide range of power units of the German auto giant VAG (Volkswagen AG), FSI engines, ...
1. Unscrew the filler plug of the rear axle. 2. Substitute under the drain ...

OUR PARTNERS: Website about German cars Lamps used in a car Any ...

The car heater helps to maintain the optimum temperature in the passenger compartment not only ...

