


In this article we will talk about some malfunctions of the starter solenoid relay and ways to eliminate them.
Probably, every motorist is faced with a situation when the car refused to start at the moment when it is necessary to go somewhere. There can be many reasons for trouble. But one of the most common is starter failure.
However, this node itself also consists of several constituent elements. And most often one of them is susceptible to breakdowns - the solenoid relay. Let's try to figure out which ones are encountered, what are their symptoms, and ways of repair exist.
Starter Solenoid Relay Malfunctions
So, if, nevertheless, the shadow of suspicion after checking the ignition lock, the battery, as well as the starter activation relay falls on the starter itself, it is necessary to dismantle it for further "examination". Although it is possible to check the performance of the starter and relay even before removal.
Use a screwdriver to close the two contact bolts located on the back of the unit. In this way, voltage is applied directly to the starter windings, bypassing the retractor relay itself. In the case of rotation of the starter itself, the cause of the breakdown is really in the retractor. With a working relay, after turning the key in the ignition lock, it will click, and the starter will still refuse to turn.
The principle of operation of the retractor relay itself is based on the phenomenon of electromagnetism. When voltage is applied to the winding of the pick-up relay, it attracts the armature. The latter pushes the bendix gear until it engages with the flywheel crown. At the same time, the contacts, through which the voltage is supplied to the windings of the starter motor, are closed. Interestingly, all of the above processes are carried out simultaneously. And the loss of any of them will result in the inoperability of the starter.
It is worth noting the main reasons due to which malfunctions of the starter retractor relay occur:
- Long service life of materials, and as a result of their destruction;
- Burnout of the so-called dimes - contact plates located inside the solenoid relay;
- Failure of the winding of the relay itself or the starter.
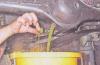
In any case, to correct the malfunction of the starter retractor relay, it is necessary to dismantle it. Of course, you will first need to remove the starter itself from the car engine.
It is worth noting that in the vast majority of cases, the solenoid relay is made non-separable. In this way, manufacturers are trying to increase the degree of its reliability and extend its resource. Therefore, in such cases, the only way out of the situation can be a complete replacement of the retractor relay with a new unit. This procedure is not at all complicated and will take a little time even for a novice motorist.
If the retractor relay installed on the starter still has a collapsible design, then you can try to restore it. To do this, you need to dismantle it from the starter and disassemble it.
Relay breakdowns can be of the following nature:
- Breakage or complete wear of the mechanical drive of the solenoid relay;
- Burning the contact plates (the aforementioned dimes);
- Short circuit in the winding of the assembly.
The first two failures are detected by visual inspection of the disassembled relay. The latter requires connecting a starter to an ohmmeter to check the resistance between the ends of the wire and the body. Its value must be at least 10 kOhm. If the device showed a lower value, you will have to buy a new retractor, since its windings are closed.
Assembling the starter after installing a new relay is carried out in the reverse order. It also does not constitute anything difficult, therefore even a beginner can do it.
Starter Solenoid Relay Malfunctions
Many car enthusiasts have found themselves in situations where attempts to start the car ended only with the sounds of the starter relay under the hood. This is especially common in the frosty season. The battery capacity decreases more quickly and the charge is low. The review will make it clear what other causes of malfunctions of the starter retractor relay are, whether you can fix them yourself.
What it looks like, where it isHow does the starter solenoid relay workSigns and causes of malfunctionHow to checkHow to disassembleDiy repair $ (".index-post.contents"). ToggleClass ("hide-text", localStorage.getItem ("hide-contents") \u003d\u003d\u003d " 1")
What it looks like, where is
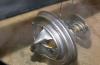
The solenoid relay controls the overrunning clutch. An electromagnet with a starter is mounted in one block. The part is equipped with a gear that must rotate the flywheel of the motor when it is started. If the flywheel continues to rotate further, this will lead to a failure of the starter or the electrical network of the machine. To avoid this, the clutch is extended exclusively when the motor is started (after which the relay returns it back).
Outwardly, it looks like an elongated metal cylinder with an armature coil inside, where current is supplied after the circuit is closed. Compressing the return spring, pushing the lever with the movement of the freewheel, the resulting magnetic field forces the armature to move to the coil. The motor starts, the electrical circuit breaks, the magnetic field disappears, and the return spring pushes back the armature with the clutch.
Did you know? Today the largest vehicle in the world is a German-made Liebherr T 282B dump truck. Its weight is over 220 tons. In order to get into his cockpit, you need to overcome as many as 16 steps. The body of this "monster" can freely fit a private house, and its carrying capacity is 363 tons.
How does the starter retractor relay work?
Turning on the ignition starts the power supply to the winding of the device. As a result, the formation of a magnetic field in the pull-in winding, the retraction of the coil core and the closing of the contacts. At the same time, the core pushes the clutch against the crankshaft flywheel, forcing it to spin.
The pull-in winding forces the core to be drawn in, connecting the power connectors of the relay through the center contacts, transferring energy from the battery to the starter and making it work. The winding holds the core to ensure that power is supplied to the starter.
If there is a lack of battery power, the retraction winding is still triggered, but for the holding force it is no longer enough. The spring acts on the core and pulls it back, and the retracting winding again tries to return it to the coil.
Important! One of the common problems with the starter return relay is considered to be burning of the power contacts. If this problem occurs, you should thoroughly clean the damaged area with sandpaper, and if the contacts are worn out, replace them.
But since the holding one is not able to hold it, the core goes back again. Such attempts to transfer energy from the battery to the winding are characterized by numerous clicks of the core pulling in and out.
Symptoms and causes of malfunction
Malfunctions can be noticed by such factors, having eliminated which, this device will continue to work:
a click ends the turn of the key, but without rotating the starter; the key starts the rotation of the starter, but it remains idle, not acting on the engine; the car starts normally, but the starter, instead of shutting off, continues to rotate quickly and with a bang.
The reasons why the switch may fail are as follows:
violation of the integrity of the device due to marriage, mechanical wear or during an accident; short circuit in the winding turns due to prolonged exposure to voltage when trying to start the motor; violation or burning of contacts due to poor connecting contact or prolonged operation of the starter to start the engine; weakening or breakage of the return spring due to mechanical stress or prolonged voltage supply; breakage of the holding winding caused by physical stress when the relay cover is not tightly fitted; loose fastening of the device, which leads to a bias and the inability of the core to completely enter inside to close the contacts.
Important! The alternator and battery should be tested to ensure that the charge is sufficient to operate the starter. This should be done periodically.
How to check
To evaluate the operation of the device connected to the starter, you first need to check the integrity of the supply wiring. Further, by turning the key, you can check for the presence of an actuation sound.
If there is a click (but the starter does not rotate), the likely cause is burning of the contact plates. To find out if this is the reason, you should give voltage to the car engine, bypassing the relay. The relay terminal is disconnected from the lock, and two terminals are closed with a screwdriver - from the battery and to the starter. The beginning of rotation indicates a malfunction in the retractor.
It is more convenient to check when the starter is disconnected.
Then you need:
place the relay near the battery, connect "plus" and "minus" to the relay contacts, attach the free end of the "minus" wire to the starter housing (a distinct click will show the normal operation of the relay).
The absence of a characteristic sound indicates that the device needs repair or even replacement.
How to disassemble
It should be noted that the starter relays, in which the rear contact covers are factory-sealed, is almost impossible to open. Only those relays where the back cover is fixed with screws are subject to repair. Below is a disassembly of just such a relay.
Find out what to check if the car won't start and the starter is turning.
The necessary tools and equipment are:
drill / screwdriver; soldering iron 100 watts; brush for metal; copper stranded wire; soft wooden block.
Step-by-step instructions will help you to correctly disassemble the starter return relay. For this you need:
Unscrew the fixing screws on the rear cover with a screwdriver. For better heating with a metal brush, remove the oxidation that has appeared from the ends of the windings. With a heated soldering iron, melt the tin at one end of the winding and knock out its remains on a wooden block. Do the same with the other end of the winding. Open the back cover by first bending the end of the wire.
Video: disassembly of the starter retractor relay
DIY repair
By opening the insides of the solenoid relay, you can see the two ends of the retractor wire (thick) and the end of the retention winding wire (thin). At the exit point of the thin winding, the wire must be spot-welded to the body. One of the most common problems is the breakage of the holding winding in this very place. This can happen if the cover was not twisted during assembly, or if it unscrewed itself during operation.
Did you know? The legendary Soviet vehicle "Victory" could have had a completely different name - "Rodina". However, after the question of Generalissimo Joseph Stalin: "Well, how much will we have a Motherland?" the car was immediately decided to rename.
As a result, a barely perceptible slack appears: the lid can move a little. When the moving contacts hit, it jumps up and touches the pull-in wire. And that, acting on the wire of the holding winding, leads to its breaking off. If possible, then it is necessary to properly weld the end of the wire in place by spot welding. If not, strip the wire well and, taking it slightly to the side, solder it. The relay will recover.
Also, for prevention, you should clean the contacts on the body and the inside of the cover with a metal brush or sandpaper. It remains to put the cover back in place and tighten the screws with a screwdriver.
The most difficult part of this repair is the correct installation of the cover in place. Do everything in accordance with the step-by-step instructions (see above). As a result, only clean holes should remain.
Clean a piece of copper stranded wire of insulation and take two veins from there. In the veins, slightly tin the ends and solder them to the ends of the windings. Next, you need to correctly orient the moving contact, which could have shifted during stripping. It should be in such a position that the distance between the hole with the wires and the contact is the same for both sides of the plate. The distance from the screw hole to the contact must also be the same on both sides.
Not a single car can do without such a device as a starter. At the VAZ "seven", the performance of this unit directly depends on the serviceability of the relays that supply power and start the starter. If problems arise with the switching elements, the causes of the malfunctions must be identified and eliminated in a timely manner.
Starter relay VAZ 2107
The engine is started on classic Zhiguli by means of a starter. Trouble-free operation of this unit is ensured by two relays - control and retractor. If there is a problem with these elements, the engine will not be able to start. Therefore, it is worth dwelling in more detail on checking the relay, troubleshooting, repairing and replacing.
Starter relay
On all classic Zhiguli models, except for the Seven, the starter is powered directly from (ZZh). This design has a significant drawback - the contacts are oxidized and burned, which leads to the premature failure of the contact group. This is due to the fact that a current in excess of 15 A flows through the HZ. To reduce the load on the lock contacts, an additional starter relay, designed for a current of 30 A, was installed on the VAZ 2107.This switching element consumes a small current, which does not in any way reduce the reliability of the contact group.
The owners of the earlier "classics", due to the rather frequent replacement of the contacts of the ZZh, independently mount an additional relay.
Where is
Structurally, the starter relay is located in the engine compartment on the right side. Its attachment is made to the mudguard (part of the body) using a stud and nut. It is easy to find the relay, for which it is enough to trace where the wires from the starter retractor relay are routed.
Check
If there are difficulties with starting the engine on a VAZ 2107, you first need to check the operation of the on relay. If the part turns out to be intact, you can continue troubleshooting. To diagnose the switching element, you will need a multimeter or "control" (an ordinary 12 V car light and wires for connecting it). Relay performance is determined as follows:
Video: checking the power supply of the starter switch on the VAZ 2107
Solenoid relay
The starter by its design is a small electric motor, a special clutch (bendix) of which engages with the flywheel of the power unit for a few seconds, driving the crankshaft to rotate. Despite the small size of the starter, currents reaching hundreds of amperes pass through it when the engine is started. If power is supplied to this device directly through the HZ, then no contacts will withstand such loads and will burn out. Therefore, to connect the starter to the power source, a special retractor relay is used, in which contacts designed for high currents are structurally provided. This mechanism is structurally located on the starter housing.
A number of functions are assigned to the considered switching device:
- connection of the starter to the power source;
- engagement and retention of the bendix with the engine flywheel;
- turning off the starter power after the motor starts to work.
Operating principle
The retraction mechanism functions in the following order:
- When the key is turned to the ZZh, an additional relay is triggered.
- Power from the battery is supplied to the traction relay coil.
- Under the influence of a magnetic field, the armature goes inside the winding.
- The starter fork moves and extends the bendix.
- The starter sprocket engages with the flywheel of the power unit.
- A plate attached to the end of the solenoid relay rod connects the contacts.
The described actions start the motor within a few seconds. After activating the starter, the retraction winding stops its work, and the current flows through the holding coil, due to which the armature remains in the end position. The presence of two windings reduces the energy consumption of the battery when starting the engine.
After the motor starts to work, the electric circuit of the starter is opened, the current through the holding coil stops flowing, and the armature returns to its original position due to the spring. At the same time, the clutch and penny are withdrawn from the relay contacts, the bendix moves away from the flywheel and the starter is disconnected from the battery.
Malfunctions
Since the retractor operates every time the power unit is started and is subjected to high loads, it will gradually wear out and fail. Relay malfunctions can be judged by the characteristic signs:
- when the engine starts, the starter continues to run, making a buzzing sound;
- at the moment the engine starts, the relay emits a click, but the starter does not function;
- when the key is turned, the starter turns, but does not engage with the flywheel.
Problems can occur for several reasons:
- violation of the integrity of the relay case;
- problems with the pick-up or holding coil;
- burning of contacts;
- loosening of the spring.
All of these problems are manifested as a result of natural wear and tear, burnout of the windings or destruction of parts of the assembly.
Check
There are two ways to check the relay - without dismantling the starter and on a removed device. Let's consider both options.
By car
We carry out the diagnostics with a multimeter or "control":
- We visually assess the integrity of the relay wiring.
- We check the operation of the relay, for which we turn the key in the ignition lock and listen to the starter: if the click is inaudible, the relay is considered faulty.
- If there is a characteristic sound, but the starter does not turn, the contact nicks in the relay itself may be burnt. To check, we remove the chip that comes from the ZZH and close two threaded contacts together. With this connection, the starter will be powered bypassing the relay. Rotation of the starter will indicate a problem with the switching element.
- We connect the multimeter to the "+" relay, that is, to the contact where the power comes from the battery, and connect the minus to ground. We turn on the ignition and, if the voltage is below 12 V, then most likely the battery charge is not enough to start the engine, but enough to trigger the relay.
Video: diagnostics of the starter without removing it from the car
On the removed starter
Before dismantling the starter, you must complete several steps that will allow you to determine the malfunction:
- we check the condition of the battery and starter terminals, the battery charge and, if necessary, clean the contacts with sandpaper;
- we determine the performance of the starter relay.
If the actions listed above did not give results and the starter still does not work properly, dismantle it from the car. We clean the unit from contamination, clean the contacts, and then check:

Video: checking the starter traction relay
Which relay to choose
Socket relays are collapsible and non-collapsible. The first design is older, but such products are interchangeable with the second option. For VAZ 2107 and other "classics" the device in question is produced by several manufacturers:
- KATEK and KZATE (Samara);
- BATE (Belarus);
- "Kedr" (Chelyabinsk);
- Dynamo AD (Bulgaria);
- Iskra (Belarus).
From the above list, the highest quality products are KATEK and KZATE. The cost of pull-in relays from these manufacturers is about 700–800 rubles.
Repair of the traction relay
Dismantling of the solenoid relay is necessary in two cases - for repair or replacement of the mechanism. It is not difficult to remove it, but first you need to dismantle the starter itself from the car.
Removing the starter and relay
Of the tools for work, you will need the following list:
- flat screwdriver;
- key for 8, 10 and 13.
The procedure is carried out as follows:
- We remove the terminal from the negative battery.
- Unscrew the starter mount to the clutch housing.
- Turn off the starter fastener from the bottom with the head.
- Disconnect the connector from the traction relay output.
- We unscrew the nut securing the wire that connects the contact of the solenoid relay with the battery positive.
- We take out the starter assembly.
- We unscrew the clamp fasteners and bend it so that there is no interference with further dismantling.
- We unscrew the bolts securing the relay to the starter.
- We remove the switching device.
Disassembly
The solenoid relay is disassembled in order to replace or clean the contacts (nickels):
- Using a key or a head for 8, unscrew the fastening of the relay cover to the case.
- We press on the bolts and take them out from the back.
- We dismantle two contacts, for which we unscrew the nuts on the cover.
- Carefully move the relay cover aside, since the wire will prevent complete removal.
- We take out the nickels from the lid.
- Using fine sandpaper, clean the contacts and the central plate from carbon deposits. If the nickels are badly damaged, we replace them with new ones.
- Relay assembly and starter installation are performed in reverse order.
Video: repair of the starter traction relay
Malfunctions of the auxiliary relay and the solenoid relay lead to difficulties or inability to start the starter. It is possible to identify the cause of the problem by its characteristic signs, and repairs can be carried out by every motorist according to step-by-step instructions.
The ability to start the engine by turning the ignition key from the passenger compartment and without great physical effort can be safely attributed to one of the most significant achievements of designers in terms of improving the consumer qualities of a car. However, it sometimes happens that it is not possible to start the car with an electric starter. The reasons for such an unpleasant event are varied, but the list of the most probable among them includes a failure of the retractor relay. A savvy car enthusiast is able to quickly localize and diagnose such a breakdown on his own, then carry out repairs and restore the normal operation of the car without contacting a service and with minimal financial costs. An assistant is required to perform some of the checks.
Purpose and design of the solenoid relay
The starter retractor relay is a two-winding traction electromagnet with a spring return movable core used to activate the overrunning clutch. Often, for reasons of increasing overall reliability, it is structurally made in the form of one of the functional blocks of the starter.
Starting the engine from the starter is due to the rotation of the flywheel in the desired direction, which occurs through the corresponding gear. Therefore, when current is applied to the retraction winding of the relay, the gear of the starter clutch (bendix) is transferred to the operating position and engages with the flywheel ring gear, additionally compressing the return spring. When the clutch reaches the extreme forward position to reduce the current consumption, the retraction winding is disconnected and only the holding winding remains energized. Then the starter motor turns on.

Constant engagement of the bendix and the flywheel is unacceptable and must be broken after starting the engine. For this, when the ignition key is removed from the starting position, the current supply circuit to the holding winding is broken, the clamping force of the coupling in the forward position disappears and the return spring moves the relay rod to its original position.

The need to apply the rather complex procedure presented here is due to the fact that
- contacting it reliably insures the starter from failure (it is not carried away by the running engine and it does not go into generator mode);
- there is no coloring of the gear teeth and the rim.
Relay failure symptoms and their causes
The relay fails due to mechanical wear and seizure, burning of contacts, breaks in current-carrying circuits. A malfunction of this unit is indicated by the following:
- when trying to start the engine, the starter turns without cranking the engine crankshaft;
- an attempt to start the engine is accompanied by a characteristic click without rotating the starter, or the starter does not develop the speed required to start;
- after starting the engine, the starter does not turn off and again functions with a characteristic high-pitched sound.
Reasons for failure of the starter relay:
- rupture of the current transmission circuits to the retraction and holding winding;
- the return spring has weakened;
- burned contacts;
- damaged winding;
- destruction of the hull.
Relay test without dismantling the starter

Checking the functionality of the solenoid relay at the first stage does not require disassembling and dismantling the starter:
- Visually check the absence of breaks in the connecting wires to the relay.
- After moving the ignition key to the “Start” position, a characteristic click should be heard.
- If there is a click and the starter does not start, the lock or its contacts may malfunction.
- To check the health of the lock, remove the relay wire that connects it to the lock. Then, with a screwdriver, this terminal is closed to the battery terminal (the operation is equivalent to bypassing the lock). If the engine starts, the cause of the failure is the relay.
Diagnostics without removing the starter using a multimeter
To do this, a multimeter (tester) sequentially first measure the voltage at the terminals of the battery disconnected from the vehicle's on-board network. It is approximately 12.7 V. If the device reads less than 12 V, it is considered that the battery is very discharged and is not suitable for further checks.
Next, the standard wire connection is restored and the voltage is measured at the battery terminals and relay contacts. Compared to the previous case, it changes by no more than 0.1 V and will be equal at both control points. Move the key to the starting position. The voltage at the relay contacts should not drop below 12 V. Otherwise, the connecting wires are most likely faulty, it is possible that one or more contacts in the current flow circuit have burnt out.
Checking with the starter removed using a multimeter
This check of the solenoid relay allows for very accurate internal diagnostics and determination of the condition of the windings and contacts.
Dismantling the starter, depending on the car brand, is performed in different ways. For the VAZ 2110, this procedure is carried out from the bottom of the pit. Before unscrewing the fasteners, remove the wires (it is better to mark the terminals so as not to confuse during assembly), it may be necessary to remove the crankcase protection. 
To begin with, voltage is supplied from the battery to the case and relay terminals, the triggering is accompanied by a characteristic click and visible movement of the rod.
Further checks are carried out using a multimeter, which is switched to the resistance measurement mode and the 200 Ohm range is selected.
Video: Checking the starter removed from the car
First, the serviceability of the retraction and holding coils is checked. To do this, one of the probes is connected to the ground, the second consecutively touch the contacts. The reading is 2 ohms. A deviation of the instrument readings from the specified value is a sign of an open circuit or short circuit. To check the power contacts, the core is removed from the relay case and the return spring is removed, and then the core is inserted back. The core rod is pressed against the table with a certain force and the resistance between the contacts is replaced. The resistance is approximately 1.5 ohms.
Conclusion
Diagnostics of the failure of the solenoid relay does not apply to complex technical procedures; it can be carried out by a motorist with an average level of knowledge in electrical engineering and having locksmith skills. When working, you only need knowledge of the principles of functioning of this unit. Accurate diagnostics are performed using a multimeter.
The relay does not apply to devices that can be repaired in a garage. Therefore, the faulty relay is replaced with a new one.
Printing
The starter solenoid relay supplies current to the starter motor and also expels the bendix. This means that the moment the starter starts to rotate, its bendix is \u200b\u200bpushed out. In fact, it is not difficult to understand how a starter works. Today we will help you understand how a solenoid relay works, how to check this element and repair it.
Solenoid relay design and operating principle
In the starter, the retractor relay engages the flywheel crown with the bendix. All work is based on the principles of electromagnetism. The core, which is designed as a hollow tube, inside which the armature is located, is wound with a wire. The current in the coil creates an electromagnetic field, as a result of which the armature enters the core. After the current has ceased to be supplied, the armature can move freely.
AT the composition of the starter solenoid relay includes:
- body;
- magnet with windings;
- anchor;
- contacts;
- return spring.
The magnet in the relay is made in the form of a pair of coils - retraction and retention. The retractor coil of the relay is connected to the electric motor and the control terminal, but the holding one is connected to the control pin and contacts the case.
When power is applied to the control pin, magnetic induction occurs in the coil, which results in a magnetic field. As a result, the armature compresses the return spring. At the same moment, the bendix rotates, which connects the starter to the car battery.
At the time when the contacts close, the pull-in winding is powered from the "+" terminal, the generation of current in the coil stops, but the field of the holding coil acts on the armature, so it remains inside. When the vehicle's power unit starts up, a power outage occurs, causing the armature to return to its original position under the action of the return spring. The contacts open, which can cause the bendix to disengage.

Common breakdowns of the solenoid relay
The main reasons for failure of the starter retractor relay are as follows:
- Physical deterioration.
- Burnout of contact plates.
- Destruction of components.
- Burnout of the winding.
How to determine that the solenoid relay is out of order:
- The engine starts, but the starter does not want to shut down, constantly rotating. At this time, you hear a characteristic buzzing sound.
- The starter motor rotates after starting, but cannot start the engine.
- When the key in the ignition switch turns to its original position, a click is heard to turn on the starter, but it does not want to rotate.
How to check the starter retractor relay
As mentioned above, the operation of the solenoid relay, as well as the starter itself, is based on the principle of electromagnetism. When voltage is applied to the windings, the relay acts on the armature. He, in turn, changes the position of the bendix gear so that it meshes with the flywheel crown. At the same time, the contacts close, providing voltage supply to the starter windings. In order for a car's engine to start, all this must happen very quickly. If at least one of the elements is not working properly, you will not be able to start the car.
To check the starter relay, it is not at all necessary to remove this element from the car. Experts advise to close the contact bolts located on the back of the relay using a piece of wire or metal.
This will supply current to the starter windings. If this has caused the starter to rotate, it can be concluded that the starter is operating normally, and the problem lies with the relay itself.
If the retractor clicks the starter does not turn, this indicates that the relay is probably working, and the cause of the breakdown must be looked for directly in the starter.

Repair of the starter retractor relay
If you come to the conclusion that the starter traction relay is out of order, you need to repair it. We want to note right away that in most cases it is much easier to replace this element than to restore its performance.
Many manufacturers make non-separable relays in order to make this assembly the most reliable. In such situations, you just have to change the solenoid relay to a new one. If the starter in your car is equipped with a collapsible relay, you can repair it yourself. Often the relay does not work for the following reasons:
- the mechanical drive is worn out and out of order;
- a short circuit has occurred in the winding;
- "Pyataks" or contacts are burnt.
You can determine each of the above malfunctions after disassembly. True, to determine the integrity of the windings, you will have to use an ohmmeter. When measuring the resistance between the ends of the wire and the body, this indicator should be at least 10 kΩ. Otherwise, the windings were closed, so you will need to go to the store for a new relay.
Installation of a new or restored relay is carried out in the reverse order of dismantling. At this stage, many motorists have a problem, which is how to connect the starter relay. In order to avoid such troubles, we advise you to mark the disconnected terminals in advance. Before installing the relay, do not forget to thoroughly clean the contacts and degrease them.
You will also be interested in:
With the onset of autumn cold weather, all motorists begin to turn on the interior heater to ...

In a wide list of power units of the German auto giant VAG (Volkswagen AG), FSI engines, ...
1. Unscrew the filler plug of the rear axle. 2. Substitute under the drain ...
OUR PARTNERS: Website about German cars Lamps used in a car Any ...

The car heater helps to maintain the optimum temperature in the passenger compartment not only ...

