


In search of the material for the community kak_eto_sdelano. I accidentally stumbled upon a blog in which the author described how he created the car. It was not just some kind of car, but a legend car with an interesting story - Mercedes 300sl "Gullwing". I became interested in the recreation history of the car raritet and plunged into a fascinating story about how from scratch did a copy of the legendary car, and not just a copy, and the car collected from the original spare parts.
Later I managed to meet Sergey, who embodied my dream of life, and learn some details of the creation of the car. He allowed me to take text and photos from his blog and make a post for community readers.
(Total 90 photos + 5 video)

1. In the process of creating a Mercedes 300sl "Gullwing", the suspension from Mercedes W202 and W107 was used. Remembering that the best - the enemy is good, we put adjustable shock absorbers. Special attention should be paid to the gearbox rear bridge, usually it is with him the most big problemsThat is why castomizers like the continuous bridges so much. On Mercedes, this node together with the drives is assembled on the subframe, which greatly simplifies work with him.


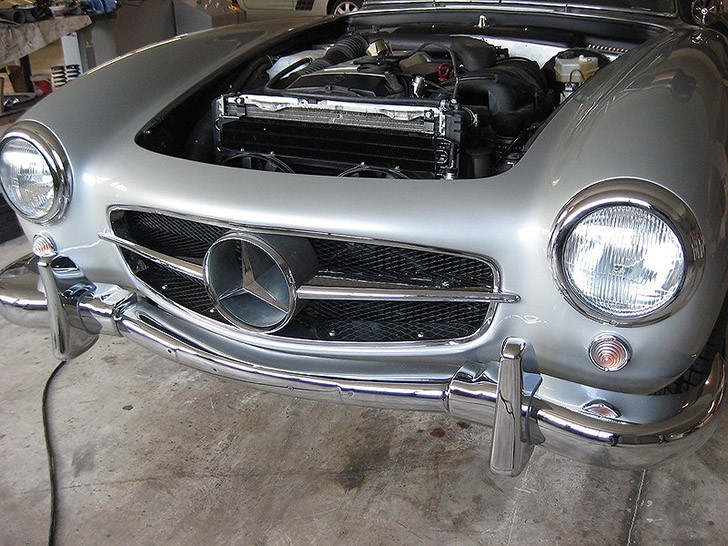
5. Stainless steel exhaust system complies with EURO-3 standard, and fuel tank - This work of art: so that the fuel does not splash, partitions and overflow tubes are installed in it. In one of the photos - locking the steering wheel lock.


10. In the Gullwing project, it was decided to use the next generation of M104 engines with a volume of 3.2 liters and with a capacity of 220 hp. In a pair with automatic 5-speed transmission. The choice of the engine was incredible - it is more powerful, easier and quieter. The gearbox is primitive, with a torque converter, many of these aggregates are familiar to Mercedes W124, W140, W129, W210. A hydraulic was also installed, all the units are new, so there should be no problems.


12. Making body.

13. In the distance 1955, Daimler-Benz released 20 cars with aluminum body and one with composite. We decided to try the composite.


15. After the manufacture of the body and the chassis assembly begins the bumping of the body with the frame. The process is so painstaking and vigorous that no photos and words will not be passed. Assembly and disassembly, fit - all this takes not one day. Many details are being finalized in place, and the body is attached to the frame through special dampers bolts in 30 places.

16. All body parts are installed and customized - doors, hood, trunk lid. A lot of hassle with glasses - they are attached to rubber seals, and since all the original seals are designed for steel, then it is necessary to strictly observe the thickness of the opening frames. Each detail is removed, manually adjusted and only then installed in place.


24. Many details on the most popular rare models still produce small-sector in some workshops than all restorers are actively used. Yes, what is sin there: the plants themselves fake their rarities, especially in this succeeded by Audi and Mercedes.

25. Many museums have candid copies. So, recently, "chorchov" was very much. This is especially interesting, considering that all the factory documentation was lost during the war. Dozens of workshops on the equipment of those years stamps fakes, issuing them for carefully restored products. The devil lies in the details.

26. So we just bought and gathered all the details that could decorate any rarity for 500 thousand euros. I assure you, every wrench and bolt (I'm not talking about gum) have the correct marking of 1955. Original all, even salad seats.

27. Now the body is closed, and this is the highest moment, for the composite is a special material in painting, because there are plasticizers and all sorts of other complex pieces. The secrets of the primer will be guarded, and no one will ever tell you. But it looks beautiful.


Small video from the painting process

31. Well, while the body is painted, we will deal with the preparation of nodes to the assembly. As I said, the Devil lies in the details, and there are more than 2 thousand in the car! DashboardShe was looking for a very long time.

32. Tigs and relays also find, not everything, of course, it turns out right away.

33. But with enviable patience and perseverance, you will have the opportunity to get a fully authentic instrument panel consisting of 80 (!) Details.

34. The main thing is that it is later and earned: the instructors are all expensive. Cheap does not happen well.


36. The body is covered in 6 layers of varnish, it is very beautiful and will not need to be filled under chrome. Yes, Shagrena is necessarily, well, and grain so that it was petty. Now it is no longer paint, everything is diluted with water, they have the ecology, the nature will be guarded. By the way, the paint 744 (silver) is the most difficult for painting, any painter will tell you.


41. Finally got married the chassis with the body.


45. Installed doors. It would seem, the case is simple, but I want to tell you one story. Mercedes 300sl "Gullwing" had many constructive flaws. One of them was actually the doors: they were steel, heavy and mounted loops to the roof of the body, and fixed the spring concluded between the hollow steel tubes with hinges at the end.
In Earth upper position The spring was compressed, and when lowering the door, stretching, the door slammed with the roar. When opening, it was necessary to overcome the springs resistance, which simply pulled the door along with the brackets (900 euros per piece).
The experienced owners "Gullwing" know that with imperative use, it will inevitably lead to the deformation of the roof, besides the brackets themselves simply break. Spring rod assembly with time became a mad deficit and its cost increased to astronomical heights. Each owner of such a rarity repairs these nodes once a season. We decided to go to another way and put gas shock absorbers.

46. \u200b\u200bIt would seem that it was easier, but it was not there. I had to develop a node entirely, it took 4 months of hard work. Fortunately found a workshop that embodied ideas and drawings to life. With the full external authenticity of the door today open as the rear fifth door from the German SUV. The node turned out so successful that he immediately became the subject of the desire of all the owners of the rarities, I think that all the "Gulving" will have very spectacularly and smoothly, the doors open without knocking. Now this process really has become similar to the wing of the seagull - graceful and smoothly.
This is only one, and the simplest, example of those tasks that I had to decide when building this car.

47. By the way, the mechanism of the door lock is also subject to change. Despite the cost of 1500 euros, he very often drove and did not record the door, but this is another story.


49. At the very beginning of the project, it seemed that the interior decoration was the smallest problem, good at every step workshops on the stirring salons, so what, and with the skin now any master will cope. Business things - shelter a bunch of skin details, but, as it turned out, this is a huge problem! After four attempts to create details of the interior in the tuning atelier, I understood: everything is much more difficult.
Created products, well, did not want to look at the original. Everything looked cheap fake: the skin was sharpened, traces of heat treatment were visible, the texture did not coincide, and no one could choose the material. In short, he began to delve into subtleties and found out that modern masters did not know how to work with felt, wool and other materials used at the time. They stupidly warmed and stretched the skin, the foam rubber was used everywhere, where they could, actively worked as an iron, in short, they mercilessly destroyed materials, damping their naturalness and nobility. I'm talking about durability and not saying.
Walking for half a year, we came to the conclusion that only restorers are capable of such work. They have a special foam rubber, and felt. In general, found a company, guys - wolves, uncle years near 60, which for 40 years have been restored only Mercedes. What they have shown and told us is just a novel about the skin, and they protect their secrets about the same way as the secret of making paper for the dollar.
On the video approximate course of the process.

50. Details of the interior on my kid did 4 months. The skin is just like a living.

51. I will also add that the skin that manufacturers are offered today are a chemical bull with impregnation. No wonder all owners of Mercedes and BMW after the year of exploitation are awesome - the salons look like an antique Redvan: not fresh, the skin is drawn up, seals. As I said earlier - the devil lies in the details.

52. I'm not talking about vinyls, widely used by the Japanese, and all manufacturers in principle. Now in the Mercedes of the skin and the jacket is not enough, one fuflo, therefore, the options - "estate", "individual", "exclusive" appear. Leading manufacturers at least for 10-15 thousand dollars you will be given real skin, and the fact that you sew for 50 thousand rubles, even the skin does not turn the language to call.


54. Wheels - one of the important parts of the car. So for our handsome there were two types of wheels. The first were put on the civil version.

55. The latter was offered as an option. They came from sports - real, with a central nut. Of course, it is beautifully chromed wheels, but the price of 5 thousand euros per wheel is somewhat annoying.

56. How then will die with a hammer on the nut, knowing that she is golden? Original disc For the classics, too, no cheap - 3 thousand euros. So I think it hurts 8 thousand euros to save.

57. One of the main factors of the engine work is the removal of exhaust gases (combustion products). I do not want to remember the laws of thermodynamics here, I will only say that the last 150 years exhaust pipe is a symbol of progress. Remember the locomotive pipes, steamboats, domain. I remember my love for details, I want to assure you that it was the pipe that the closest attention was paid. This is a masterpiece of engineering thought.
The graduation system is made of stainless steel, no manufacturer can afford, and is a complex system of thick-walled and thin-walled pipes mounted one to another, this allowed the external appearance of the pipe to solve the "Gulving" problem - noise and heating of the cabin. . Well, the main thing is the sound of the exhaust, it's just a song. The problem was solved using the resonators installed inside the system.
Want to understand what you have a car - look at exhaust pipe!
At the date on the photo, do not pay attention, just bought a decent fotik. I've been departed, only with the instructions did not understand, it turned out not the date. Well, hell with him, everyone interested - enjoy.

58. Made a lot of changes in the design, we try to do everything as authentic as possible. Very tricky handbrake.

59. With a tank, a separate song, my stainless steel, slightly changing the location of the neck, but this is a separate story.


63. There is a good saying - it is better to see once than a hundred times to read about it. All who read and watch my blog know my favorite expression - the devil lies in the details. It is these details that I'll show you today. It makes no sense to write for a long time, you will understand everything yourself.
64. The harnesses and wiring in the braid, well, that, I think you just have not seen, the two-tone claxon, in short, just look, all this is called technology.


67. The main task facing the implementation of this project was to create a complete authenticity of all parts of the interior. It would seem that it could be easier than to copy the existing sample, but, as they say, everything is not so simple, and much more difficult than restoration.
So, we needed to make all the analog devices and work correctly with electronic blocks modern aggregates; Till a close car a bunch additional equipment, such as air conditioning, hydraulicer, brake amplifier. All this should work from full-time togglers and switches. The stove valves used to have mechanical drives, as on the "Volga" GAZ-21, therefore had to thoroughly remake the stove. But the largest problem was the manufacture of gear gear selector.

68. All complexity was that the car was initially built for sports, was small and very low, even the engine had to be placed under the tilt of 30 degrees to the silhouette of the machine not violate. The box was located in the tunnel and had a direct hinge drive.

69. There was no more than 2 cm of free space between the box and the box itself. I have already said that the car itself was cramped and very noisy, it was necessary to solve this problem. Since the standard pair of the engine was taken - the box, then the task became even more difficult because automatic box Much more in size and has a completely different management principle.


71. After long torment, a hinge and a load system was designed, which allowed to completely simulate this node, which is easy to make sure, looking at the original.

72. Well, the most interesting thing: if you carefully read the photos, you will see that the seats are much lower than the original, it is also a trick. The fact is that the car was so close that a person with an increase of 180 cm rested his head into the roof and was forced to sit hunted at the helm, I love to ride on straight hands, because I had to change the angle of inclination of the steering column to ensure comfort and not break general form. How it was achieved - this is a whole novel, starting with the manufacture of unique salazzo and ending the alteration of the floor and seats.

73. I am not the first one who decided to recreate the legendary car. Even at the end of the 70s, such attempts were made in America, Tony Ostermaer, the former mechanic engineer from Gardena, was advanced. He managed to build about 15 cars in 10 years with the use of aggregates from Mercedes for those years. Today, these cars themselves are raritets.
I saw them, of course, this is far from such high-quality products as I would like, but this is the best thing that was done. In the 90s there were attempts to the American company "Speedster" using the Tony matrix, implancing it on the Chevrolet Corvette C03 nodes. There were only two cars. One of them is now in Ukraine, and the other in Moscow. Machines were sold 150 thousand dollars.

74. Actually, this is all. True, there were attempts to wear a shell on SL and many more loud statements, but all this pshik, people fled ahead of the steam locomotive, as with our e-mobile: there is nothing yet, but there are already 40 thousand applications.
By the way, work with the composite is very complex. Only his high-quality painting costs about 10 thousand euros. Well, the most important thing: fake and copy - these are two big differences.

75. They say that in the car everything should be fine - both the engine, and the trunk. On the first car, gas shock absorbers decided to open and fix the trunk lid.

76. We have a little converted a fuel neck, reasonably counting that if it is hermetically sealed to the lid of the trunk, it will reduce the risk of spreading the smell of gasoline inside the cabin in the case of its strait.
I did not like the idea. This car was closer to the original, changing only the shape of the filler neck (steel funnel around the lid should prevent the fuel strait on the carpet).

77. Of course, without a collective farm, it was not necessary: \u200b\u200bthe leather gondon was built around the bay neck. It seems that it looks beautiful, and abandoned the shock absorbers, putting the native mechanism (stick) of fixing the trunk lid. It could, of course, could be freezed with springs, as on modern machinesbut it seems to me that it will kill the spirit of the car. It looks very nice the trunk in the open state.

90. Walk around the car.
One can only add: before you start something to do, think carefully, whether you have enough strength to bring the started to the end.
After arriving in Russia.
Video from the inside of the recreated car.
In this video, you can see how the Germans restore the hero of the report, the very "gullving".
If you think that homemade is the lot of kids and bored housewives, we will quickly dispel your errors. This section is completely all devoted to the manufacture of homemade from automotive spare parts and rubber tires. You can make almost everything from the auto stroke. From garde shoes to a full-fledged playground with swings, fabulous characters and elements for recreation. Finally, and eternally busy dads will appear the opportunity to show their creative talents and create something useful and beautiful on its own landed area or a rival yard.
The automotive tires should be involved in disrepair, especially considering the domestic quality of roads and sharp temperature differences. Instead of sending the old auto stroke into a landfill, it can be slightly transformed and give a new life on the playground, in the garden or garden.
We collected great amount examples how to make automobile selfiems Using tires in various household and aesthetic purposes. Perhaps, one of the most popular ways to apply the arrangement of its auto stroke is the arrangement of playgrounds. The easiest option is to wear up to half a row of tires and decorate their upper part in bright colors. The architectural element created in this way will be used by the kids as a device for walking and running with obstacles, as well as instead of "furniture", because on the surface of the tire you can decompose the sand products or even sit yourself, resting a quiet summer evening.
It is possible to diversify the exterior of the platform to the exterior, creating fairy-tale dragons, funny bears, who will meet your guests at the entrance to the courtyard in the garden of crocodiles and other animals. Family lovers car tire It can replace a full-fledged vase, and the plants planted in her will give the courtyard well-kept species.
You can please the children by creating comfortable swings from the most surviving tires. You can leave the tire shape in the original form, and, having spent a little more time and effort, create an unusual swing in the form of horses.
Whatever you choose, to create automotive crafts, your children in any case will be delighted with the appearance of homemade for cars in the yard. Inventive children will be able to play new games, and will definitely be proud of their folder, praising your creation to friends. And the mixture of happiness and pride for you in the eyes of the child is perhaps the only thing for which you can step on the throat of the long-awaited weekend in the company of the sofa, television and beer.
Did you love the heading "crazy handles" in the television program "While all at home"? It's so cool - make a useful device from nothing. Maybe you know how to weave the rope from old plastic bottles or virtuoso wasting baskets for linen from newspaper tubes? What about the vitals, pipes found in the landfill, and set a young chemist to build ... a car? Yes, not just a layout, and so he traveled? In our country, such a hobby existed quite recently. Moreover, in some kind The moment it acquired almost industrial scales. At the same time, none of the manual models created and nearly did not resemble or domestic nor foreign cars. "Around the world" recalls the Soviet Kulibins and their iron "pets".
And seams and rebels
In the spontaneous folk movement "DIY" there were several of the most famous names. First of all, these twin brothers Alexander and Vladimir Shcherbinin. I must say, they did not really resemble the obsessed technique of people: they worked as artists-charts and spent their free time in a bohemian environment, sitting in the Hermitage garden and discussing painting with comrades. However, it did not bother them not only to get involved in the automotive design, but also to understand the nodes and aggregates. In the late 1960s, the brothers set out the goal of building a sports car on the basis of Volga.
Shcherbininskaya gtsh
The frame for the first sample was welded right in the yard, then raised the car on the seventh floor, where the body was adhesive from fiberglass. Then the design on the ropes descended back across the balcony, and there, in the open sky, continued to work on the suspension, engine, interior. The car received a double body of type "Grand Tourism", hence the difficult-acting name of the model - GTSHCH (the last letter meant the name of the designers - Shcherbinins).
Soon, the brothers designed another model - the coupe, which was given by the shocking name "Satan" (collected later in the image and likeness of this car by other enthusiastic brothers algebraic model received the name "YUAN"). Scherbinini had matrices for manufacture body details, as well as all technical documentation, therefore, anyone can take advantage of the developments. And a few people did it. Therefore, all such cars in the Soviet Union had at least a dozen. Some of them are preserved to this day and sometimes flashed at rarity exhibitions.
I would go to the designers
The flourishing of automotive "self-configuration" fell on the post-war years. There were mugs of auto and motorists in the country, where not only disassembled the repair of nodes, but also learned to descriptive. On successful models they were told on the pages of newspapers and magazines, such as "technique - youth." Largely due to this edition in the traffic police in 1957 were developed technical requirements For homemade cars and regulations for their registration, which allowed such cars to travel to common roads. The last revision of such requirements was published in 1987.
As a time, Satan has traveled to Satan for a long time without state registration signs. There were several reasons for this, one of them was that the movement of "self-delicacies" in the 1970s was so popular that this car was all learned. Specifications Machines did not fit into permitted traffic rules, but for Shcherbinini made an exception, since they were artists and illustrated the new editors of the rules road THE USSR. In exchange, they were allowed to put their cars for accounting.
Dreams Come True
One of the most famous Soviet automobile homemakes was called "Yuna". Her designer, Yuri Ivanovich Algebraists, dreamed of becoming a pilot, but did not go to flight school on health and became a first-class driver. From youth, the future designer revenge the father's "victory", which got a family bat and unsembly, and over time he knew every detail, every car screw. Having learned about the homemakers of Schcherbinin brothers, Yuri, along with her brother, too, caught fire the idea of \u200b\u200bgathering own car. Algebraists joined Shcherbinin to work on Satan, and after the basis of this experience was collected by "Yuna".

"YUNA" brothers algebraic
From ideas to implementation when ready car The rooms began to ride on the roads, six years have passed - from the 1970s to 1976. The first car series got a brother, and then Yuri began to collect a car for myself. He completed him in 1982, three days before the mileage homemade machines Moscow - Baku. Directly from the garage, the second "Yuna" went on testing and in the first trip "made" 14 thousand kilometers.
The algebraist machine was starred in the movie "Testers", which went to the movie screen in the second half of the 1980s. Later, the spectators learned "YUU" on the streets and applauded. By the way, the very name of the model is an abbreviation from Yuri and Natalia Algebraist. In numerous interviews, the designer mentioned that the manufacture of a car and all subsequent modifications were possible only thanks to his wife Natasha, who supported him on this field.
Yourself show on others
The state not only did not interfere with independent designers, but also helped them. As we said, cars made by their own hands could be registered in the traffic police. In addition, there were regular and runs, where you could show yourself, and their car. Whenever it was an all-union scale event. In his memoirs, the designer Yuri Algebraists told: "... the arms of homemade cars of that time were simply amazing. There were pioneers with flowers between the villages on the road, the traffic policemen were from beginning to end, changing at the boundaries of the regions. And it was necessary to see the faces and eyes of the people who met us, those who were shown on TV ... "

Another Soviet self-made car - Pangolina - and its constructor Alexander Kulagin
About automotive homemade Removed telecasts. Especially often, this topic was pedalsted in the computer program - "This is you can": both "Yuna", and Pangolina, and the Amphibian "Triton", and many other unique models are somehow mentioned in the issues. They wrote about "piece" cars and authoritative magazines, such as "driving", "model director" or "technique - youth". Self-timer names knew any Soviet boys. Moreover, in the late 1980s, the book "I am building a car", written by Vasily Zakharchenko and Ilya Toguensky. Also appeared special sections like the Moscow section of amateur autoconstruation, which was attended to four hundred people in some points.
* * *
The names of the Soviet self-lodges were the most different: in different years, the "Gnome" and "Ant", "work" and "star", "Cheetah" and "Proton" were drunk in our streets. Of course, a good car designed by her own hands was a wand-grinding and an excellent substitute for an inaccessible serial car. And yet it should not be forgotten that most of the homemade were built on nodes and aggregates all the same "Zaporozhtsev", "Zhiguli" and "Muscovites", and sometimes "Volg". It turns out, it was not only in short supply, but in the desire to stand out, realize their design ideas and sit behind the wheel of something unusual, not like everyone else.
Unfortunately, in the 1990s, the "SamAvto" movement gradually went to no. Car for many stopped being unattainable dreamThe possibility of choice, and for the most inventions, most of the hands did not reach, and there was no time. In addition, fashion for "homemade" passed, giving way to the prestige and comfort of foreign cars.
Photo: ru.autopedia.wikia.com (x3)
The uniqueness of paper crafts is that for their implementation, any family of secure materials are needed. Ownership of such art little child. To attract a boy to the needlework by creating a toy paper, it is only interested in this occupation. Offer a small man options, how to make and print a car, car, truck and kamaz from paper using a gluing pattern.
The uniqueness of paper crafts is that it is necessary to perform any family safe materials available for their implementation.
How to fold or assemble a police car from paper with the help of origami: a simple scheme and drawings
The cracker can be done both for the game and the original gift to a good friend - an adult person. Because men in the soul are always boys, as a gift, the origami machine from the cash banknote is suitable.
It will take:
- Rectangular sheets of colored paper;
- scissors, glue.
How to make a toy car:
- The selected color sheet of the paper roll horizontally. This is the central inflection of the future product.
- Parallel bend lines bend two halves of the leaf on the left and right side inside.
- Bends back to overload inside. Then the ends of the sheet will appease in the direction from the inside.
- The bent bends of the inner corners form the body of an improvised paper machine.
- Under the wheels make bends inside with triangles. To achieve maximum similarity with the wheel, angular vertices bend inside.
- For headlights, the right corners of the machine are also internally bend. On the left side of the inflection, we do the same, but smaller in size and out.
For more colorful making machine on the headlights stick paper triangles of another color.
How to make a car from paper in 3 minutes (video)
Gallery: Machine of paper (25 photos)


How to make a car that rides from paper
From paper you can make a moving machine for the race. To start moving, put such a craft on a smooth surface and blow on it. Under the action of air flow, the figure starts a slip on the coating, imitating the movement of the present racing car.
Need:
- White paper sheet with third-party ratio 1: 7 or 4.

From paper you can make a moving machine for racing
How to do:
- Fold paper sheet in half along.
- Note the inflection line, bending the right upper and left lower corner of the paper.
- Form the top of the top of the sheet with internal triangles in the center.
- In the central direction, once again make the bending of existing triangles.
- Bending the sides inside to the central line, we form the side sides of the car.
- Fold the lower part of the sheet with triangles above the riding crafts, then proceed to the figure in half. In pockets to fix the corners.
- Now the model of the machine can be decorated at will.
Helping and directing the work of the child, you can fold a whole racing fleet.
How to make a paper truck
Figure cargo car It looks more effectively in bulk format.
It will take:
- Dense paper;
- Glue, scissors;
- Sucks wooden;
- Scotch bilateral;
- Plastic bottle;
- Circul, pin.

The figure of the cargo machine more effectively looks in bulk format.
How to do:
- Cut separately four squares for the cabin, three equal rectangles and two squares for the body.
- Fold from the cut figures two boxes, connect their fasteners using a tape inside. You can pre-cut out of two squares of the cabin glasses, consolidating from the inside scotch pieces of plastic. The same makes the best craft, imitating windshield. Glue parts of the cabin and body together.
- On the black color of the Circular designate the same size eight small circles with central point. For stability, the future wheels glue two circles. At the center point to make a small hole pin.
- Wheels to attach through the symmetric opposite holes on the sides of the figure, putting on the vessels through the hole.
- Flower figure coloring at the request of paints.
The stability of the model will provide the strength of the wheels - the more circles glued at the base of the wheel, the better the cauldron.
How to make a military car
It will take:
- Tight paper sheet of dark green color;
- Sucks;
- Scissors, Circular;
- Pencil, line, glue;
- Black paints, brush;
- Pipes paper or cocktail plastic.

finished product you can additionally decorate
How to do:
- Draw four squares for the cockpit. On another sheet, draw three rectangles and two squares for the body. Separately take a sheet, folded along the three parts, glue the triangle - it will be a mount for missiles.
- Draw on the details of the cabin glasses, on the front square windshield. Glue squares from the wrong side of the scotch or paper strips.
- Similarly, connect the car body details. At the top of gluing a paper triangle.
- Connect the finished cabin and body into a single machine model.
- From black paper make the same eight circles with a central point. In the designation to do the needle a hole for spedes.
- Do the holes at the bottom of the cab and the body with a sparecrows, ride the wheels on them. So that the design did not fall apart, the ends of the speakers wet in the glue, dry.
- Cut the cocktail tube on equal parts, about 3 cm. Break up all segments in black. Give well to dry.
- Gently glue to put homemade rockets on the body fastening.
For decoration military car From paper you can draw the finished product of dark spots on the sides (or strips of hood) with watercolor paints.
Paper racing
The figure of this racing car Invented for the smallest.
Need:
- Roll from toilet paper;
- Paints, brush;
- Cardboard, circulation, scissors;
- Toothpick 2 pcs.

The figure of this racing car is invented for the smallest
How to do:
- Paper roll Clear toilet paper residue, paint in the desired watercolor paint. By drying, draw racing designations with ballpoint handles.
- Circle denotes four equal circles for wheels, cut, paint black paint.
- At the base of the roll, go through the pin hole for the axis - toothpicks.
- Strip the roll on the toothpicks, fix on both sides of each wheel.
- In the upper part cut the semicircle, bending the outdoor part as the windshield.
- Inside, you can plant a little man carved out of paper, attaching it to the scotch.
So that the wheels of the car spinned, drip on the ends of the toothpick of the glue. The dried glue will prevent the removal of paper wheels when driving.
Paper car scan diagram: how to make
Machine sweep circuit can be downloaded from the Internet. The presented models make it possible to make any type of technology from special to Soviet times.
For the manufacture of a figure according to the scheme, it is necessary:
- Selected car model scheme;
- Scissors, cardboard;
- Glue.
How to do:
- For the sustainability of the future figure, the picture of the circuit is placed on the cardboard. After drying, trim.
- Folded on the lines details of the layout. To glue them, thoroughly lean the place of adhesive.
How to make a paper machine (video)
The assembly of the origami machine or its schematic construction will first seem a bit complex processes. However, a fascinating and informative occupation will give the delight of the future designer. Handmade develops a kid thinking, helping to improve the motility of the handles. And the machine made will become the most beloved of all toys.
(No ratings no)
Do you have a car that you independently constructed and collected? Then to be able to register it. However, not all homemade cars can be registered, but only those whose maximum mass is no more than 3,500 kilograms. Besides passenger cars, You can arrange motorcycles, trailers and semi-trailers.
Procedure
You need to start with the requirements for the design of the car. They are put forward testing laboratory. She also issues a conclusion about the design of the design of your car. There are certain parameters that must be observed. Therefore, we recommend that you first agree on the design of the car by contacting the Motransport Research Institute. In the same Research Institute, your vehicle will be tested, after which you will be given the test protocol.
You are obliged to present a document that confirms the legality of its acquisition. If you collected TC from the components old car - It is necessary to in advance and get a certificate about it. If you bought previous car From the hands - attach to documents notarially. All this you will need to present in the traffic police.
After receiving the test protocol, you need to go to the Institute for Road Safety. This authority will give you a conclusion that your car is safe for riding in the city and its design meets the established standards. To obtain such a document, you must provide the test protocol. Certification must be carried out within a month after the time you have submitted a corresponding statement to government agencies.

After the work done, you can go to MREO. There you will be given a resolution that your auto has no identification number. Then it will be necessary to go with this paper to the Bureau of Forensic Examination, where the direction in the traffic police for the car will prepare for you. There you will have to present the following documents:
- passport of a citizen of the Russian Federation;
- conclusion of the Institute for Road Safety;
- conclusion of a forensic expert from MREO.
In the traffic police, the machine will assign an identifier and will prepare a conclusion about the application of the room. After the room is naked, you must go to the MREO on your homemade car, taking all the documents received during the procedure. Then your vehicle will finally register.
Note that for each document you will have to pay state duties. After car registration, you will receive a technical passport. In it, the "Mark" column will be indicated - "homemade". In the "special marks" can indicate on the basis of which model your car was made.
Video review of self-made cars of the USSR:
About trailers
If you plan to put a trailer or semi-trailer - the conditions of the procedure change slightly. You will need to present a check about buying in the traffic police. In addition, you will need to provide a technical passport of that machine to which the trailer will be used.
A bit of history
The manufacture of homemade cars has become popular not just like that. This was preceded by certain historical conditions. The fact is that during the union, cars were not produced that would satisfy the requirements of a specific group of consumers - were produced only mass models. In this regard, our craftsmen created cars with their own hands, from remedies.
Then, of three old non-working cars were collected one new. In the villages, enthusiasts turned the passenger body into freight. They independently lengthened the body and increased the carrying capacity of the machines, because at that time the trucks were not provided for personal use. The craftsmen even created amphibians that were able to overcome water obstacles. And everything in order to simplify life.
There were also aistet that were worried not only technical and performance features cars but also appearance. They created a wide variety of vehicles. All these masterpieces were put off at the exhibitions and quite legitimately traveled through urban roads.

IN soviet period Homemade machines were not prohibited. The limitations appeared in the eighties. They concerned power (50 l. Per ton) and dimensions (4.7 m - length; 1.8 m - width). But then the car enthusiasts used some tricks. For example, they were registered in Rostechnadzor under the type of tractors. Due to the soft requirements, which were presented to homemade, at that time was registered a large number of TC manual assembly.
Ban on homemade cars
In 2005, the registration of homemade cars was generally banned. It was argued by the need to develop clear requirements and standards for such vehicles. However, the true reason for this was most likely concluded in the emergence of a new phenomenon at the automotive markets - sales of "designers". The scheme was simple: to care from taxes, the craftsmen imported into the Russian Federation, and then collected them and recorded as self-made.
But in practice, this ban touched and those who really made their own hands domestic cars. However, motorists did not lose their enthusiasm due to this. This is evidenced by the holding of annual exhibitions "Autoexotics", on which homemade masterpieces were presented. Unfortunately, these cars did not have numbers, were brought on evacuators and could not be used to ride through urban roads. The most offensive thing is that many homemakes could give odds to some serial machines. Later, the authorities were still signed by the order, in accordance with which it is allowed to execute vehicles manufactured independently.

Norms certification
To, first need to be certified. Requirements defining the procedure approved in the relevant order of Rostechregulation. Now cars are evaluated by a simplified scheme - as the TC, which is made by the "small series". Under the small series it is understood as a single instance of the machine.
This small trick of the state with which it could get rid of the import of so-called designers. The number of machines in the small batch is thoroughly checked. It is clear that the author of the self-made car, that he collected for himself, will not be made more than one Tc of the same type. Thus, to the one who is engaged in an industrial assembly, it is already unprofitable to work according to such a scheme. Repeated certification procedure is impossible.
European requirements
Requirements that are presented to homemade vehicles, not lower than the norms established. There are no "concerns", in addition, such vehicles must comply with the standards of the European Economic Commission. True, the certification of small parties is carried out on the trimming list of requirements. However, all the same is a sufficiently serious procedure that not all self-teles.
The video shows a homemade Ukrainian sports car:
In accordance with the document approved by the European Commission, cars are checked for compliance with the following requirements:
- traumatic security;
- brake characteristics;
- and their attachments;
- the quality of stalk and, as well as the correctness of their installation;
- , light alarm;
- good car handling;
- high resistance car;
- low level of harmful substances in the cabin;
- low level of harmful substances in the exhaust pipe.
All these requirements concern passenger carsMade independently.
Good news
By sending your car to certification, you may not worry that it will be damaged during testing. In accordance with the norms, single vehicles are exposed only to those tests that will not cause damage. Instead of tests that harm the car, an expert assessment of the design is allowed.
After carrying out all the necessary examinations, the owner of the vehicle (in case it meets the established standards) receives type approval. This document allows him to go to the place of registration. When registering a car, all data is entered into the registry.
Video review Spacer self-made car:
Restrictions
Registration is not subject to homemade cars made on the basis of components that were imported into Russian Federation more than six months. They should be provided with appropriate documents confirming the legality of their appearance in the country. All of them must be certified. If you make any changes to the design of the registered car, including its design component parts, spare parts and additional equipment - you will have to re-pass the procedure for certification and declaration of conformity.
If you have not passed certification
If your homemade vehicle does not meet the security requirements, you can get a refusal to register from the certification authorities. You have the right to appeal such a decision through the court. However, it will be much more efficient if you try your TC in accordance with the reasons of failure. After you change, you can apply to re-equipments again.
If you are converting a car, in accordance with the issued conclusion, and apply those aggregates that, for example, used your comrade, who received permission, then it will go much faster. Of course, if he surrendered a similar model for certification. However, do not forget that you can get permission individually for each car. Conduct the serial production of self-made machines will be more costly.
Video review of self-made Ferrari:
Having received a refusal, you can re-equip the vehicle on or in the repair shop. Of course, you can perform these works on your own, but you will still need to get an act on their conduct on a certified station. After re-equipment, the electric vehicle will need to be certified again for compliance with the requirements and conditions defined by the expert organization. Such organizations include testing laboratories that have a valid accreditation certificate in this area. If you are given permission now - go to MREO and register your car.
Machine lovers should understand that in most cases collect the car is much easier than to register it. Therefore, before issuing a self-made vehicle, think about whether you have patience and cash. When the procedure for certification and registration it is necessary to pay state fees.
But if you do not scare all this - dare! Now that you know how to register homemade carYou can start collecting your masterpiece. By the way, it is quite possible that you can, because today some models of homemade cars are very popular among lovers of elite cars.
Please leave your comment on the article! We are interested in your opinion.
You will also be interested:

Chinese car manufacturers are increasingly introduced into bewilderment world famous ...

Any driver who violates parking rules, risks daily not to detect his car on ...

In major cities with a lively movement, minor body damage due to ...

Almost every resident of the city at least once saw on his streets passing a tram or ...
If you decide to make a car with your own hands, you will need some basic knowledge, ...

