


It is not uncommon to remove the nozzles on the VAZ 2109 injection car. You can contact a car service, where they will do everything for your money, or do the work yourself, gaining invaluable experience and saving an impressive part of your own budget. The choice is yours.
Location
You cannot start a conversation about the instructions for removing the injectors without first talking about the location of the desired object.
The nozzles of VAZ 2109 cars are located on the fuel rail. There are 4 of them in total. This is due to the fact that each injector atomizes fuel to one individual cylinder. Since the nine has four cylinders, we conclude that the number of injectors is logical.
When replacement is required
There are several signs that indicate the need to at least remove and check the condition of the fuel nozzles. Further, a decision is already made to clean or replace the elements.
Pay attention to the behavior of your car and specifically the engine. They will tell you if something is wrong with the injectors. This can manifest itself as follows:
- The engine produces less power, the same acceleration efficiency is not felt;
- With poor engine performance, lack of power, fuel consumption still increases;
- Poor starting is not an uncommon sign of injector failure;
- If the engine does not hold well idle speed, sprayers may well be the reason;
- The amount of toxic components in the exhaust gases increases;
- The idle speed increases.
Do not rush to immediately purchase new injectors, since cleaning old ones often restores their performance, restores their previous stable functionality.
Removal and replacement
Now let's talk specifically about how to properly remove and replace old nozzles, which have lost their usefulness, with new units.
The dismantling process for each of the 4 nozzles is identical, so there will be no difference in the process.
Perhaps the most problematic step in replacing or cleaning injectors is removing the fuel rail. Therefore, we will separately tell you how this knot is removed.

The fuel rail is the rail on which the injectors are mounted. It is fixed with a pair of bolts on the intake pipe. To the left of the ramp is the fuel pressure control fitting. To remove it, you need:
- Disconnect the negative terminal from battery... Nobody needs short circuits;
- Relieve pressure in fuel line;
- Take off air filter and disconnect the hose of the inlet pipe, then dismantle the vacuum hose of the pressure regulator;
- Disconnect the supply block of wires from the idle speed sensor. To do this, simply squeeze the pad lock, made of plastic;
- Disconnect the block with the wires coming from the injectors;
- Disconnect the drain and supply hoses from the fuel pipes;
- Unscrew a pair of mounting bolts on which the fuel rail is attached to the intake pipe;
- The fuel pipes are held in place by a special holder, which requires unscrewing one fastening screw;
- Remove the fuel rail by sliding it along the axis of the fuel nozzles. So they will come out of their seat on the intake pipe;
- Assembly is performed in reverse order.

Please note that there are washers under the fuel rail mounting bolts, which must be returned to their place during the reassembly process or replaced with similar new ones.
- The first step is to remove the fuel rail from your vehicle.
- Then the ramp is laid on a flat surface, after which the block of wires is disconnected from the damaged injector. To remove it, you need to squeeze the spring retaining bracket and then detach the shoe.
- Using a screwdriver, slide the metal clip towards the fuel rail. It serves to fix the fuel spray. For some reason, many remove the retainer completely. There is no need for this. Just slide a little to the side.
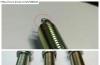
- Take the nozzle in your hand and shake it slightly to the sides. So it should exit the fuel rail without any problems.
- In parallel, be sure to check the current state of the O-rings of the fuel injector housing.
- The O-ring of the spray element of the nozzle is checked in the same way. To do this, you need to pry both rings with a screwdriver and see if they are worn out.
- In the case of fuel injectors, it is not necessary to change the O-rings when replacing the nozzles themselves if they are in good condition... Only if you intend to reuse them, be sure to lubricate the rings with oil before installing. Motorized, of course.
- When the nozzle is removed and the rings are replaced (or the old ones are left), you can begin to install new devices. The procedure is carried out in reverse order.
- Insert the sprayer into the hole on the fuel rail, secure with the clip.
- Replace the block with wires, install the fuel rail in its rightful place.

Replacing injectors is not always the only and rational way to restore the performance of fuel atomizers. Try cleaning them. This business is not difficult, but the savings are impressive.
Cleaning
There are two ways to clean fuel nozzles, each with its own nuances. Choose for yourself which one you like more or more affordable, given the available funds.

|
Cleaning method |
Necessary materials |
Features of the |
|
The first way |
You will need:
|
|
|
Method two |
You will need:
|
|

Both operations take about 2-3 hours, but cost several hundred rubles. This is ten times cheaper than replacement and about as much more affordable than service station services.
How to remove the injectors?
Answer 1.

There is nothing terrible there. There are several nuances, I will try to describe from memory (I shot it last year, I could have forgotten something). If anything, Leo will correct, he has more experience. From what you should pay attention to.

Be careful with the snaps on the fuel supply and return lines. They are plastic, it will be a pity if they break.
It is advisable to change the O-Rings (sealing rings on the injectors) when removing - installing injectors. If my memory serves me, then they may be different in color (they have different temperature conditions) - those that enter the intake manifold and those that are in the common rail. It would be better not to confuse them in places.
Why is it better to install new ones? Americans generally advise, at any work, to change all rubber bands that come across on the road over three years old - their labor costs much more than these rubber bands. If it then flows again, you will have to disassemble it. Those rings that enter the common rail (the fuel line that feeds directly to the injectors) must keep the tightness against fuel leakage to the outside. Below the intake manifold on our resin block is the exhaust. It will be very disappointing if the car lights up because of the kopeck piece. However, we live in Russia and everything that is needed in science is not always fair in our country, therefore, for example, I checked visually and by touch the condition of the rings and put the old ones (but what to do?).
To remove the common rail, you have to remove the throttle, kickdown and cruise control cables. Be careful with their tips - some can be easily broken and although it's not very scary - it's still a shame.
The kickdown cable will need to be adjusted later. It is advisable to thoroughly wash the engine from the side of the injectors before disassembling. otherwise, dirt may fall into the intake manifold.
In my opinion, it is better to shoot with a unit - rail injectors. It is normal for the injectors to come out of the nozzles with a fairly large effort.
It makes sense to prepare the vacuum cleaner in advance and, after removing the nozzles, collect the debris (washing the motor, unfortunately, does not remove everything).
When disconnecting the injectors, do not forget that the connectors are fastened with spring brackets.
And it would be better to disconnect the battery before disassembling.
I also ask you to keep in mind that, as I already wrote, I have so far tried THF only against external contamination. Then I will let you know what they achieved when flushing from the inside.
Yes, if the engine is already running unevenly, it would be a good idea to first unscrew the spark plugs and see their condition. Pay special attention to injectors from those cylinders in which the candles differ sharply from the rest.
It is advisable to carry out the work clean. Although an additional filter is installed in the inlet of the injector, any dirt is highly undesirable. Can bring in such that then it will not be rinsed at all.
Removal and installation of unit injector
The sequence of removal and installation of unit injectors in a diesel engine.
1-Radiator frame with attached parts, 2-Bolt (4pcs. Tightening torque 8Nm), 3-Bolt (2pcs. Tightening torque 20Nm), 4-Bolt (8pcs. Tightening torque 20Nm),
Take off and put aside expansion tank cooling systems
-Remove the filler pipe of the washer reservoir and headlamp cleaner
-Unscrew the screws 4
-Screw the guide rods into the right and left side members (2 each)

-Unscrew screws 2 and 3 (left and right)
-Disconnect the intercooler pressure hoses
-Using the guide rod tool, move the radiator frame forward by about 15 cm in the direction of the arrow.

-Tighten hoses and wires next.
If there are no guide rods, the radiator frame can be carefully placed on the pads, choosing their height. The photo shows the approximate position of the radiator frame installed on the pads.

Removing the nozzle:
-Remove the inlet manifold
-Remove the shroud as well as the cylinder head cover
-Turn crankshaft with a wrench so that the pair of cams, respectively installed or removed, points upwards evenly. If there is no wrench for turning the crankshaft, you can do it differently. Jack up front wheel car. Switch on top gear. Rotate the wheel slowly with your hands until the cams are in the desired position.

-Loosen the locknuts of the adjusting bolts -1- and unscrew the bolts so that the corresponding rocker arm rests on the spring of the pusher of the unit injector

-Unscrew the fastening bolts -2- of the rocker arm shaft from the outside inwards and remove the rocker arm shaft
- Unscrew the fastening bolt -3- of the shoe and remove the shoe
- Lift the unit injector connector with a screwdriver. To avoid skewing, support the connector with back side light finger pressure
-Insert the puller instead of the clamping block into the side cutout of the unit injector

If there is no puller, you can make it yourself. For example, such as shown in the photo.

- Using careful tapping movements, pull the unit injector upwards from its seat in the cylinder head.
Installing the unit injector

1-20 Nm + turn 1/4 turn (90 °), 2-lock nut, 3- adjusting bolt (replace at each disassembly), 4- rocker shaft with a rocker arm, 5- block, 6-12 Nm + turn 3- / 4 turns (270 °), 7- pump injector, 8- sealing rings, 9- thermal insulation, 10- retaining ring.
When installing a new unit injector on the engine, it is imperative to replace the corresponding adjusting bolt in the rocker arm. New nozzles are supplied complete with O-rings and heat-shielding seal installed. If an old unit injector is installed, it is necessary to replace it with new O-rings and a thermal insulator. Make sure the rings are not twisted.
- Lubricate the rings with oil and very carefully install the injectors into the seat in the engine cylinder head
- Insert the unit injector into the seat by pressing evenly until it stops
- Insert the clamping pad into the side cutout of the unit injector.
Attention!
If the unit injector is not at right angles to the retainer, the fastening screw may loosen after a certain time, resulting in irreversible damage to the unit injector and the seat.
- Screw the new fastening bolt into the block so that you can turn the unit injector slightly
- Position the template as shown between the bearing seat and the unit injector.

- Turn the unit injector body by hand relative to the template
Helpful advice!
If you do not have a template, then before removing the nozzle measure the gap between the nozzle and the bearing seat (by selecting a plate of a certain thickness). In the figure, the arrow indicates the location of the gap measurement.

- Correct, if necessary, the position of the injector and tighten the mounting bolts. Tightening torque 12Nm followed by 270 ° (3/4 turn)
- Refit the rocker arm shaft and carefully tighten the new bolts
- Tighten the inner bolts first, then both outer bolts. Then tighten in the same sequence with a torque of 20 Nm + 90 ° (1/4 turn)
- Place the indicator on the injector adjusting screw as shown in the figure

- Crank the crankshaft in the direction of rotation of the engine so that the rocker arm stops at the top of the drive cam. The side of the roller (arrow A in the figure) is at the highest point, the indicator (arrow B in the figure) is at the lowest point
- After that it is necessary to remove the indicator
- Then unscrew the adjusting screw 180 ° back from the stop

- While holding the screw in this position, tighten the lock nut to 30 Nm
- Reinsert the unit injector connector and secure the engine cylinder head cover.
If you liked the article, add it to the social. networks. Thank you in advance!
How to remove the injectors?
Content personal car in perfect condition - every driver's aspiration. Moreover, it is often necessary to fix some problems on your own, without the help of auto mechanics. The most common problem with the fuel system is flue gas contamination of the filter and injector needle. As a result, negative processes begin in the engine associated with increased consumption fuel.
Injector removal instructions
- Before removing the nozzles, you should familiarize yourself with the basic rules of this process. Make sure you have a handy pair of screwdrivers handy (long and short is best). They will help remove the clips from the part.
- If these nozzles are still suitable for further operation, it is worth using round-nose pliers or tweezers when unwinding. Disconnect idle speed regulators from each of the nozzles.
- A removed connector can be cleaned immediately so you don't have to come back to it later. Do not forget to also disconnect the crankcase ventilation suction, otherwise it may interfere with your further work. Then you need to disconnect the black bar, which is located just above the nozzles.
- Be careful - this tire is secured with latches, since it serves to control the injectors. Now proceed to disassemble the fuel trim.
- Don't worry if gasoline spills out - you are on the right track. But the safety regulations here must be followed more carefully, do not forget that you are working near flammable and explosive substances.
- After removing all the parts, you can proceed to the direct dismantling of the nozzles. In this case, you may need to apply some physical force to remove them from the engine. At the same time, it is important not to lose the rubber seal rings - important parts of the nozzles that are on both sides of the part.
A clearer picture of the above instructions can be found on many specialized sites. The video on how to remove the injectors will help you to understand in detail the correctness of this work, and user comments may lead to the solution of other related problems.
Often, as a result of contamination of the injectors, malfunctions can be noticed motor system... If the engine loses much of its performance, it starts to consume more fuel mixture, the exhaust gases become more toxic - it is imperative to pay attention to the condition of the injectors.
Cleaning the injectors.
Cleaning the injectors is slightly more complicated than replacing the injectors. At the same time, cleaning the elements saves a certain amount of money for car maintenance. That is why most of the car enthusiasts prefer to clean their nozzles on their own. In most cases, the cleaning of the elements is started after malfunctions in the engine system are found. Of course, a more correct and productive solution would be to diagnose the car and replace the injectors before the engine loses its productivity. Modern vehicle manufacturers recommend checking the condition of the elements after passing 40,000 km.
What effect can you get from replacing or flushing an element?
Of course, changes in motor performance will depend on the state of the elements. If the injectors have been heavily clogged, cleaning or replacing them can greatly restore the correct operation of the propulsion system.
As a rule, the results of injector restoration are:
- Optimization of gasoline consumption.
- Increased engine performance.
- Elimination of various malfunctions in the engine system.
- Correct operation of the engine at idle speed.
- The simplest start of a cold engine.
The modern car enthusiast knows a considerable number of tools that allow you to clean the nozzles without independent intervention. Auto store counters are overflowing with various additives for car systems. Use additives or clean the elements yourself, a personal matter for each car owner. On automotive forums, you can find a comprehensive amount of information on various formulations for engine cleaning. It is difficult to find an unequivocal answer about the use of additives. In this case, much depends on the state of the system. vehicle and the manufacturer of the specific formulation.
Consider a proven method for restoring injectors, with preliminary removal.
Cleaning and changing nozzles in a garage.
In order to restore the element in question, it is necessary to dismantle it. After performing visual diagnostics, you can flush the element or replace it with a new one.
In order to flush the nozzles and fully restore their performance, you need to stock up on a certain amount of tools and materials.
- Rhombo - shaped key for eight.
- Special remedy for flushing nozzles. Also, carburetor rinsing agents or solvent can be used as a composition for the recovery of elements.
- Rubber hose. As a working material, you can use the vacuum tube of the distributor from classic models domestic cars.
- Syringe with an outlet diameter of 10 mm. With this tool, you can avoid removing the seals.
- 2 m of electrical wire.
- Light bulb and relay (10 and 12 W).
- Eight new rubber seals for internal combustion engines.
- Four clips for petrol hoses.
Recovery stages.
1. For simplicity and convenience of disassembling the engine system, it is worth removing the pressure in the fuel line. To do this, remove the fuel pump conductor. After that, we start the engine and wait until it finishes its work on its own. The procedure is repeated until the motor stops starting.
2. In order to gain free access to the nozzles for cleaning or replacement, you will need to dismantle the following elements:
- Air filter guide.
- Holders for injector conductors. The main wire retainer can be found under the thermostat pipes closer to the front glass.
- Idle speed controller retainer.
- Throttle position drive.
- Vacuum lead from the fuel pressure controller.
- Gasoline supply conductor.
- Gas pedal cable.
3. Remove the plate retainer that holds the fuel lines. After that, carefully dismantle the ramp with injectors. The nozzles are fixed tightly enough, so it is necessary to remove the ramp with little effort. Lift the element and fix the conductors on the leash of the glass cleaner.
4. In order to dismantle the injectors, it is necessary to unfasten the electrical connector fixing brackets and the element holders. First, it is necessary to cover the working surface with a rag, since after dismantling the element, a certain amount of the fuel mixture will pour out.
The gap in the ramp should be plugged in order to prevent the ingress of foreign materials inside.
When the injectors are dismantled, you can start restoring them.
5. We connect the output of the injector with a relay and a 12-volt light bulb. In this case, the lamp will act as a charge absorber. The restoration of injectors is carried out under a certain pressure, so all fasteners must be fixed conscientiously. It is possible to make a system along which the composition for flushing the element will move using several simple methods.
One method is to make a rubber tube system - attached to the top of the atomizer. Most in a simple way, is the supply of the cleaning mixture with a syringe.
6. Dismantle the rubber seal ring and put the hose on the tail of the element.
7. We produce power supply of conductors from the storage battery.
8. Press the button to spray the mixture and wait for the pressure optimization.
9. Turn the nozzles away from you and push on the spray.
As a rule, to thoroughly clean the element, it is worth repeating the procedure at least two times. When spraying is uniform, nozzle cleaning is complete.
If there is no desire to restore the ICE element and you decide to replace the element, then after dismantling, the injectors are changed and the elements are collected in the reverse order.
Thus, we will restore the performance of the motor and increase the life of the propulsion system.
Despite regular maintenance and flushing of elements, modern manufacturers still recommend replacing nozzles every 100,000 km. Changing nozzles or flushing them is simple, but very useful procedures for servicing the propulsion system. The modern car enthusiast is provided with several injector maintenance methods. You can clean the injectors with special composition or ultrasound in specialized service... You can also restore or replace a used item with your own hands.
Regardless of the choice of technique, timely diagnostics and regular car maintenance remain the main ones.
Checking the nozzles in a specialized workshop will cost an order of magnitude higher than the independent restoration of the elements. Doing the work yourself, you remain confident in high-quality and honest service.
You will also be interested in:

We are often asked about the average budget a novice climber would need to ...

Trekking area The trekking was made on the territory of the Altai Republic. The length of the route is ...
Replacing spark plugs is a must-have service ...
To replace the timing belt on a Mazda 626 GF, many owners of this car turn to ...
Dedicated to all owners of front wheel drive vehicles. Sooner or later at the front ...

