


Many car owners are trying to give their car a certain personality in order to distinguish it from the general stream. At the same time, what tricks they do not go to, starting from banal stickers on glass and body, and ending with rather serious processing of the body and external elements.
What are unwelding?
Recently, another one has become popular, which does not concern the body, but the wheels, in the process of which the geometry of the wheel disk is self-made, which allows you to install tires of increased width on the car. Such alterations of disks are called "uncoiling".
It is noteworthy that there is practically no benefit from such alterations. But since the installation of bondings allows you to highlight a car at least a little, then such tuning is now in quite good demand.
Of course, you can just buy discs with increased width, but they are expensive, and not all models can be matched. But the revision of the disk is available for any car, even the old Moskvich.
The essence of the welding method is reduced to just cutting the disc and installing the insert between the halves obtained.
There are several technologies for making bondings, and further we will consider the most common of them.

Advantages and disadvantages
But first, let us point out what the increased width wheels installed on the car give.
Of the positive qualities from their use, it is noted:
- Original, non-standard type of wheels;
- Ease of manufacture with minimal costs;
- Increased contact patch of the tire with the road due to the greater width, which affects the cross-country ability of the car.
On this, all the positive qualities from the installation of unwelding on the car ended.
But this tuning has more disadvantages:
- Increased fuel consumption;
- Decrease in the dynamic performance of the car;
- Reduced car handling at high speeds;
- Increased axle load, leading to premature bearing wear.
This also includes the difficulty of finding tires of increased width, because standard tires will no longer fit on such a wheel.
And making changes to the design of the disc itself will certainly affect its strength characteristics. And no matter how high-quality the bonding was done, they still cannot be considered safe.

And in the end, though a trifling one, it is still a drawback. A car with installed bondings will have to be washed much more often, since the edge of the wheels will protrude beyond the fenders.
Because of this, entering even a small puddle will be accompanied by abundant splashing of the sides of the car.
Therefore, before proceeding with the manufacture of unweldings, you should think carefully about everything, because to do unique car it is possible in other ways.
For those who decide to equip their car with such disks, it will not take so much.
Ordinary stamped steel disks are the "donors" for creating weld beads. Cast ones are not suitable for this, since the material of their manufacture is very difficult to weld, and indeed any interference with their design is fraught with serious consequences.
Steel discs are inexpensive, easy to work with, and weld well, and you cannot create them without welding.
First, let's go through the design of the stamped disc itself. It consists of the disc itself (with a central and mounting holes) and a rim with beads on which the tire sits. In this case, the rim sits on the disc and is welded to it.

There are two main ways to do the bonding - from two discs (simpler but more expensive) or using an insert. Moreover, the second method may differ in the way of execution.
Therefore, we will consider each of them in more detail, using the example of specific cars.
Unwelding of two discs
The first will be the VAZ-2108 car. In general, the described technology is suitable for almost any car of the VAZ family, since their disks practically do not differ structurally.
The peculiarity of all work is to make all the cuts as even as possible. This concerns not only the unweldings obtained by this method, but in general all.
For cutting, it is best to use a lathe where it is possible to fix the disc evenly. But not everyone has the opportunity to use such equipment, therefore, to make the necessary product in garage conditions will be required:
- Measuring tools (ruler, vernier caliper);
- Wheel hub;
- Angle grinder. a machine with cut-off wheels ("Bulgarian");
- Welding machine;
- Joint sealant.
In order to make the cut as smoothly as possible, it is better from the hub (any will do, the main thing is that wheel rim sat down evenly and it was possible to fix it), make a device. Its essence is a shaft on which a hub with bearings is put on.
This shaft is fixed on the bed (table, flat floor), and the position of the shaft must be strictly horizontal. That is, you need to install the device so that the disc is not skewed.
Also, for the convenience of work, you can make a holder for the "Bulgarian" from available tools, and fix it on the same frame as the shaft with the hub. Moreover, the holder should provide the ability to move the "Bulgarian".

There is another way.

Having prepared the tool and accessories, we get to work:

All that remains is to paint the disc, put rubber on it, balance the wheel and install it on the car.
The described method is inconvenient in that two discs are needed to make one weld, which somewhat increases costs, but it is simple to perform and, importantly, there is only one weld.
Unweld with spacer
The second method does not require so many disks, one set is enough. But in terms of implementation, it is more difficult.
Let's consider it on the example of the VAZ-1111 "Oka" car.
The peculiarity of this car is that it uses wheels with a diameter of 12 inches.
The method described below boils down to using a spacer. Of the tools, in addition to those described above, you will additionally need a rolling machine and 4 even strips of sheet metal 3 mm thick, 50-60 mm wide and at least 1.5 m long.
Unwelding by this method is done as follows:

Unwelding with a spacer, the second way
The last method for making the weld is identical to the spacer method. The only difference is the incision site. An example in this case is the UAZ car.
Today we will see how the uncoiling is done. Those who have read the previous posts already know that this is the slang name for wide steel discs. Often in our country they are also called stamped disks or "stampings" - I mean those that are ordinary, have not yet become wide spreading. I'll cheat a little and present you with someone else's article and some of my comments. To make one wide disc, you will need:
- standard steel disc (stamped) - 2 pieces
- grinder
- welding machine
- suture sealant (not necessary, read about this at the very end of the article)
We take two discs and from 2 discs (see figure) we cut through and through with a grinder along the red line, cutting off the outer rim and throwing it out.
1 disc has only an incision along the red line of the outer rim to the inner part of the disc a little closer to the middle, disconnecting the outer rim, throw it out. 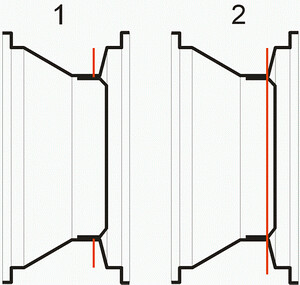 Remove unnecessary residues from the second disc with a grinder
  We put the rest of the disk 1 on the hub rear axle, fix with nuts and put on the second part. We align the second rim relative to the first, eliminate the beating, and weld it at four points at the joints.
  Boiling points are marked in green.
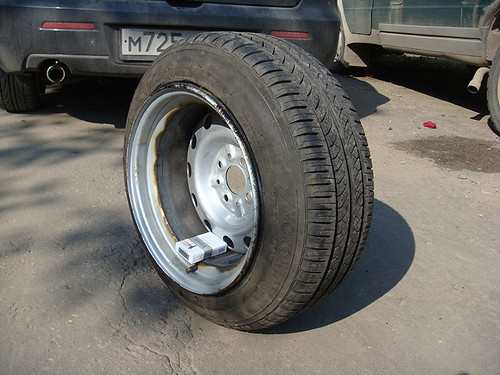
  And here's what came of it:

 For tubeless installation we just need to seal the seam in the middle of the disc. This should of course be done before painting. For this purpose, 3M Joint Sealant is suitable for us. Alternatively, it can be thinned with a Degreaser. Attention! Precisely with a degreaser, and not with a solvent or, God forbid, White spirit! Grease the seams with diluted sealant. Wait until it gets up, remove excess (chisel, sandpaper, etc.), and paint it so that it does not rust and please with its appearance.

 As a curtain - a radical urn.
Tuning is very common among motorists. rims - the so-called production of bondings. It is as follows: the width of the discs increases in order to be able to use wider tires. And in fact, this method can be considered artisanal, but it is widely used among craftsmen.
Among its advantages are the following factors:
- improving the grip of the wheel with the road, due to which the driving performance car;
- low cost of such discs;
- making the car look more stylish;
- the ability to make do-it-yourself splices.
 Advantages of uncoiling on cars
 However, before doing the unwelding, it is necessary to take into account that they also have disadvantages:
- an increase in the moment of inertia of the wheel due to changes in mass and size;
- the need to use non-standard rubber;
- decrease in the strength of the wheel structure due to the presence of welded seams;
- deterioration in vehicle handling due to the use of wheels with modified characteristics;
- the need to use tires of non-standard sizes.
If all this does not convince you of the need to operate standard products automotive industry, let's look at how you can make unwelding yourself at home. Let's do this using the r13 wheel for a VAZ car as an example - this example can be considered universal.
 Disadvantages of using bondings
 Training
At the initial stage, you need to fully understand the entire course of the process. You should know that stamped wheels for a car serve as the starting material for manufacturing. Cast products will not work, since welding will be carried out in the process - cast products do not tolerate thermal loads.
The rim width of the discs can be increased in 2 ways:
- a steel plate is welded into the middle;
- of two ordinary discs, cut in half, one wide is welded.
You should consider how wide the rims your vehicle design will allow. For VAZ cars, the width is usually 7j. But if you cut or roll out the wheel arches, you can bring the width up to 10 j. So, first we need to calculate the width of the rim that we want to get.
If we decide to use the method of welding two disks, we need to take this into account and stock up on them with the required amount - for each weld, you need 2 disks.
First stage: cut and cook
First, you will have to perform metal cutting and welding - to perform these works you will need the appropriate equipment, as well as skills in handling it. So, we have stocked up with the required number of discs, a grinder and a welding machine - now we can get to work. The step-by-step process of welding 2 discs is as follows:
- Cut off the rim outside the first wheel with a grinder.
- Cut off the rim outside the second wheel.
- We install the first disc on the rear axle hub and attach it.
- We put on the second part and perform alignment, eliminating the beating.
- We fix the contact at four points by welding.
- We weld a seam around the entire circumference - this is necessary in order to ensure the necessary structural strength.
- Using a grinder, we clean the welding seam outside and inside. It should be remembered that the balancing of the wheel will depend on the quality of stripping.
 Production of bondings
 If we weld a steel strip inside, then the process will look similar, but it will differ in some details:
- Cut off the outer rim to the inner part of the wheel.
- Cut out the steel strip the right size and bend it around the circumference - for this it is best to use rollers. They will provide the accuracy you need.
- We install the disc on the hub and fix the steel strip on it by welding.
- We weld the outer rim onto the strip so that no deformation occurs.
Stage two: sealing
Now we need to seal the resulting blanks so that we can put rubber on them. Sealing is especially important if we plan to do without installing a camera. If we put a camera, then sealing is not necessary, but the weld should be smooth and exclude the possibility of damage to the camera.

Final stage: painting
And the last stage is painting. However, before this stage, you need to check the weld beats for beating and roll them. After making sure everything is in order, you can think about painting.
After you have chosen the right enamel, apply it in the following way:
- Sand the surface of the product carefully.
- Perform degreasing with white spirit.
- Apply a layer of a primer - it will fill in all microroughnesses and increase adhesion, provide better adhesion of the paint to the metal.
- After the primer has dried, apply the enamel in several layers.
- When the paint dries, it is advisable to varnish it - such a coating will be more durable and aesthetic.
 Painting ready-made splices
 Conclusion
Self-production of bondings is a rather responsible process. It looks simple, but it requires certain skills and specialized equipment. It is very important to control the correct implementation of all points and make sure that the resulting weld beats do not give beating.
Good day to all! Car tuning is a multifaceted and versatile procedure, ranging from major technical improvements to the engine and suspension, to the simplest visual changes. Today's topic of conversation will be uncoiling disks.
Not everyone knows what it is, what the unwelding is done for and what result it can ultimately lead to.
This type of tuning is aimed at motorists who are not satisfied with the standard appearance their car, they want to do something really different. I can say that unwinding can be done by hand. The production itself is carried out in 2 main ways. But first, I want to answer other questions. The main one is whether it is worth putting boiled-on wheels on your car.
When did such tuning appear?
In cities such as Moscow, St. Petersburg, Minsk or Kiev, you can find quite a large number of car owners with boiled discs installed on their cars.
Although many consider this to be the prerogative of purely sports cars, unwinding is easily put on Gazelle, UAZ cars. Even for Oka, such tuning is not prohibited.
If you look into the history of auto tuning in Russia, then here the first samples of cars with welded rims appeared around the middle of the 70s of the last 20th century. Cars that took part in all kinds of competitions and contests drove with such wheels. In fact, the installation of a weld gave them a certain advantage when driving, since wider tires could be located on the machine.
Most often, fans of this type of competition in cars such as drifting or drifting do the unwinding.
This is due to the fact that the modified discs provided better maneuverability and reliability when keeping the car on the track.

The popularization of tuning grew at a rapid pace. Similar solutions can be found on many vehicles.
Popular machines on which boiled discs can be found include:
- Nissan 350Z;
- Nissan 370Z;
- Toyota Mark 2;
- Toyota Chaser;
- Nissan Skyline;
- Mitsubishi Lancer;
- Honda S2000;
- Honda Civic;
- Ford Mustang;
- Dodge Charger, etc.
But the list is not limited to these cars.
The most important thing is to understand what it is, why unwelding is needed and whether it is worth using it at all on your own vehicle.

Ways and types of uncoiling
There are currently no problems with and install the required kit on own car... The price of a product depends on a number of factors.
But what do you say if some of the two discs only make one? That is, in fact, to equip a car with 4 wheels, you will need to buy 4 discs. This is what is called unwelding. Although objectively this is not the only way. The essence of the procedure is to increase the width of the stamped disc for vehicle... But in the case of cast products, this trick will not work. Craftsmen and ordinary garage craftsmen work with stamped car tires... The production itself is independent and factory-made.
In the case of factory production, specialists simply make initially wider discs. They differ in that they are very expensive, and the circulation itself is limited.
For owner inexpensive car buying a factory kit is probably not an option. Objectively very expensive, and only a few are willing to spend money on it.

Therefore, they follow an alternative path. Namely, they do the unwinding with their own hands. But how to make one product from two discs suitable for installation on a car?
There are actually 2 ways.
- The first option is simple, but the most expensive for the price. Here you need to take 2 discs, weld them together. It is extremely important to make the incision in a well-defined place. High price due to the need to purchase 2 sets of products at once to equip 4 wheels of the car;
- The second method is cheaper, but harder to implement. Here you will need to use an additional metal strip. It is cut out, rounded off. One disc is cut in half, and a strip of metal is welded in between the halves. The advantage of this method is that there are virtually no restrictions on the width of the weld being created.
How appropriate and necessary, judge for yourself. You can find many videos on the net on how this is done and in the end it looks like. The main thing is to be real for the sizes received.
In some cases, in order to install a welded disc, you will also have to cut the wheel arch on the car.
Advantages and disadvantages
And now, as for me, the most important thing. I want to objectively look at the pros and cons of this type of tuning.
Of the advantages, only 2 points are distinguished. This is a spectacular and unusual appearance, as well as an opportunity to provide better stability and stability for cars that participate in drifting competitions. But basically, uncoiling is used for exhibition machines that are not intended for everyday use.

But there are much more disadvantages. Moreover, many disadvantages directly affect the characteristics, performance and durability of the machine:
- sometimes it is very difficult to find tires with the required parameters;
- too narrow rubber at any time can simply jump off the disk;
- such structures are difficult to install;
- to inflate tires on welded disks is really only explosion methods;
- machines with such discs will not pass technical inspection;
- increased attention from traffic police and traffic police officers to cars with splicing;
- it is easy to get a fine for unwinding;
- there is a high probability that the car will be taken to the impound.
As for me, there is absolutely no practical sense in unwinding. Yes, it is beautiful and externally impressive. But nothing more.
Recently, such a type of aesthetic auto-tuning as the installation of bondings has been gaining popularity. What are they and what are they used for?
Uncoiling - this wheel disks increased width made from conventional steel discs ("Stamping"). They are made by welding to each other two wide rim flanges taken from two discs, or by welding an expanding insert in order to install wider tires.
Uncoiling can be made by specialists to order, or by hand, subject to availability necessary tools... When expanding iron discs, the two most common methods prevail - No. 1 and No. 2 (in the picture). The rest of the options for reworking the disk are quite rare and more difficult to manufacture, therefore they are used only by specialized specialists.
The first method implies that two discs are cut lengthwise in a certain place and welded together. With this method you need not 4, but 8 disksas donors are still needed for expansion.
The second method involves changing the width of the disc by welding a metal strip with a thickness of 2.5 to 4 mm. 
What is the width to do the splicing
The standard stamped disc is 6.5J wide. After the uncoiling process, the width can vary from 8J to 10Jand the total width is not limited to 10J. It all depends on the wishes of the owner and the design features of the car. To put it simply, the main task is for the weldments to fit into the fender arches of the car. To do this, the arches are cut out, more often they are rolled out, if the size of the splices allows them to be "hidden" there.
Source materials
The starting materials for their manufacture are, first of all, discs that will be welded. In the case of the first manufacturing option, you will need another set of disks of the same size as a donor. In the second version, in addition to the discs themselves, you also need a sheet of metal of a certain thickness and width to weld it into the disc.
Design features
When making bondings, it is important to remember that the choice of bonding widths is limited. design features donor discs. The calculation of the final width and overhang must be done before cutting the discs so that later there will be no problems with installing the discs. Another important nuance there is a need choose the right tires for welding... Since the uncoiling is usually worn with rubber that is already in size than the uncoiling itself, such rubber should be soft (especially cord). 
Security
When using splices, the vehicle track becomes wider, which affects the stability of the vehicle. In addition, if the welding robots are made with high quality, then the welds are even stronger than ordinary discs. On the other hand, it must be borne in mind that a tire fitted on a non-standard rim changes its characteristicsand can behave in a critical situation ( sharp turn, skidding, skidding, etc.) not as expected and as the driver is used to.
Manufacturing process: step by step procedures
In the case of production by the first method (1 uncoiling from 2 disks), you need to take 2 stamped discsand cut through the second disc with a grinder along the red line, cutting off the outer rim, which is soon discarded. 
On the first disc an incision must be made along the red line the outer rim to the inner part of the disc, slightly closer to the middle. We no longer need the cut-off outer rim. 
Remove unnecessary residues from the second disc with a grinder. The rest of the disc 1 must be fixed on the rear axle hub, fixing it with nuts and putting on the second part. Next, we align the second rim relative to the first, eliminate the beating. This operation is quite time consuming and can be the most difficult process in the entire stage of welding. From such a procedure, the rim can lead, which is a rather risky and frequent case. After both parts are aligned relative to each other, we grab by welding at four points at the joints. 
When both parts of the disc are fixed, it is necessary to carry out an operation to weld a seam around the perimeter of the entire joint. This is done to give the weld strength. 
Boiling points are marked in green. After boiling, it is necessary to clean the welding seam with a grinder from both the inside and the outside. The smoother the weld, the less you will need to balance the disc. When using the second method (welding a metal plate), 1 disk and a plate of the required size and thickness are taken. To start you need to cut the outer rim to the inner part disk. The cut to size strip of metal must be bent under the wheel. You can bend as you like, but better with special rollers. Next, we fix the disc on the hub and grab a strip of metal to it by welding. After that, we grab the strip to the second part of the disc and weld all the seams, trying to make sure that the disc does not lead. If it is possible to use automatic welding when welding a rotating part, use it, so the seam will come out much stronger. 
Disc sealing
So that the disc does not allow air to pass through, the weld must be sealed... For tubeless installation, it is necessary to seal the seam in the middle of the disc. If the use of a camera is intended, then sealing is not necessary. The main thing is that the weld seam is smooth and does not damage the camera. Sealing is carried out before painting with special sealants, which can be bought at any auto shop. 
Painting
You can paint in several ways. It is best to first clean the surface of the disc, degrease it, apply a primer, then cover it all with several layers of paint, and after complete drying, cover the uncoiling with varnish. Then the paint will last for a long time and will not peel off after the first wash. This is the perfect and correct painting option. But domestic craftsmen know how to paint discs from a spray, without subsequent varnish application, having previously manually sanded and degreased the surface. But after such painting, the service life of the paint is short, and as a rule, after a couple of months, the paint begins to slip. Before painting, check the disc for runout and roll it. If you do this after painting, there is a high probability of damage to the paint, and then you will have to repaint the splices again. 
You will also be interested in:

Any used car is an inconvenient burden for its owner's budget! For now ...

Hello! Every day in our country, tens of thousands of buying and selling transactions take place ...

For maximum safety of persons under the age of majority, for the period of organized ...

Deregistration of a car is required in many cases - during disposal, theft, removal ...

Car owners are often disappointed in their purchases, and for many reasons ...

