


Very often the owners of Gazelles, when replacing power units from carburetor versions to injection ones, are faced with the need to replace electrical wiring in the car, since there are major differences in the electrical circuit.
However, not always complete replacement justified since the repair does not affect other electrical devices except for the ignition and fuel injection system.
Accordingly, when intending to replace the engine with a Gazelle, the owners prefer a more modern injection engine, for example, ZMZ-4061 or ZMZ-4063.
Usually, overhaul require Gazelle cars manufactured before 2001, and having carburetor versions of power units.
Then the 402 motor was often installed, and the Gazelle wiring diagram on the 406 motor, which appeared in production program car plant in 1998, had its own design featuresnot compatible with different types engines.

A power unit that has exhausted its resource is subject to replacement, often giving preference to more modern versions.
Structurally, everything fits into the factory seats, and the differences, for example, from the location of the equipment:
- Another form of connector blocks;
- Other wiring diagram for devices;
- Another voltage.
Supply system
Leaving the carburetor in the past, replacing the power unit inevitably entails replacing the power system:
- A new gas tank is installed, since the injector must dump excess fuel back, and old construction the tank is not suitable for this;
- The gas line is being replaced (the reverse is being laid + the supply connection is being modified);
- The operation of the injectors is regulated using the connecting wiring.
Cooling system
New injector zMZ engine-406 is more demanding on the cooling system, therefore, during the installation of a new power unit:
- An electric fan is installed on a cooling radiator;
- Replacing the wiring harness engine compartment.
Fuel injection control system

Do not forget that the power supply system of the injection engine is controlled by an electronic unit, which also needs to be connected to the car's standard power supply. Accordingly, on the Gazelle 406, the wiring is different than on older versions of the car with motors of the 402 series, and must be replaced.
Replacing the wiring

Advice: replacing functional control devices on the panel due to new connectors is unjustified.
Therefore, when integrating new wiring, only the wiring diagram in the connecting terminals changes, and to combine, use the wiring diagram of the new power unit.
Changing everything to 406 is certainly not impractical.
The fact is that on newer versions of Gazelles, the connection diagram of certain devices also changed:
- gazelle 406 wiring is integrated into the standard electrical system in the engine compartment;
- electronic components and control devices are connected using terminals;
- the voltage and correct connection are checked using testers.
After assembling the wiring into a single whole, its operability is checked. In the future, the operation of the power unit is adjusted.
Conclusions: Replacing the power unit inevitably affects the change in the standard wiring of the car. That is why it is important to have a visual aid at hand when carrying out such an operation, and the factory one will help to avoid mistakes.
The operation of all electrical components in cars depends on the condition of the electrical wiring and current sources. The ability to read and understand the Gazelle wiring diagram is especially useful to owners of domestic commercial vehicles, given the age and condition of many of these cars.
[Hide]
Trouble symptoms
Signs of problems with the electrics of Gazelle cars are failures of various systems, for example, a heating system or an alarm system. If checking and replacing the fuses protecting this section of the circuit does not help, then the problem lies directly in the wiring. A faulty wiring is also indicated by a repeated burnout of the installed new fuse-link.
Typical "symptoms":
- The engine will not start. If the starter does not work and the lamps on dashboard, then the reason is in a discharged battery. If the lamps light up normally, but the starter does not work, then the cause of the problem should be looked for in the wiring. When the starter is running and there are no flashes in the cylinders, damage to the electrical circuits of the ignition system may be the cause. The malfunction can be corrected by charging the battery or replacing damaged cells.
- A burning lamp for charging the on-board battery when the engine is running stably indicates problems in the electrical circuit of the generator or an open circuit drive belt... Gazelle cars have a voltmeter that measures the voltage in the on-board network. The operation of the generator can be judged by the readings of this device. If such problems arise, you will need to replace the belt or overhaul the generator with the replacement of burnt-out elements.
- A burning smell indicates overheating of the wiring elements, which may occur due to damaged insulation. In this situation, it is necessary to check the condition of the fuses and ring all sections of the circuit with a tester to determine the location of the short circuit. For repair, you will need to replace the damaged sections of the chain and lay them in such a way as to exclude repeated chafing.
- An unstable operation of lighting devices indicates a short circuit in the circuit. If the lamps are too bright or rhythmic pulsation, the cause must be looked for in the failed voltage regulator installed on the generator. The regulator is replaced by removed generator... In parallel, you can check the condition of the brushes and the collector.
- Broken sections of the chain. This is possible due to oxidation and decay of contacts or wires. In the event of a complete failure of the power supply system, check the condition of the battery and the terminals on it. When the contacts on the battery are oxidized, they cannot transmit high current. In this case, backlighting elements, a radio tape recorder, wipers can work. But when you try to start, all the lights go out. You can fix the problem by stripping and tightening the contacts.
Wiring Gazelle with carburetor
Below is a typical electrical diagram of machines produced from 1995 to 2003 with carburetor motors of the ZMZ 402, ZMZ 421 and ZMZ 406 models. Depending on the model of the car (GAZ 3302, 33021, 2705, etc.), there may be differences in the electrical circuitry.
Electrical diagram of machines with carburetor engines ZMZ 402 and UMZ 421
The location of nodes and wiring on the Gazelle wiring diagram:
- IN 1 - electronic sensor for measuring the oil pressure in the engine.
- B2 is an auxiliary sensor that signals an excessively low pressure in the lubrication system. Works in conjunction with a warning light installed on the instrument cluster (H7).
- B5 - indication of a drop in the fluid level in the reservoir of the hydraulic brake drive. When the level drops below the critical level, the lamp on the instrument cluster (H56) is turned on, which is also a warning indicator for the applied hand brake.
- B7 is a thermal sensor that monitors the temperature of the liquid in the cooling system.
- B8 - sensor for turning on the engine overheating indicator. Includes the H8 lamp installed in the instrument cluster.
- B12 is a device for measuring the fuel level in the tank.
- B68 - distributor sensor.
- D4 - idle speed control economizer.
- E1 and E2 are headlamps on the left and right sides of the body. The headlights include front lamps (marked on the diagram H62 and H63) and main light lamps (H64 and H65). The lamps have filaments of far (H64-1 and H65-1) and near (H-64-2 and H65-2) light, powered by separate circuits.
- E7 and E8 - head direction indicators mounted next to the headlights (left and right sides of the car).
- E9 and E10 are additional turn signals mounted on the front fenders.
- E16 - lighting system for the interior of the driver's and passenger's cab.
- E17 - illumination of the internal volume of the cargo compartment (used on flatbed truck and the van).
- E27 and E28 - combined lights on the rear of the frame or body, including brake light (H74 and H75), direction indicator (H78 and H79), side light (H76 and H77), fog lamp (H70 and H71) and reverse gear engaged indicator (H72 and H73).
- E30 and E64 - two lamps for illumination of the rear registration plate.
- E35 - lamp engine compartment.
- E59 - cigarette lighter in the cab.
- E65 - system of illumination of the second row of passenger seats (applicable only to cars with a double passenger cabin). On buses, several lampshades are connected to this circuit.
- F1, F2, F3 and F4 are plugs installed in cylinders.
- F41, F42 and F43 - three mounting blocks fuses and relays.
- G1 is an engine-mounted generator.
- G2 is a battery.
- Н1 - horn.
- H6 - buzzer in the instrument panel.
- Н16 - signaling devices for direction indicators located on the instrument cluster. In addition, there is a warning signal for the emergency fuel residual (indicated by H19 on the diagram), indicators of the high beam (H20) and dimensions (H59).
- H66-H69 - four small bulbs to illuminate the instrument cluster.
- K1 - starter activation relay.
- K3 - relay for selecting the operating mode of the glass cleaner motor.
- K12 - turn signal interrupter.
- K13 - limit switch of the signal lamp of the activated parking brake.
- K16 - switch.
- M1 - electric motor for starting the engine (starter).
- M2 - heater fan drive electric motor.
- M4 - electric motor for driving the glass cleaner brushes.
- M5 - drive for the washer fluid pump.
- M20 is an additional electric pump for an extended heating system (used on utility vehicles and buses). Works in conjunction with the switch indicated in the diagram as S65.
- М38 and М39 - electric headlight position correctors.
- P1 - A combination of devices as part of a speedometer (on the diagram P2), a tachometer (position P3), an on-board network voltmeter (on the diagram P5), an indicator of the temperature of the liquid in the cooling system (position P6), an indicator of pressure parameters in the lubrication system (on the diagram P7) and an indicator of the amount of fuel in the tank (position P8).
- R1… R4 - noise suppression resistors in high-voltage wires.
- R12 - resistance for adjusting the speed of the heater fan motor.
- S1 - ignition activation (in the lock).
- S3 - switch for additional lighting for the additional row of seats (for cars with a double cab).
- S5 - switch for hazard warning lights.
- S6 - switch of resistance stages, designed to adjust the speed of rotation of the heater fan.
- S9 - steering column turn signal switch.
- S12 - steering column lever for switching operating modes of the glass cleaning system.
- S13 - remote shutdown batteries from the on-board network.
- S18 - switch of filaments of fog lamps installed in rear lamps.
- S29 - Reverse gear lamp limit switch.
- S30 - Limit switch for brake warning lamps.
- S36 - signaling device.
- S39 - head switch for outdoor lighting operating modes.
- S52 - turn off the parking brake lamp.
- S72 - economizer operating modes control.
- U1 - tape recorder or radio receiver.
- T1 - ignition coil.
- V2 - transistor switch of the ignition system operating modes.
- X1 - socket for switching on the plug of a portable lamp.
- Y3 - valve with solenoid coil on the carburetor.
Wiring Gazelle with an injector
After restyling in 2003, there were changes in the Gazelle electrical circuit associated with the use of new monitoring and control devices, as well as an expansion of the range power plants... Below is a diagram of a machine with injection engine ZMZ 405. The wiring of the machines can have different versions (depending on the motors, year of manufacture and body).
Scheme Gazelle with a ZMZ 405 engine (Euro 2 compliance)
- B1 - data meter for the oil pressure gauge.
- B2 - electronic sensor for turning on the alarm for emergency low oil pressure.
- B5 - measuring mechanism for fluid level in the brake drive reservoir.
- B7 - measuring device for liquid temperature in the cooling system. Works in conjunction with warning light, which is switched on by a separate control sensor (in diagram B8).
- B12 - fuel level measurement. On some cars (for example, GAZ 33027), it is possible to use a second tank in which a second sensor is installed (indicated in the diagram as B13).
- B46 - sensor for measuring the speed of movement.
- B57 is an optional sensor used to turn on the electromagnetic clutch for the fan drive (used on some machines with ZMZ 402 or UMZ 421 carburetor engines). The signal from the sensor goes to a separate controller, indicated in the diagram by code D28.
- D7 - an optional anti-lock braking system control module in the brake drive (practically not found on older cars).
- D21 - switch block for controlling the temperature and flow directions of the heating system.
- D27 - rheostat for adjusting the incandescence of the combination backlight lamps.
- E1 and E2 - headlamps. The headlights include dimensions (shown in the diagram as H62 and H63), near (lamps H98 and H99) and distant (lamps H100 and H101) light. In restyled headlights, turn signals are integrated into the headlamp unit (lamps H102 and 103).
- E9 and E10 - additional side turn signals.
- E16 - lighting panel for driver and passenger seats.
- E18 and E19 - additional lampshades (used only on vans). The buses use three lampshades - one on the starboard side (E20) and two on the left (E60 and 61). The lights are controlled by switches designated S62 and S63.
- E27 and E28 are combined rear lights. The lanterns include dimensions (shown in the diagram as H76 and H77), foglights (position H70 and H71), reverse (lamps H72 and H73), braking lamps (in the diagram H74 and H75) and turns (lamps H78 and H79).
- E30 and E64 - number illumination system.
- E35 is a lamp for lighting the engine compartment.
- E59 - cigarette lighter.
- E63 - additional cover for lighting the sliding door step (on vans and buses).
- E65 - auxiliary lamp for illumination of the second row of seats (applies only to cargo and passenger versions).
- E71 - box lighting system on the instrument panel.
- F1-F4 - ignition system (candles).
- F41 - engine compartment fuse box.
- F42 and F43 are two fuse and relay blocks in the instrument panel.
- G1 and G2 are the main current sources (generator and battery, respectively).
- H1 and H2 are two tone horns (low and high).
- K1 - starter start.
- KZ - glass cleaning control unit.
- K7 - horn relay.
- K12 - turn signal control.
- K13 - handbrake signaling switch.
- K16 - remote battery deactivator (applies to buses only). The device is controlled using the S13 button.
- K40 - headlight control.
- M1 is a starter.
- M2, M4 and M8 are the motors of the heater fan, wiper and washer pump.
- M8 - circuit electric pump additional stove (only for buses and utility vehicles with a two-row cab). Installed in conjunction with a second radiator and a fan on it, which is driven by the M20 engine.
- М38 and М39 - electric headlight tilt correctors. They are controlled by the S116 regulator.
- M43 - electric drive of the main heater tap.
- P2 - electronic instrument cluster.
- R12 and R13 - resistances for switching the fan speeds of the main and additional heaters.
- S1 - activation of the starting system and electronic devices.
- S3 - switch for the second row of additional lighting fixture (only the cargo-passenger version).
- S5 - alarm.
- S6 - control of the pump and engine of the heating system.
- S9 - switch for turn signals and headlights.
- S12 - selection of wiper modes.
- S29 - reversing lamp end switch.
- S30 - brake pedal limit switch.
- S39 - light switch.
- S52 - parking brake lever end switch.
- S54 - alarm system test.
- S60 - glove compartment lighting end switch.
- S62 and S63 - control of the lamps for lighting the passenger compartment of the bus.
- S73 - fan speed switch for the additional heater (bus and passenger-and-freight Gazelle).
- U - radio tape recorder.
On carburetor machines with motors ZMZ 402 and UMP 421 additional chains are:
- R1-R4 - candle suppression resistor system;
- D4 - carburetor economizer control system;
- B68 - sensor for the ignition pulse distribution system;
- S72 - economizer system control;
- T1 - standard ignition coil;
- V1 - charging voltage level regulator;
- V2 - a switch based on a transistor circuit;
- YЗ - economizer valve on the carburetor;
- Y48 - electromagnetic clutch for fan drive (on machine parts).
After another restyling in 2010, a Gazelle with the trade designation Business went into the series. The electrical circuit for the base GAZ 3302-216 with the UMZ 4216 engine (Euro 3) consists of separate harnesses, the wiring of which is given below.
Wires and ECM blocks Gazelle Business
- Gasoline vapor recovery solenoid valve.
- Throttle flap sensor.
- Engine temperature gauge.
- Fan drive clutch.
- Idle speed control module.
- Generator.
- Oil pressure drop indicator below alarm level.
- Common ignition coil.
- Candles.
- Air pressure and temperature meter at the filter inlet.
- Camshaft position sensor.
- Crankshaft position sensor.
- Lambda probe harness connector.
- Lambda probe.
- Roughness sensor on the road.
- Knock sensor.
- Injector wiring harness connector.
- Injection nozzles.
Repair of the clutch engagement circuit is shown in the video from the Garage AutoHlam channel.
The front cab wiring is attached to the ECM harness at the connectors.
Front harness
- Headlight.
- Starter.
- Battery.
- Mounting block for relays and fuses.
- Generator.
- Headlight.
- Glass wiper drive system.
- Glass cleaner wiring block.
- Illumination of the engine compartment.
- Klaxon low tone.
- Washer pump.
- Block of the first harness of the ABS system.
- Brake fluid level gauge.
- Block of the second harness of the ABS system.
- Starter control.
- High-pitched klaxon.
- Heater pipeline valve.
- Crane drive wiring harness block.
- Rear compartment heater pump (on buses and utility models).
- ECM harness block.
- Likewise.
- Likewise.
- Connecting the rear wiring harness.
- Likewise.
- Block of a harness of the instrument panel.
- Likewise.
- Motor control controller connector.
A separate wiring harness is used for the instrument panel.
 The wiring of the instrument panel Gazelle Business, part 1
A separate harness is available for machines with ABS.
Rear wiring harness
- Connection connector.
- Likewise.
- Fuel intake from the tank.
- Right side taillight wiring connection.
- Likewise for the port side.
- Lantern on the right.
- Lantern on the left.
- Illumination of the sign.
In the case of installation on a Gazelle diesel engine Cummins are changing the harnesses of the engine compartment and cab. Glow plugs are installed instead of spark plugs to simplify starting the engine at low temperatures. In addition, there are additional circuits for gas pedals and an additional autonomous heater.
Electrical circuit commercial vehicle "Gazelle" may differ primarily depending on which one. The wiring also differs by body type - for example, in taillights differently located than onboard. Accordingly, the wires are laid in a different place, having a different length.
Wiring in the cab of the GAZ 3302 truck
You should also take into account different generations cars by year of manufacture - over time, instrument combinations, optics, fuse box, etc. change. In the electrical circuit, plugs and wiring change. Therefore, there are many modifications in the electrical circuit.
Despite many modifications, the principle of constructing the electrical circuit is the same on all cars. All consumers of electrical energy are powered from a constant voltage of 12 volts. The mass of the body and the power unit is a negative wire, the electrical circuit is two-wire.

The location of the battery in the Gazelle
Any schema has the following elements: 
Read also
Repair and replacement brake caliper on Gazelle
Various schemes depending on the engine
The very first on the "Gazelle" began to install carburetor engines ZMZ 402. For the operation of the ICE ignition system, it was necessary to supply power to the ignition coil, distributor and switch. The next in the series was also a carburetor version.
But it already had coils, a distributor and a commutator, instead of them it was installed the electronic unit ignition control.
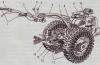
Later, Gazelles were equipped with a ZMZ 405 injection engine, which instead of a carburetor had a distributed injection system.

It looks like the ZMZ 405 engine
The wiring of the engine on this engine is already completely different - the control unit has become common to both the ignition system and the distributed injection.
have their electrical circuit, and it is different depending on the type of internal combustion engine installed: Cummins or UMZ-A274. Since the end of 2014, the Gazelle Next has been equipped with a new 2.7-liter engine.
Rearranging the motor wiring
Prudently divided the bundles of wiring into the front, rear and engine compartment. Therefore, when changing the power unit to another type of engine (for example, a ZMZ 406 carburetor for a ZMZ 405 injector), it is not necessary to change all the wiring, it is enough just to change the engine compartment wires.  It is also easy to rearrange the engine compartment wiring harness in case of replacing the 3M3 402 internal combustion engine with a ZM3 406 carburetor or a ZMZ 405 injector.
Each car is equipped with an electrical diagram, which indicates all devices and equipment used in the car, as well as the connection circuits. The performance of the wiring is very important for anyone vehicle, since its damage can significantly complicate the operation of the car. What elements does the Gazelle wiring diagram include, what malfunctions are typical for it? Look for answers to these and other questions below.
[Hide]
General information
The wiring diagram in a GAZ car with an engine, a carburetor or injector consists of many components.
And it doesn't matter if it is a Gazelle 402, 405, 406, 3302, 2705, Business or Euro, the electrical circuit will include the following subsystems:
- Ignition system. This unit consists of different components, the main ones are the switchgear, candles, and also those that transmit the charge. The functionality of the engine and its operation in principle depends on the performance of this system.
- Optical system. It includes all external headlights, ranging from dimensions and ending with brake lights and foglights.
- Lighting in the car interior, including the dashboard.
- Electronic (depending on the car model).
- The wiper system, which includes an electric motor and.
- Fuel system, one of the main components of which is the pump.
- and a generator unit.
- Audio system, if available, etc.
How to identify a malfunction?
In the event of malfunctions in the operation of the equipment, first of all, you need to check the integrity of the safety devices. If a short circuit or a voltage surge occurs in the wiring diagram, the safety elements are the first to fail, protecting the main devices and electrical equipment connected to a particular circuit. Since a visual check is far from always effective, troubleshooting should be carried out using a tester - a multimeter.
The diagnostic procedure consists in removing the fuses from the seats and further checking the sockets. If you have identified a broken fuse, this does not mean that the test can be completed, since a short circuit can occur simultaneously in several circuits (video author - Denis Legostaev).
If a short circuit occurs in the wiring of a car with a carburetor or injection engine, then you need to diagnose the condition of the circuits. Of course, if all the fuses were intact. Before diagnostics, disconnect the ground; you will need a tester or a control lamp directly for testing. When using a lamp, one of its contacts should be connected to the base and the other to the center contact.
The check itself goes like this:
- first, the key in the ignition lock should be set to position I;
- then you need to connect the tester probes or lamps to the contacts in the fuse sockets;
- in the event that the lamp does not light up, this indicates that there are no short circuits in the tested section of the circuit, if it lights up, then the short circuit was detected.
Another important point is diagnostics of the integrity of electrical circuits. In this case, the search principle is quite simple - for diagnostics you need the same tester (a voltmeter or ohmmeter is suitable) or a lamp with wires. You will need to connect one of the contacts of the probe to the body of the vehicle, and with the second contact measure the power at the connecting points between themselves and the equipment.
It is best to start in the middle of the circuit and check for easily accessible areas first. In addition, to diagnose an open circuit, it should be understood that most often circuit damage occurs in places where the wiring is bent. Moreover, as practice shows, wires in bundles are very rarely damaged.
Another breakdown in the electrical circuit is poor contact at the joints; it is best to search for such a malfunction using a tester - voltmeter.
There are two diagnostic methods:
- One tester probe should be connected to the car body, and the second to the connection terminal, voltage measurement is carried out in both directions. Note that the voltage drop should be no more than 0.5 volts.
- The next method is to connect one wire with a pin on one end of a plug and the other to a pin on the other side of that plug. In the event that the tester shows more than 0.5 volts, this indicates that the contacts on the plug should be cleaned (the author of the video is the MZS TV channel).
Possible wiring problems and how to fix them
What malfunctions are most typical for the electrical circuit of Gazelles 4216, 2003, 2705 and other models:
- Damaged wiring. If the damage is not serious, then this problem can be solved by additional insulation of the circuit with electrical tape. For more significant damage, it is better to replace the entire section of the chain.
- Failure of the safety element. Malfunctions of such a plan are solved by replacing damaged devices. Never use homemade wire or coin fuses, as this could cause a fire. The only time it is possible is when the fuse has failed, without which the car will not start, for example, the one responsible for the gasoline pump, and you will only need to drive to the nearest store.
- Poor contact of the equipment with the mains. In this case, you need to make a diagnosis, detailed instructions presented above. If the poor contact is due to oxidation, then it will be enough to clean the connector, but if the contacts burn out, they will most likely have to be changed. At the same time, keep in mind that you need to determine the reason why the contact burned out.
- Malfunctions in the ignition system. For example, it may be damage to the valve body, poor contact high-voltage wires with distributor and spark plugs. Also, the car owner may encounter a malfunction of high voltage, in particular, we are talking about insulation breakdown. Such a malfunction will lead to unstable operation of the power unit as a whole; it can be solved by replacing the wires.
- Failure or incorrect operation of the generator. This node, as you know, is designed to power all electrical equipment of a car. It consists of many components, most often the brushes wear out, the windings burn out, the voltage relay fails. You also need to monitor the tension of the alternator belt - it should not be overtightened or under-tightened. Belt damage is also not allowed - if any, you need to think about an early replacement.
Today Gazelle cars are used in many areas of modern business. To ensure the operability of the vehicle, it is necessary to pay attention not only to the operability of the main components and assemblies, but also. From this material, you will learn everything there is to know about wiring and its faults.
[Hide]
Trouble symptoms
There are several types of state of the electrical circuit in Gazelle cars 405 euro 2, 402, 406, 4216, 2705, 3302 or business diesel:
- The engine will not start. The car cannot perform its main function when the engine is not running. Either the business diesel, 402, 406, 405 euros 2, 4216, 3302, 2705 is damaged, or one of the units or mechanisms of the car is out of order.
- The car engine starts, but the electrical equipment is malfunctioning or intermittent.
If, as a result of an attempt to start the engine, the unit does not start, but fuel enters the engine, then most likely the problem is in the electrical equipment:
- In the event that the vehicle is equipped with a carburetor, first you should pay attention to the diagnosis of high-voltage cables and candles. By the way, quite often on older Gazelle cars with a carburetor, in practice, they bring inconvenience to the driver. If the high-voltage cables have exhausted their service life, the engine will not work correctly. So check them out first. It will not be superfluous to check the operability of the distributor and coil on a Gazelle with a carburetor. In addition to high-voltage wires, you can diagnose the circuit diagram in the engine compartment.
- In the case of the injector, the situation is slightly different. Of course, high-voltage wires can also cause breakdowns, but first of all, you need to pay attention to electrical equipment. In particular, you are interested in the engine management system. In the event that the injector control system is not able to properly process the pulses coming from the regulator, then as a result it will not be able to give commands to the rest of the units and mechanisms. Accordingly, the engine will be interrupted.
 Engine compartment wiring
 As practice shows, in most of the Gazelle business diesel cars, 402, 406, euro 2 405, 3302, 2705 and other causes of breakdowns are acidified or burnt contacts. In this case, we are talking about contacts in the ignition lock. If the ignition lock or the block in the vehicle compartment is inoperative, at least the lighting will not be able to work. Also faulty electrical equipment can lead to inoperability of washers, fans, wipers, etc.
Types of power units
The manufacturer of Gazelles business diesel, 402, 405, 406, 2705, 3302 and other models is the Gorky Automobile Plant.
Initially, two types of engines were used in the production and assembly of vehicles:
- carburetor engines manufactured at UMP;
- injection and carburetor engines supplied by ZMZ (Zavolzhsky enterprise).

The essence of this approach was to modernize and unify power units for business diesel models, 402, 405, 406, 2705, 3302 and others with UAZ and Volga cars. Of course, in the case of trucks the circuit diagram has been redone.
For individual types of motors, a different scheme was used:
- In vehicles with an internal combustion engine injector, the operation of the ignition system was initially more demanding fuel mixture... Such units were equipped with elements electronic ignition, injection control units. Of course, in such units, the quality of the fuel plays an important role.
- As for carburetors, these options are considered more traditional today, but they also have certain features. Of course, the wiring diagram in carburetor motors is different from injectors.
In addition to the main models 402, 405, 406, 2705, 3302 and others, since 2001 the manufacturer began to produce a version called "business diesel". In the case of a diesel engine, the wiring diagram has also undergone certain changes. In particular, such transports were equipped with a more powerful starter, rechargeable battery, as well as a generator (video by MR. BORODA).
Breakdown reasons
If you are the owner of a Gazelle car, then the circuit diagram will come in handy in any case. At least, so that, if necessary, one can detect certain breakdowns caused by the use of low-quality fuel.
The reason for the inoperability of electrical appliances can be extreme climatic conditions:
- To complex climatic conditions include severe cold. With the onset of frost, the loads on the electrical circuit of the vehicle increase, and the type of motor - carburetor or injector - does not matter here. The loads on electrical equipment are especially noticeable during the morning starting of the motor.
- Regardless of the time of year and the type of internal combustion engine, every driver may encounter interruptions in the functioning of the injection system. When using low-quality gasoline or diesel, malfunctions of the ignition system of the combustible mixture may occur. To avoid such problems, it is necessary to use quality fuel.
- The Gazelle car owner may face other types of breakdowns and malfunctions. These can be short circuits, peeling of contacts on devices, the appearance of corrosion. All these shortcomings are caused by poor build quality or improper auto repair.
Conclusion
There is only one conclusion - the appearance of new modifications in the Gazelle families contributed to the change. The appearance of malfunctions in the operation of the electrical circuit can affect the functionality of the vehicle. Therefore, from time to time it is necessary to diagnose the performance of electrical appliances.
Video "Repair of electrics Gazelle"
You will also be interested in:

Under the supervision of his father. The situation is relatively under control - the kid hardly gets to ...

Ford-T is the first mass-produced vehicle. Making one car a month at the beginning of the 20th century ...

Street in Sweden, the day after the left-hand traffic was changed to ...
To narrow your search results, you can refine your query by specifying the fields by which ...
Ensuring the ship's turnability is achieved by using controls and ...

