


Stabilizer lateral stability - an interesting thing. Its main feature is that it is often underestimated by motorists, especially those who have recently been driving or have not seen anything cooler than a nine with leaked shock absorbers. Indeed, it can be removed and thrown away altogether - the car will still drive. True, bad.
What are bushings and why are they needed
The main task of the bushings is to reduce the noise of the suspension while driving and to attach the stabilizer to the car body. They are usually made from two materials: polyurethane and rubber. The parts have high elasticity and strength, which is why there are no squeaks and knocks when the height of any of the wheels changes. In addition, it is impossible to rigidly attach the stabilizer to the body, since the distance from the attachment point to the edge of the stabilizer changes during bending.
Often, various sounds arising from movement and sharp turns - squeaks, knocks, and so on, can indicate a malfunction of the bushings. This phenomenon is associated with the loss of elasticity of the sleeve, as a result of which it becomes very rigid. Also, dust or sand can accumulate under this part. 
Stabilizer design features
In the field of mechanical engineering, the stabilizer appeared along with the first cars, maximum speed which exceeded the mark of 20 km / h. Due to the large rolls that occur when turning, it became necessary to install this component. The main purpose of a stabilizer is to protect vehicle from overturning, since during the turn the load on the outer wheels increases, and on the inner ones, on the contrary, decreases. This causes the machine to rock. The stabilizer makes it more stable on the road, preventing it from rolling over.
On a note! All car suspensions are equipped with a stabilizer, not only at the front, but also at the rear. A stabilizer is not needed only if a torsion bar is installed at the rear of the car: the stabilizer functions will be assigned to the suspension itself.
The design of the stabilizer on many cars is a U-shaped metal bar made of spring steel. To attach the device to the body, special clamps and bushings are used to allow the stabilizer to rotate. For greater stability of the car and increase the elasticity of the stabilizer, bushings are used - all the shocks from various suspension elements fall on them.
Stabilizer bushings. Malfunction symptoms. Effects.
For the best damping of vibrations and forces acting on the car body, the vast majority of suspension elements are connected by means of elastic elements. The same goes for the stabilizer. For its fastening, special bushings (rubber bands, pillows) made of durable rubber or polyurethane are used. Over time, as the vehicle is used, these bushings can begin to collapse and noticeably lose their elasticity. This results in unsatisfactory operation of the stabilizer \u003d. More serious defects may begin to appear, which will only grow faster over time.
The first symptom, foreshadowing the replacement of the bushings, will be a slight knocking of the suspension. A similar knock can be observed with "tired" shock absorbers. Only in the case of the bushings, it will be heard not only on pits and bumps, but also when entering a relatively sharp turns... At the same time, the car often feels too wobbly and sluggish. The resulting knock will be the result of a backlash in the connecting nodes of the stabilizer levers due to worn bushings.
If measures are not taken in time, the knocking will only intensify in the future and will begin to accompany the work of the suspension everywhere due to the increasing deformation and destruction of the bushings. Side roll and excessive play in the steering wheel may occur. It is possible to "yaw" the car not only in corners, but also in cases of braking or lane change. Most automakers advise changing the stabilizer bushings every 30-40 thousand mileage. However, in our conditions, it is better to focus on the wear of the bushings. Therefore, a sudden knock and slight bounce in corners will be clear signs of an impending replacement of components.
As folk method Checking the bushings for serviceability, it is proposed to move in the 2nd gear of the speed bump obliquely. There was a dull thud in the area of \u200b\u200bthe pedals - most likely, the Khan's bushings. You can also just crawl under the car to inspect everything yourself. Worn bushing "Will please" with the presence of cracks and abrasions typical of worn and cracked rubber. These cracks are sometimes also called "daisies" by the car maker.
Also, the rubber of the bushings can simply harden and lose the necessary elasticity. If the stabilizer bushings do not work well, just swing your hand hard up and down and to the sides of the stabilizer itself. If you feel a backlash, squeaks and knocks in the lower part of the suspension, then the bushings have become unusable.
But for best result it is better, of course, to drive onto an overpass, a viewing pit or use a lift. Of the tools, you only need a crowbar or a mounting paddle, which you just need to rest on the bottom of the car and slightly "shake" the stabilizer, in the places of its docking with the body. If you feel a noticeable backlash or a loss of elasticity, then it's time to think about replacing the bushings. 
List of required tools
You definitely need to have the following set of tools: new bushings; to unscrew the subframe bolt, an open-end wrench of size 24 is required; keys 17 and 15; for unscrewing screws from the motor protection - a key for 10; for mounting bolts - a key 13; clamps made of metal material for 20 - for clamping the stabilizers, since the old ones must be replaced; anti-scale and rust agent - WD 40; graphite grease; jack.
Benefits of timely replacement
Every driver will be able to cope with the replacement of bushings on his car, because this process is not a super-complicated repair. Everything can be done with your own hands, but if you do not have time or desire, then it is advisable to seek help from specialists. This will help protect the anti-roll bar from premature wear.
Driving on poor-quality road surfaces will recede into the background if you have previously installed new bushings. And in general, the installed new bushings are the absence of difficulties and problems while driving, as well as comfort and safety.
Replacing the stabilizer bushing "Kia"
Replacing the Kia stabilizer bushings involves the following algorithm: Raise the front of the car and dismantle the wheels. Find the steering shaft and make a mark (for easy further installation in the original place), remove the mounting bolt. Raise gearbox using a jack, unscrew the rear cushion and subframe. To facilitate access to the rear cushions, four bolts are removed to secure the subframe. Raise the front section of the subframe with a jack. Remove the fastener and treat with an oil solution to prevent the development of corrosion processes on the metal. Screw them into place only four to five turns.
This is done crosswise to provide additional security and uniform contraction of the plane. Loosen the jack until you can reach the bushing bolts. The bushing on the right side can be easily unscrewed through engine compartment, and on the left side - from below. Insert the staples. This procedure is carried out in a neat way so as not to damage the collar on the steering boot. The process is repeated in reverse order. The peculiarities of the Kia Sid car are that the steering shaft has a telescopic view, and therefore it is installed at the last moment.
There are the following types of bushings:
1. Spherical (or "iron") bushing. By design, it resembles a ball joint;
2. Rubber bushing.
Today, more and more popularity is gained stabilizer bushings of polyurethane type. They are quite easy to replace, which is an important plus, and they also have good characteristics for operation. Experienced drivers can safely say that these are the details that are most convenient.
If a there is a malfunction in the area of \u200b\u200bthe stabilizer bush, it must be replaced without fail. Otherwise, it can have a very bad effect on the running and handling of the vehicle. When the bushing is deformed or cracked, some noise may appear in the area of \u200b\u200bthe car suspension (mainly when the car runs into an obstacle or increases speed). In principle, problems in the suspension area are determined precisely from such noises.
For, to make sure that it is necessary to replace the bushings,periodically, it is necessary to carry out a diagnosis of the suspension, after which a malfunction will be identified or prevented.
In the event that it is revealed that it is necessary to replace the stabilizer bush, you can do it yourself. Moreover, there is nothing complicated in this and the procedure is very simple. First, the bolts are unscrewed, with which the clamp is attached. The stabilizer is then pulled to the side and the old parts are removed. Well, and for the final action, a new part is very carefully installed.
It is according to this scheme replacement is made as front stabilizerand rear... After replacing parts, driving a car will be much more pleasant and comfortable, and various road obstacles will be overcome without any difficulty. Among other things, the new elements will maximize the performance of the racks.
Suspension of any modern car consists of elastic elements that perceive road irregularities. Further, the transverse beam redistributes the accepted forces and displaces the wheels. This whole system of levers and beams is called the car's anti-roll bar.
The purpose of the anti-roll bar is to maintain the stability of the vehicle when external forces change, such as when cornering. The lateral force arising from this maneuver is capable of overturning the car with significant body roll. By virtue of its design features, the anti-roll bar evens out the lateral force acting on the external and inner wheels regarding the turn. Depending on the type of drive, the stabilizer can be made in the form of a single curved beam or a system of levers.
As a rule, for dependent suspension a car is characterized by one curved element, for an independent one - a system of levers. To avoid noise caused by movement of the stabilizer elements and vibration damping, the stabilizer is attached to the body by means of elastic elements - bushings.
The stabilizer bush absorbs vibration from the suspension assemblies, thereby providing a smoother ride and less noise.
The bushing is an elastic part made of rubber by molding. The shape of the hub may differ depending on the structural elements of a particular vehicle, but in general the shape is similar. To increase durability and reliability, on some models the bushing is reinforced with lugs and grooves. The wear of the bushing is visible visually - cracks and abrasions appear on it, the bushing becomes hard and inelastic.
When is it time to replace the stabilizer bushings?
If the stabilizer bushings are faulty, the following symptoms appear:
Steering wheel play when cornering;
Steering wheel beating;
Manifestation of characteristic clicks when the car body rolls;
"Yaw" of the car when driving;
Car drift when driving in one direction;
Vibration in suspension units;
The appearance of extraneous noise during the operation of the suspension
If these signs are found, we recommend that you sign up for the diagnosis and repair of the car's suspension.
In the event of a malfunction of the anti-roll bar bushings, the following work is performed:
Car wash;
Lifting the car on a lift;
Removing car wheels;
Removing the fender liner or other plastic protection;
Removing fasteners from stabilizer elements;
Removing the mount from the stabilizer bush bracket;
Replacing the bushing with a new one.
On some car models, to facilitate the bushing replacement procedure, it is necessary to remove the engine crankcase protection. Assembly is carried out upside-down. For ease of installation of this elastic element, the sleeve is split.
The stabilizer bushings must be replaced after 30 thousand kilometers or when the above signs of malfunctions appear. To avoid "yaw" of the car when driving, both stabilizer bushings are replaced, regardless of the degree of wear of both. To increase the service life of the anti-roll bar elastic element, at each maintenance it is necessary to clean them of dirt, since its particles in the coupling between the bushing and the stabilizer link are a source of additional wear.
The sleeve is considered one of the most important elements stabilizer design. There are two types of them - spherical and rubber grommets... The design of the first is somewhat similar to the structure of a ball joint. Like every part of the machine, the stabilizer bush must be replaced in the event of a malfunction, otherwise the controllability and movement of the machine will significantly deteriorate. If the stabilizer bush is out of order, noise may appear in the suspension, especially on high speeds or when hitting an obstacle. It is these noises that indicate a problem with the suspension. To determine if the stabilizer bushings need replacing, try to diagnose the suspensions regularly.
The process of replacing the rear or front stabilizer bush is straightforward and consists of three steps:
- Removing the clamp mounting bolts.
- Retracting the stabilizer to the side. The procedure under consideration will make it possible to pay attention to the differences in the stabilizer legs and avoid incorrect installation of the parts in question.
- Removing the old stabilizer bushings and installing new ones in their place.
The procedure under consideration can be carried out independently, but you can also use the services of specialists from a car service. Thanks to the new stabilizer bushings, the ride will be more comfortable, and obstacles on the road will be overcome much easier. In addition, new bushings can reduce the likelihood of rapid wear of the struts.
If you are unsure of how to change stabilizer bushings, the following information will be extremely helpful.
List of required tools:
- To unscrew the subframe bolt, you need a 24 wrench.
- For the stabilizer bracket bolts, a 13 wrench.
- Keys 15 and 17.
- Key 10 for removing the self-tapping screws for the motor protection.
- Two stabilizer bushings.
- Two 20 metal clips to be used to mount the stabilizer.
- WD-40.
- Graphite grease.
- Screw jack.
- A piece of pipe with a diameter of 15 millimeters and a length of places. The element in question will be used as a lever.
- Head 27 for insertion between subframe and body.

Replacing the stabilizer bushings - step by step:
- Secure the machine at a standstill.
- Remove the wheels. In the right wheel arch, remove back flap protection of the engine, for this you need to use a key 10 and unscrew the two self-tapping screws.
- Extend WD-40 - stabilizer clamp bolts on the right and left, as well as attaching the stabilizer bar to AMMO.
- Use the open end of the 17 wrench to find the grooves on the left post pin. Fix the key in the grooves found.
- Unscrew the nut of fastening to the AMMO with the sleeve part of the 15 key.
- The next step is to disconnect both stabilizer struts from AMMO.
- Place a jack under the left side of the subframe. The distance from its back should be no more than twenty centimeters. Raise the body with a jack. If you prefer a hydraulic jack, then you need to place a metal plate under the jack support. This will prevent the thrust piece from pressing into the subframe or bending it.
- Next, you need to use a 24 wrench to unscrew the rear subframe bolt. Using a jack, you can loosen the subframe bolt as efficiently as possible.
- The next step involves lowering the jack. The subframe will lower one centimeter from the body.
- Insert a piece of pipe between the subframe and the body. Press the subframe off the body and insert the head at 27 between the subframe washer and the body in a lying position. The head is best inserted using pliers to keep the fingers safe in case the subframe falls off the stop.
- Unscrew the clamp bolts while spilling the WD-40 thread. If the process is too tight, do not put too much pressure on the bolts, loosen them a little.
- Remove the bushing clamp and then remove the old bushing.
- Install a new bushing in the vacant space, with the cut on the bushing itself facing back.
- Slide the bushing into place.
- Install her clamp on it.
- Then tighten the clamp bolts with your fingers and tighten with a wrench. Try to wrap all items evenly.
- In some cases, there are stabilizers with broken stops. To avoid damage, install the metal clamp behind the ring close to the plastic ring.
- Remove the head at 27 between the subframe and the body, try not to forget about safety. Bolt the subframe to the body, in this case, you do not need to use the jack.
- Carry out similar operations in relation to the right clamp.
- Reinstall both posts
- Lubricate the threads with graphite grease before installing the fasteners to prevent sticking.
- Assemble the structure in reverse order.
In general, the procedure under consideration is not as difficult as it seems, and the replacement of the bushings can be carried out independently, as well as. In this case, it is important to familiarize yourself with the step-by-step instructions, especially if this operation is performed by you for the first time. Also, pay special attention to the observance of safety precautions, because the procedure under consideration implies the presence of ambiguous points in which improper handling of the tool can lead to disastrous consequences. Be as careful as possible and strictly follow the instructions.
Video instruction - "How to replace the stabilizer bushings"
The suspension of any car is always the first to take the hit from road irregularities. Depending on the design and settings, the suspension assemblies are designed for the most effective damping of shock loads from uneven road surfaces, as well as for ensuring the controllability and stability of the car at high speeds when cornering, as well as when there is a sharp change in the trajectory of movement ("snake", detour ). And not only comfort, but also the safety of the driver and passengers depends on how efficient the suspension is. Each of the suspension elements fulfills its role. Trunnions and levers support the wheel in a given plane, ensuring unhindered rotation in two planes (when turning).
The principle of operation of stabilizers

The springs provide elasticity and return of the suspension elements to their original state, and the shock absorbers provide smooth running and damping of elastic vibrations of the body. However, even the flawless operation of the listed elements to ensure safe traffic not enough. If you hang the car on a lift or, in addition to levers, springs and shock absorbers on any modern passenger car, you can see another element - the anti-roll bar. In suspension front axle the stabilizer is a curved arm that is attached with one shoulder to the wheel hub assembly and the other to the subframe. Mounts are not rigid, with the ability to move along the axis in one plane.
The principle of operation of the stabilizer is to redistribute the weight of the car body over the wheels when it rolls. For example, when cornering with a small radius or when there is a sharp change in trajectory. In the widely used MacPherson type front suspension, the anti-roll bar is a torsion-bar linkage. This arm is rigidly connected to the body or subframe. The forces from the suspension are transmitted to it by means of additional levers pivotally connected to the suspension. Such a simple device is able to prevent a strong roll of the car (and, accordingly, its rollover), while maintaining a straight trajectory.

In suspension rear axle anti-roll bar is usually installed on vehicles with four-wheel drive all wheels. On many rear-wheel drive vehicles with a solid rear axle beam, a jet rod (Panhard rod) acts as a stabilizer. Some four-wheel drive models made in Japan from previous years (Toyota Sprinter Carib, Land cruiser 80, etc.), along with the Panhard rod, are equipped with a stabilizer - a curved rod that passes through the entire beam of the rear axle and is connected through short levers with the load-bearing elements of the body or frame. The principle of operation of the rear stabilizer is similar to the principle of operation of the front stabilizer: reducing the overturning moment of the body when it rolls.

Signs of malfunctioning stabilizer bushings
To dampen noise and vibration transmitted from the suspension to the body, all connections are secured through elastic elements. The stabilizer assemblies, which are attached to the body through metal bushings pressed into rubber, are no exception. As a result of many factors: poor road surface conditions, the use of aggressive reagents, driving style, etc., the elastic elements of the stabilizer are destroyed. As a result, in the operation of the anti-roll bar, defects are observed, which manifest themselves in an increasing way over time.
The first harbingers of the need to replace the bushings are. In contrast to the knocking of shock absorbers, it is not only when driving through road irregularities, but also when cornering with a small radius on a flat road surface. They are caused by the appearance of backlash in the joints of the stabilizer arms as a result of wear on the bushings. If this is not given importance, then subsequently the "symptoms" can grow.
The rattling knocks of the suspension will intensify and will accompany any movement of the suspension elements, as a result of further cracking and deformation of the rubber bushings. Along with this, the car will roll strongly in corners, the body will begin to sway along the transverse axis (with severe wear of the bushings on both wheels, or if the stabilizer beam breaks). In some cases, it starts to "play" steering wheel... The car loses its sharpness of control, becomes roll. It is possible to "yaw" and move towards the faulty suspension element not only when braking, but also when trying to change lanes and trajectory. Other abnormal noise and vibration may occur in the suspension. Usually, most manufacturers recommend replacing the bushings after 30-40 thousand kilometers. But the surest signal to replace the stabilizer bushings is bouncing and knocking when cornering and body roll.
Suspension inspection
Before inspection, it is advisable to wash and clean all suspension elements, as well as their connections. By visual inspection of all elastic suspension elements, it is easy to find a damaged part. If the bushing is worn out or damaged, scuffs and cracks are visible on it, which are called "daisies" among professional auto mechanics for the characteristic patterns that form rubber elements when cracking. Loss of elasticity, "hardening" of rubber - is also a sure sign for the upcoming replacement. If for some reason (no lift, inspection hole or the nearest service station) it is not possible to inspect the stabilizer bushings, the degree of wear can be determined by the presence of knocks. It is enough to rest your hands on the upper part of the roof (B-pillar) and shake the car slightly from side to side. The presence of knocks, squeaks and their localization in the lower part of the suspension may serve as an indirect indication for replacing the elastic bushings.

For a more detailed inspection, it is necessary to hang the car on a lift, or drive it onto an overpass or inspection pit. To determine the state of the anti-roll bar elements, it is necessary to swing the joints of all suspension arms using a crowbar or a mounting blade. For this, it is necessary to rest the mounting blade in the place of attachment to the body, without damaging the protective coating and, with a slight sway, alternately press on all the stabilizer mounts to be checked. If, with such manipulation, there is a significant backlash in at least one joint, or vice versa - loss of elasticity, then half the battle has already been done! All that remains is to replace the worn out bushing.
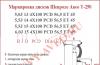
Video - How to replace the stabilizer bushings with a VAZ
How to change stabilizer bushings
To replace the rubber bushings of the front stabilizer with minimal loss of time and less effort, it is better to carry out all work not on a lift or on a jack when all the wheels of the car are hung, but on an inspection pit using a jack, supports or several jacks. Before replacing worn out stabilizer elements, for convenience, the car is first hung out on a lift or jack. After hanging and securely fastening, to access the parts of the stabilizer, remove the wheel (wheels on one axle), wheel arches and crankcase protection. After that, loosen the stabilizer attachments, including the brackets for attaching to the body or subframe.

If the threaded connections do not lend themselves due to oxides or strong contamination, in order to avoid tearing off the edges or shearing off the bolts, they must be treated with a special liquid that facilitates loosening. Before the procedure for loosening the fasteners, it is necessary to raise the lower lever with a jack or put a stop. When replacing the bushings in the suspension of both wheels (which is preferable), it is necessary to raise it with a jack or set stops on the axles of the front wheels.
This procedure is necessary to relieve the load on the stabilizer beam for easier bushing replacement. After all these conditions are met, you can remove the fasteners from the bracket and press out the bushing, followed by its replacement with a new one. On most car models, the stabilizer bushings are split. This is done for the convenience of their installation. Stabilizer repair kits are made of rubber or polyurethane.
Original repair kits always contain the required amount of grease, which must be lubricated on the inner surface of the bushings before replacing. All assemblies of the stabilizer and other elements of the vehicle are assembled in reverse order. For a longer service life of the bushings, it is necessary to periodically clean the stabilizer brackets from sand and road dirt.
You can determine whether it is necessary to replace the stabilizer bushings by knocks or squeaks that appear in the suspension when braking and driving over bumps. And given that sometimes there are more holes on our roads than asphalt pavement, the replacement process must be carried out regularly. The bushings themselves are not very expensive, their timely replacement will save from rapid wear and tear, and the car owner from unnecessary spending associated with their replacement.
The replacement process is quite simple and you can easily do it yourself, using the proposed instructions.
The stabilizer bushings are among the parts that are subject to the highest dynamic loads. They require regular replacement, depending on the service regulations adopted by different manufacturers and car models. The maximum mileage before replacing the rear and front hubs is typically 15,000 to 30,000 km. Taking into account the condition of our roads, it is recommended to replace them after wear.

Untimely replacement can lead to the formation of a roll in the vehicle's anti-roll bar, and this, in turn, increases the risk of a car overturning at speed. The complete set is subject to mandatory replacement, regardless of the difference in external signs of wear. The cost of such a repair service in a service station is often overstated, given the ease of replacement for most car models, therefore it is advisable to replace the front and rear bushings do it yourself.
Diagnostics

The knock of the stabilizers is a guaranteed sign that the bushings need to be replaced immediately. In addition to it, squeaks may appear, especially during a cold snap, when the rubber loses its elasticity.
It may be necessary to remove the crankcase guard to determine if replacement is necessary. To check the source of vibration, place your hands on the stabilizer post and directly on the mounting bracket. The partner should press hard on the hood of the car several times. If vibrations are felt on the brackets, which are transmitted to the rack, a new kit must be installed, even if no backlash was noticed when examining the seats on the stabilizer.
If the hole inside the sleeve has taken the shape of an ellipse, cracks are visible on the surface, and the material has hardened, immediate replacement is necessary. Continued use of the vehicle will significantly reduce the service life of the stabilizer struts.
Tool

To replace the front or rear bushings with your own hands, you will need:
- small ratchet with extension and cap head;
- open-end wrench, it should be thin and small;
- large ratchet, cardan adapter and union head;
- you may need an L-shaped extension cord.
Sequence of work
- The car is securely fixed in the jacked state.
- Wheels are unscrewed and removed. There is an engine guard in the right wheel arch. Its fasteners are unscrewed and the shield is removed.
- Most of the fasteners under the bottom are pretty acidic, so to speed up the process of replacing the stabilizer bushings, they must be thoroughly treated with WD 40, which removes corrosion.
- Using the open-end wrench, we fix the finger on the left stand. It is a little hidden from direct access, so the grooves must be found almost by touch.

- We throw a box wrench, preferably a ratchet, onto the nut that secures the shock absorber. We unscrew both fasteners.
- Having freed the stabilizer struts from the mountings, we disconnect them from the shock absorber strut.
- Install a jack under the left rear part of the subframe. With its help, the subframe is fixed so that when removing the fasteners, it does not suddenly jump off the studs. A significant metal plate must be placed under the jack support head so as not to deform the subframe.

- Smoothly lower the jack a few centimeters from the body. Thanks to this, the subframe also lowers slightly, opening access to the bushings.

- A pipe is inserted into the resulting gap, and the subframe is additionally pushed down. A stopper is inserted into the resulting gap. A head for 27 is suitable, when installing it between the body and the subframe washer, it is better to use pliers. This will save your hand from injury if the tube slips off the subframe washer.
- We water the bracket mountings generously with WD-40. Unscrew the bolts gradually, not pressing too much.

- Remove the released bracket from the bushing, and then remove the bushing itself.


- Install the bushing from a new kit. The cut on the parts must be directed strictly back. We position the new part exactly in the place of the old one.
- We install a clamp over the sleeve. Lightly bait the fasteners with your fingers, and then tighten with a wrench, alternately and evenly tightening all the bolts.
- The stopper, which was used as the key head, is removed. The subframe is lifted by hand and screwed onto the body.
- All these steps are performed in the same way with respect to the second clamp.
- After the bushings are installed, both posts are screwed into place.
IMPORTANT! Before installation, all threaded parts of the fasteners are coated with graphite grease to avoid sticking.
When performing the specified work, you should be careful and pay attention to safety. In general, such work can be done by hand.
Naturally, the design of different car brands is significantly different, so the replacement instructions are rather general recommendations. For more detailed information, a series of videos on carrying out this type of repair for various car brands is presented.
Video on replacing stabilizer bushings Ford Explorer:
Video Chevrolet Aveo 3 - split sleeves, which are used in this model, make the repair process quick and easy.
Nissan X-Trail video:
Video explaining workflows for Renault Logan:
You will also be interested in:
The Korean car "Hyundai Solaris" belongs to the category of inexpensive sedans that ...
Car owners often have questions: "What size wheels fit on a car?" and...

It just so happened that in most cases only a convertible could be afforded ...

Today there are many brands of cars, each of which has its own ...

Mercedes-Benz is one of the largest and best car manufacturers today ...

